Modern vending machine design involves integrating modern peripheral like cashless payment terminal and telemetry system. MDB Multi Drop Bus is a communication standard established in the vending industry to enable vending peripherals to talk to one another by simply plug-and-play. This made integration among the devices used on a vending machine much easier.
Most cashless payment terminal for digital and cashless payment are MDB ready. They allow you to accept payment like Visa/Master credit card, Apple Pay Google Pay, NFC payment, WeChat pay, etc…
This is where MDB to Pulse or RS232 converter comes in. They enable newly developed vending system to seamlessly connect to a modern cashless payment terminal. Through simply plug-and-play, your vending machine can accept a wide range of payment method fast. There is no need to spend time and effort in the learning and development work on the MDB protocol. communication protocol. Using converter enables your vending machine to accept a wide range of digital cashless payment instantly.
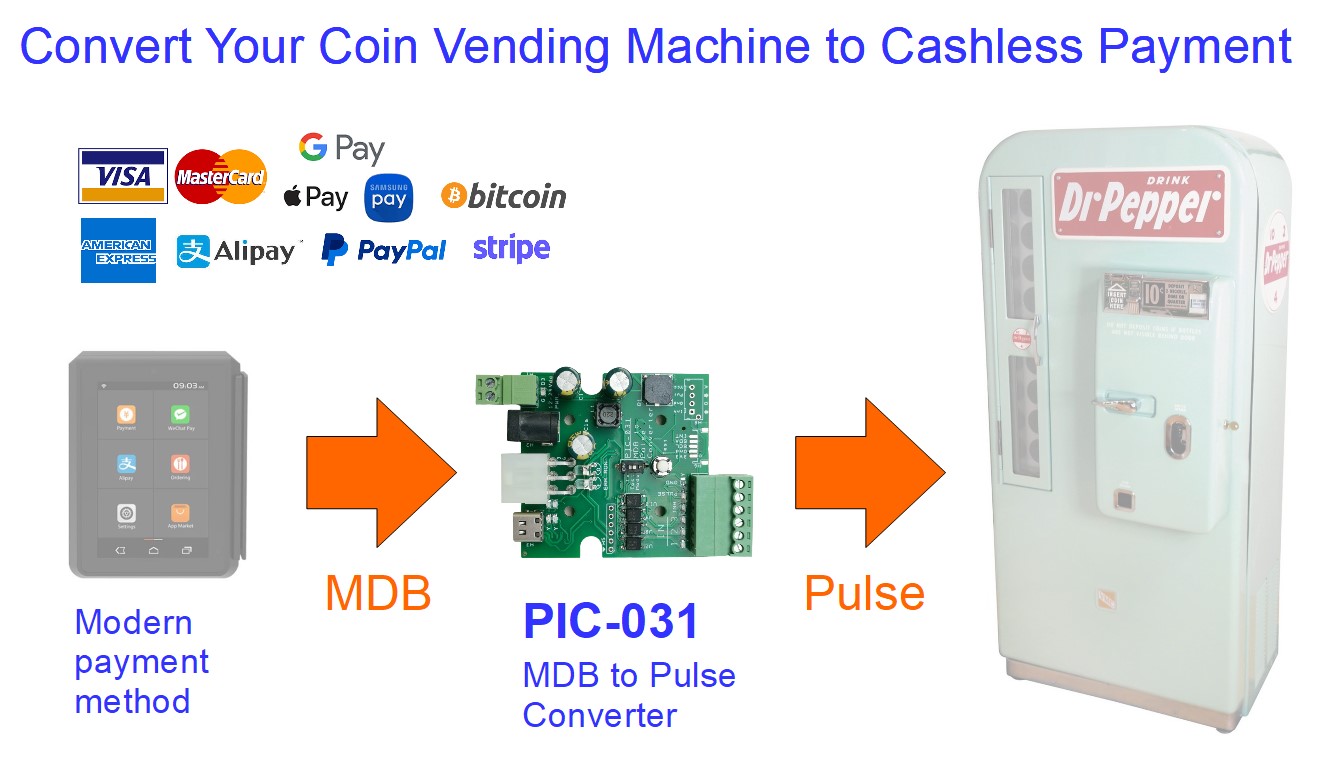
This solution is to buy PIC-031 to enable a modern cashless payment terminal to collect payment for the old coin vending machine. PIC-031 is an MDB to Pulse Converter.
MDB is also known as Multi Drop Bus. It is a “plug & play” standard connection commonly used in the vending industry which allows peripherals to talk to one another.
Convert old coin vending machines to accept modern cashless payment methods like credit cards, QR codes, NFC, PayPal, WeChat, etc…
Convert your coin vending machine to cashless payment
Increase your vending sales by enabling modern cashless payment method.
You can purchase a cashless payment terminal from your local area. They are configured for payment suitable for local transactions.
Most of these modern terminals can easily connect to modern vending machines that can accept MDB connect. Little to no integration effect is required. For old vending machines that were not designed to the MDB standard, it is much harder and expensive to integrate.
PIC-031 is designed to resolve this issue. It converts the complex MDB protocol into simple pulse command that the old coin type of vending machine can easily understand.
Modern payment terminals can be enabled to accept a wide range of new digital and cashless modes of payment. Any new mode of payment can easily be upgraded on a payment. This is not the case for old coin-accepting vending machines.
The payment method over digital and cashless means has become more and more common. By enabling these modern payment channels, you can increase your sales compared to a vending machine that only collects physical cash coins and notes payment.
Credit Cards and Payment Networks:
Visa
Mastercard
American Express
Discover
Mobile Wallets:
Apple Pay
Google Pay
Samsung Pay
Digital Wallets:
PayPal
Venmo
Cash App
Online Payment Platforms:
Stripe
Square
Braintree (a PayPal service)
Unified Payments Interface (UPI):
Google Pay (in some regions)
PhonePe
Paytm
Contactless Payment Solutions:
PayWave (Visa)
PayPass (Mastercard)
Express Transit (Apple Pay)
Cryptocurrency Platforms:
Coinbase
Binance
Kraken
Banking Apps:
Many banks offer their mobile apps for cashless transactions.
Introducing the Ultimate MDB to Pulse Converter: Revolutionize Your Vending Machine with Cashless Payment Terminals
Are you ready to take your vending machine business to the next level? Say goodbye to the limitations of traditional coin and note acceptors, and say hello to a new era of convenience and profitability. Our cutting-edge MDB to Pulse Converter is here to transform your vending machines into modern, cashless wonders that cater to today’s tech-savvy consumers.
Why Choose Our MDB to Pulse Converter?
Seamless Integration: Our converter seamlessly integrates with your existing vending machine’s MDB (Multi-Drop Bus) protocol. This means you can upgrade your machines without the need for extensive technical modifications.
Cashless Convenience: Tap into the growing trend of cashless payments. With our converter, your customers can pay using credit/debit cards, mobile wallets, or even NFC-enabled devices, making transactions faster and more convenient.
Expanded Customer Base: By offering cashless payment options, you’re not just catering to traditional cash users. You’ll attract a broader customer base, including those who prefer digital transactions for security and convenience.
Enhanced Security: Say goodbye to concerns about theft or vandalism of cash. With cashless payments, there’s no need to worry about handling and storing physical money. You don’t need manpower to collect the cash on your vending machine.
Simple User-Friendly Interface: Our user-friendly interface makes it simple for customers to select items and complete transactions. The intuitive design ensures a smooth experience for every user.
Customizable Solutions: We understand that each vending machine business is unique. Our converter can be tailored to your specific needs, offering customizable features to suit your business model.
How It Works:
Installation: Our skilled technicians will guide you through the installation process, ensuring a hassle-free setup.
Configuration: Customize the converter’s settings to match your pricing, product lineup, and branding.
Go Cashless: Once installed and configured, your vending machine is ready to accept cashless payments. Watch as your customers embrace the convenience and speed of digital transactions.
Join the Cashless Revolution Today!
Upgrade your vending machines with our MDB to Pulse Converter and bring your business into the 21st century. Embrace the cashless revolution, attract new customers, and enhance your profitability. Contact us now to learn more about how our converter can transform your vending machine business. Your success is just a click away!
How to convert your older pulse and legacy vending machines to accept modern cashless payment terminals via the MDB Interface?
Vending machines provide convenient 24-hour transactions for buyers as well as sellers. It is a very efficient way of distributing daily needs products. Vending is made possible with the cash coin/notes acceptor which uses pulsed output to activate the machine to dispense.
With the advancement trend in payment, more and more people are using digital cashless payment.
Credit Card
QR code payment
Mobile phone NFC
etc…
Many of these new payment modules has adopted the vending industry MDB (multi-drop bus) interface. Using MDB interface allows vending machine and its peripheral to use the same language to communicate with each other, making the entire vending system plug & play. This means that it is simple to install and integrate. No matter the vending accessories you buy, you know that it is going to be compatible work when the MDB cable is connected to your machine.
Older legacy machines that are still using the old pulsed output coin/notes acceptor will find difficulty in integrating into the modern MDB payment collecting module.
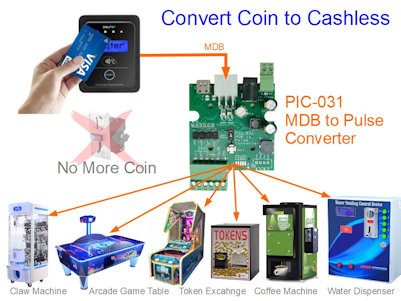
Introducing PIC-031 MDB to Pulse converter
PIC-031 MDB to Pulse converter is designed to support older legacy machines or simple machines that accept pulse input as a means to start operating. With PIC-031 converter board, your machine can now accept modern MDB based cashless payment terminals. Your legacy machine can now accept cashless payment modes like Credit Card, QR code, NFC payment from your customers.
For developer of vending or gaming machines, you do not need to understand the technical details of the MDB (Multi-Drop Bus). Simply use PIC-031 MDB to Pulse converter, and you can interface your machine to a MDB cashless device to help you collect payment.
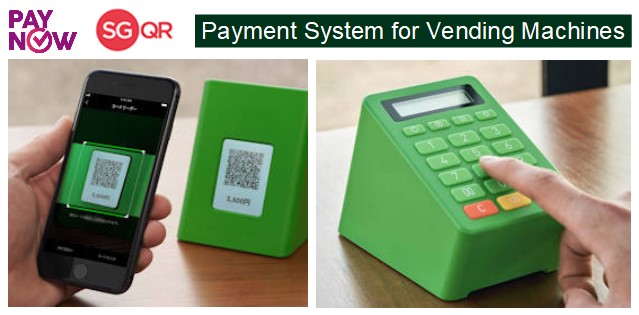
Your customer can now make mobile phone payment via PayNow or SGQR code to your automatic vending machines. Self-service vending automation payment solution using SGQR code to collect your payment from your customers.
Manual payment collection using PayNow SGQR code is also available for smaller retailers and food stall where you can manually key in the amount that you want to collect from your customer.
Benefits
Lower transaction fee.
Lower terminal cost.
Connect to your vending machines.
Payment through customer’s mobile phone.
Payment using SGQR codes, PayNow codes, PayLah.
Merchants save on cash handling expenses.
Monitoring of their daily business revenue instantly.
Eliminate any chance of thief from your cash register.
Take the terminal where ever you go. Mobile payment terminal version is available.
Application
For vending machines
Arcade token exchange machine
Cashless payment collection terminal for retailers, food stall operators, arcade game machine, kiddy ride machine, newspaper dispenser, snacks and drinks vending machine.
Mobile Phone Payment Procedures for Vending Machine
Customer select the item that they want to purchase on the machine.
A SGQR code will be automatically generate with the payment amount displayed clearly in front of your customer.
Customer take out their mobile phone and do a scan on the displayed SGQR code.
They will continue to authorised the payment to you from their mobile phone.
The machine will be notified of the payment received and dispense out the item to your customer right away.
Mobile Phone Payment Procedures for Small Retailer or Food Stall Operator
Customer service operator receive order from customers.
Operator key in the order or the dollar amount to collect.
A SGQR code will be automatically generate with the payment amount displayed clearly in front of your customer.
Customer take out their mobile phone and do a scan on the displayed SGQR code.
They will continue to authorised the payment to you from their mobile phone.
Your SGQR payment system be notified when the payment is successfully made.
Merchant deliver the order to your customer without handling physical cash.
Custom Mobile Phone Payment Solution with PayNow SGQR Code
Custom payment solution for your unique machines to a easy simple customer purchase experience. Seamless payment solution using PayNow SGQR code today.
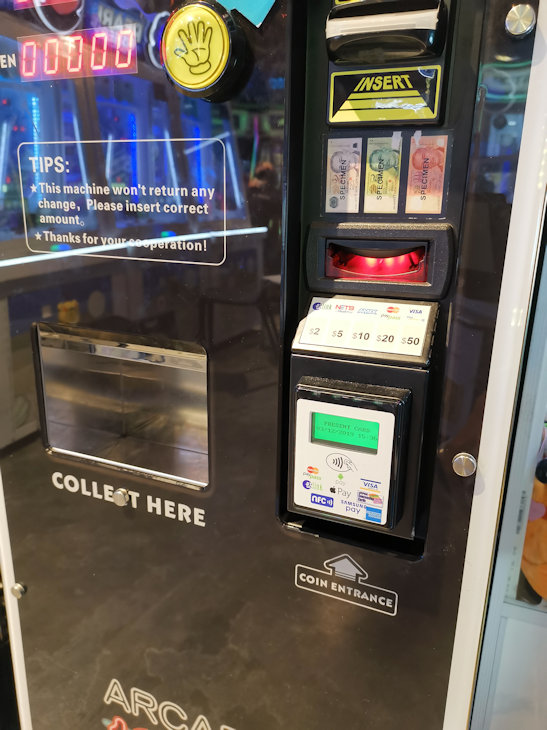
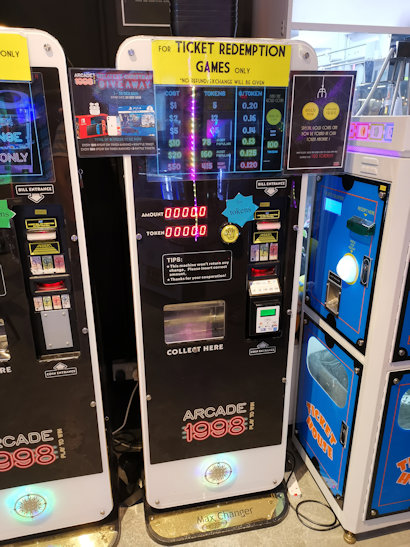
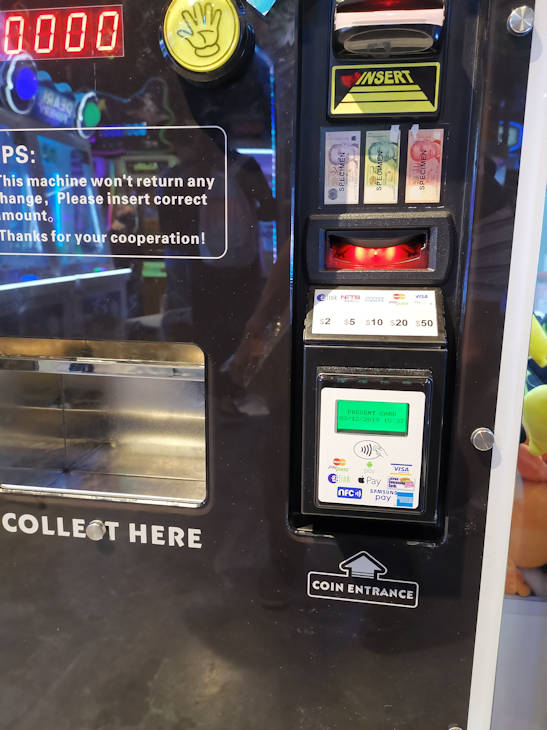
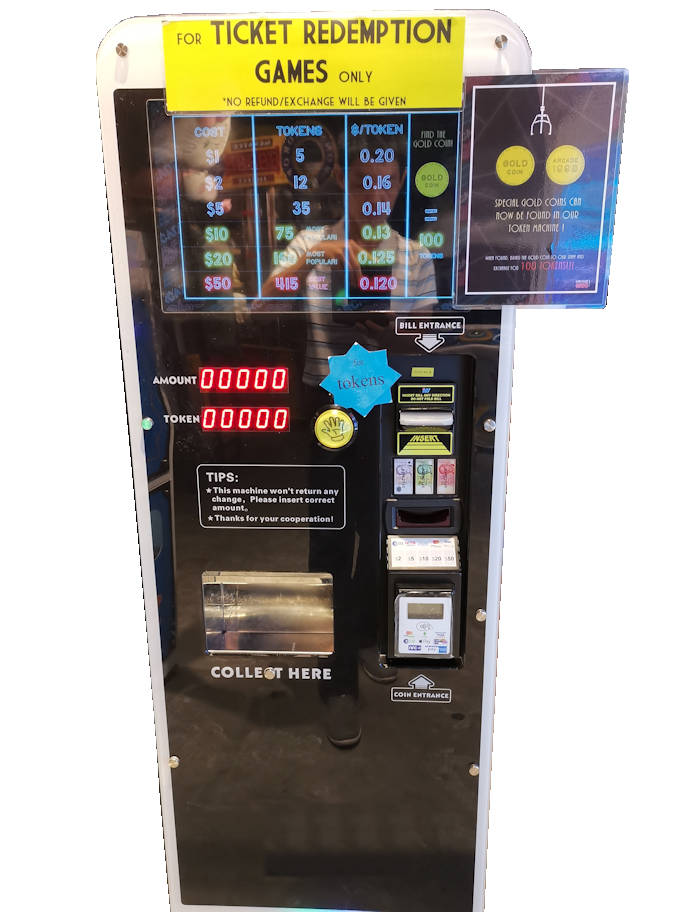
Token exchange machine, of Arcade 1998. Easy to redeem toys. As low as 12 cents per token. Click here to check out Arcade 1998 across the Singapore island.
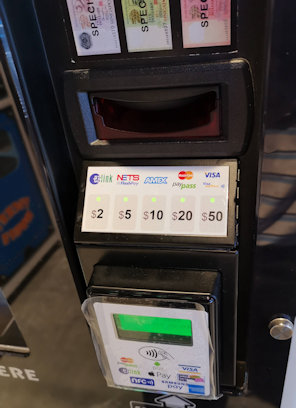
Contact-less card payment system for game token machine in Singapore.
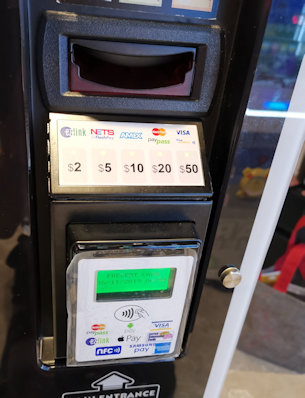
Besides using dollar notes to exchange for coin tokens, your customer can now pay by contactless credit card.
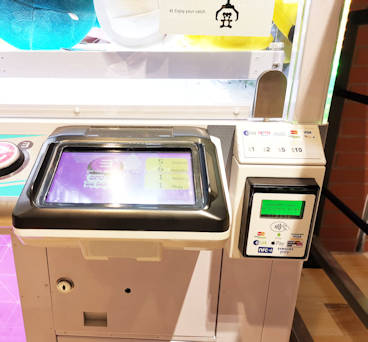
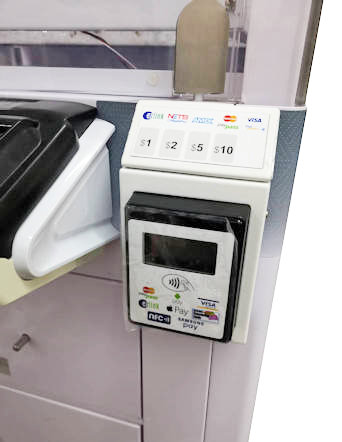
Accepted mode of payment:
Visa PayWave
Master Card PayPass
Ezlink
NetsFlashPay
AMEX
Apple Pay
Google Pay
Other new payment options are available….
Application for Payment System
Game token dispenser vending machine.
Parking ticket/token machine.
Token chip automatic machine.
Automatic coin changer machine.
Movie, concert ticketing vending machine.
Food voucher ticketing dispenser.
Self-service hair cut ticketing payment kiosks.
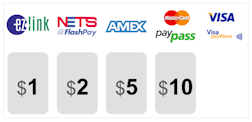
Custom payment select options of $1 $2 $5 $10 $50.
Custom Payment Design
Contact us for your custom hardware design of your payment system for your machine. Custom process design, enclosure, and user interface.
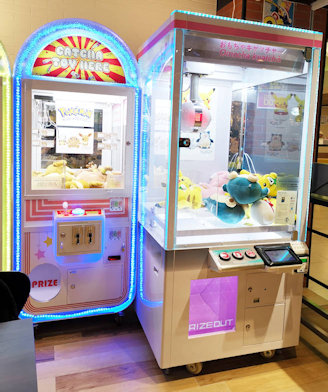
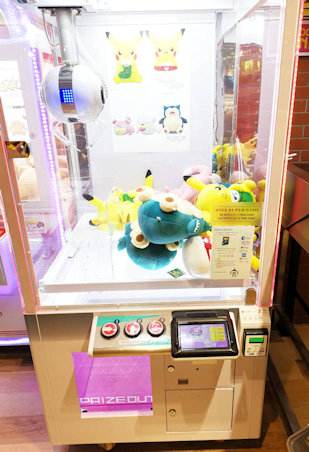
Soft toy catcher machines from Catcha Toy Here. (Original licensed soft toy for catch)
Electronic payment system for toy catcher machine.
Allows customer to pay by credit card, Visa, Master card, AMEX, Ezlink, NetsFlashPay. You can also accept mobile payment through Apple Pay and Google Pay.
Alternate Machine Name
Soft Toy Catcher Machine
Claw Crane Machine
UFO Toy Catcher
Candy Catcher
Application
Other payment system solutions
Contact us for custom payment system design and deployment.
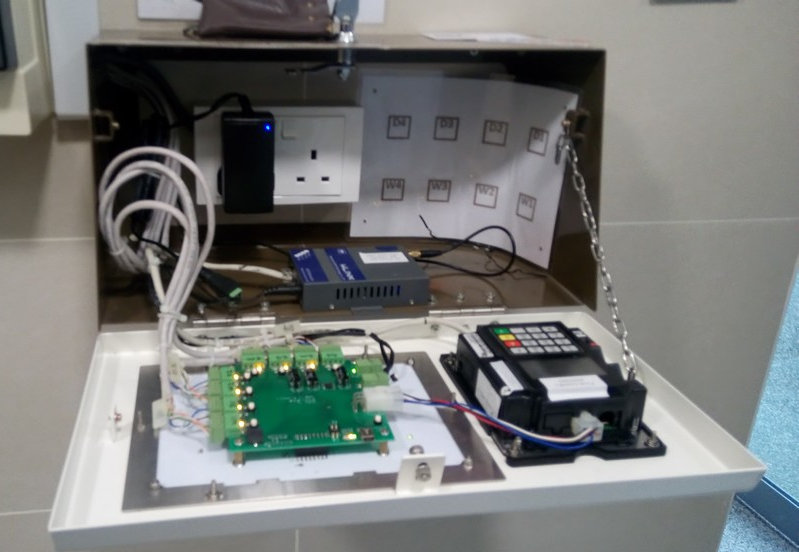
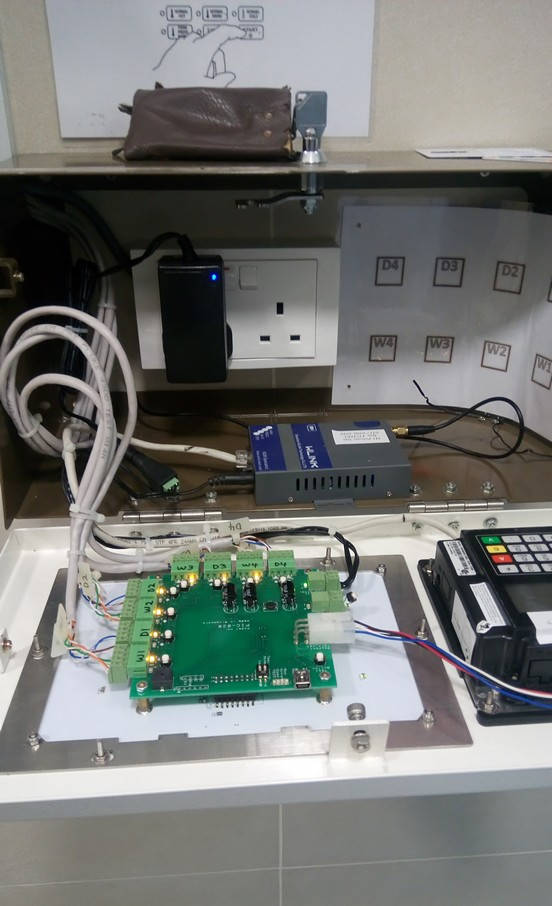
This is an illustration of an installation done. There is no network point in this illustration as it is using a 3G modem for communication instead. The cables are pulled into the enclosure via the cable entry hole channel on the left side of the enclosure.
In a typical setup, the following 3 type of cables has to be laid.
Dual ganged power socket.
Network point socket.
Cables from machines to this payment terminal enclosure.
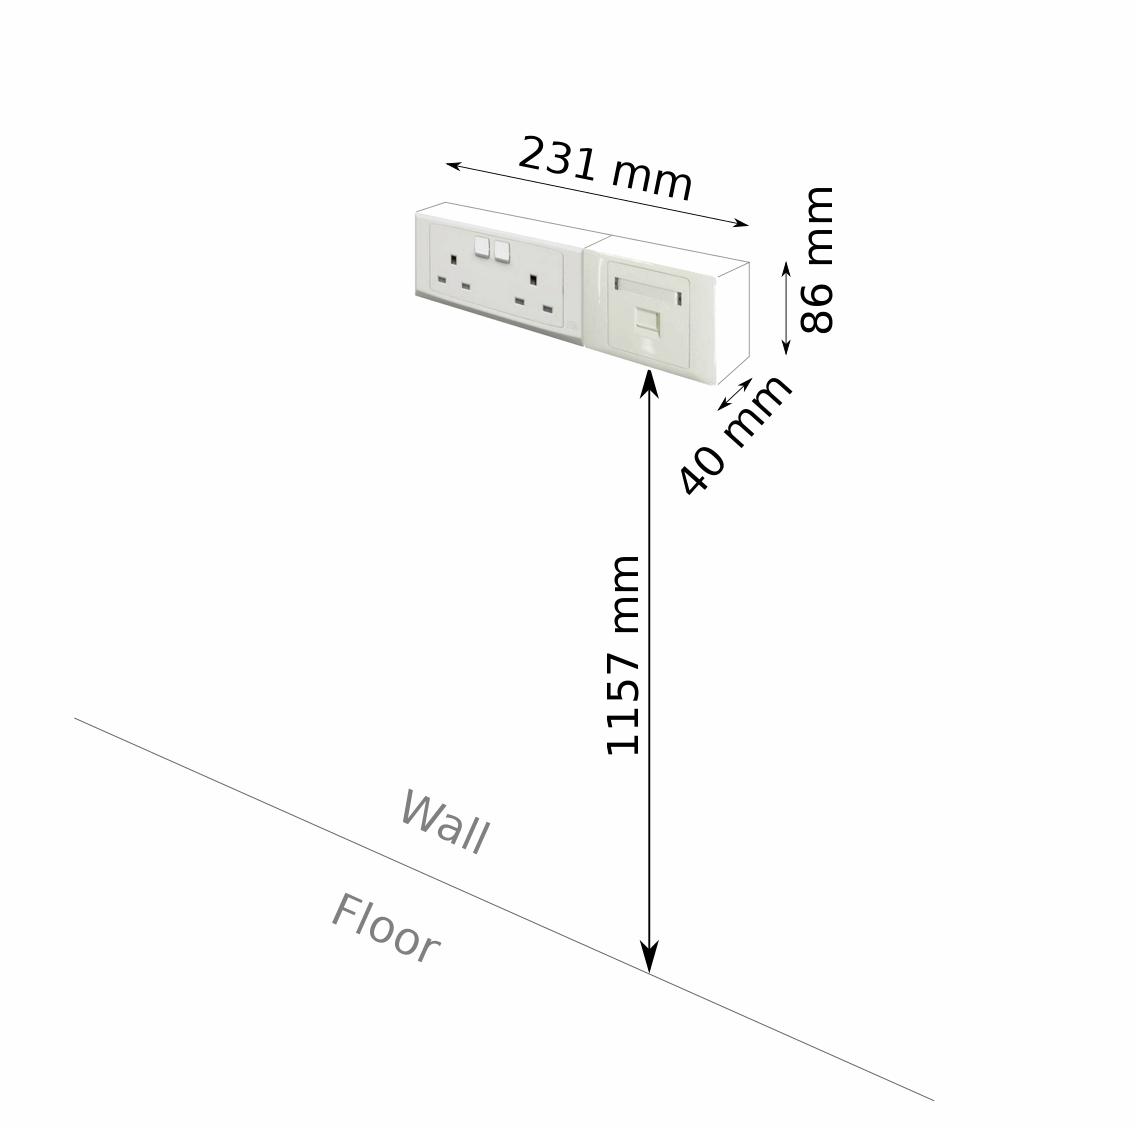
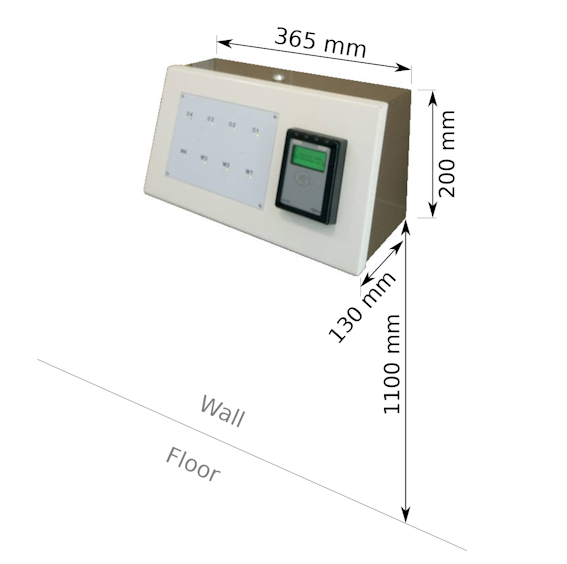
Enclosure Installation Height
The recommended installation height of the power/network socket point is about 1157mm. The enclosure will be installed after power/network sockets are installed. The enclosure will cover directly over the sockets and cable trunking.
The position of the sockets will be the center location of the enclosure. The installed position of the sockets will determine the position of of the payment terminal.
Install the sockets/enclosure at a comfortable and ergonomic high for your user.
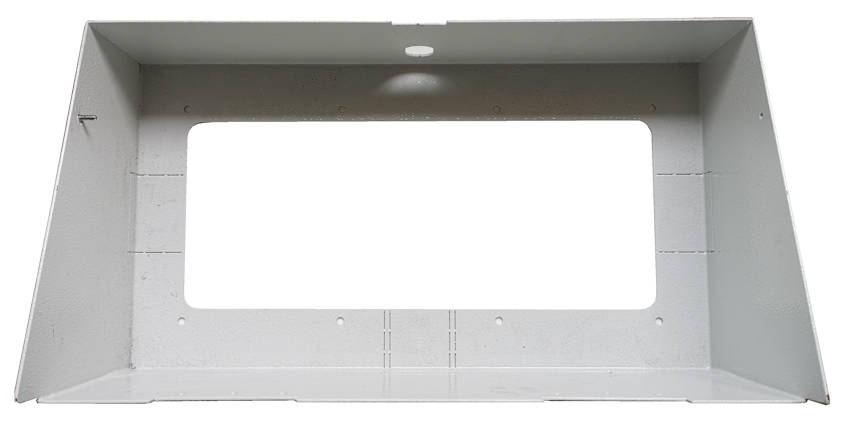
The following information provides the internal layout of the casing.
Power Point & Network Point Installation
The payment system requires a minimum of 1x power point and 1x network point. A spare power point is recommended for future use.
Resources to Provision:
2x Power Point
1x Network Point
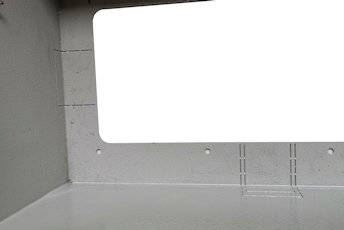
The following is the dimension of the enclosure covering the power point and network point. The opening from the enclosure is about 298 x 120mm. Space is tight. Please ensure that there is enough space for the enclosure to cover over the power/network points on the wall.
Internal layout dimension of the payment terminal enclosure.Internal structure of the enclosure.
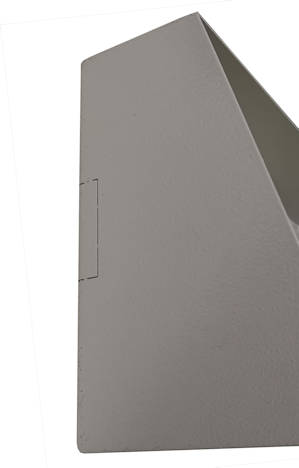
Left cable entry by the side of the enclosure.
Left and bottom entry for cable trunking.
Please note that there are 3 pre-designed hole channel for cable entry. Two are located by the sides and one at the bottom of the enclosure. The hole channels are aligned to the ceter of the enclosure. It is recommended not to have the cable entry coming from the top of the enclosure, nor the trucking be laid across the top of the enclosure. This is for aesthetically pleasing reason. It will look nicer to select the cable entry channel location to a position that is not too visible. The best entry location will be from the bottom of the enclosure.
The standard width of the hole channel (max) is indicated on the layout above. The holes are design base on the commonly available cable trunking found on the market. Suitable for small and big cable trunking.
There may be situation where the 3 standard hole channel on the casing may not be big enough for the trunking deployed. If the trunking size is bigger than the standard hole channel on the casing, the hole channel will have to be manually enlarge to cater for the massive chunk of wiring.
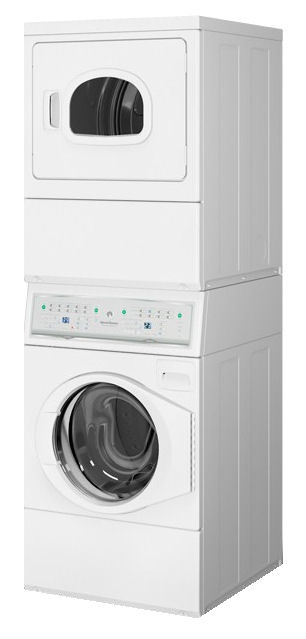
Cables from Washer/Dryer machines to Payment Terminal
Cables are required from the machines to the payment terminal location. This is to allow the payment system to trigger the machine after the user successfully made their payment.
Cable range AWG20-25 (multi-strand) is recommended. CAT5 cables is easily available and is also fine to use.
Estimate about 1 cable per Washer/Dryer stack. It is recommended to lay a spare cable for every 2 stacks of machine. There are a lot of vibration from the machine, and it is possible that wire may break after long use. This is especially for Cat5 cables as they are only of a single strand. Therefore spare cables is recommended.
These cables will be laid all the way into the enclosure together with the power/network socket. There is no need to terminal these cables. Just leave it dangling with an extra length of about 500mm will.
Network Port Settings
The payment terminal communicates over the internet for all payment transaction. When using local network point that is protected by the organisation firewall, some of the port number needs to be open so that communication needed by the transaction can proceed.
Please contact us for further details of the exact network port to open.
Use Ping.exe program to test data route to ensure that the port is open on the network point.
Common mistakes and problem faced
Here are some of the commonly mistakes and problem that makes the installation
Power socket point and Network point has to be installed in the middle of the casing position. The back of the casing has a hole opened for power point and network point. Please position the power/network point socket in the middle where the casing has to be installed. Always install them to the middle of the casing enclosure.
Precaution for Recessed Installation (not surface mounting)
Please ensure that there are no obstruction to the path of slotting the casing into the recessed hole. All wiring and termination has to be behind the wall, and in to middle of the recess hole position.
Have a wooden frame made to size, for the casing to slot in. This frame provides a stronger support and makes it more precise for the casing to fit it. Casing can then be used to secure the casing firmly onto the frame. Gypsum plasterboard should not be used as a frame for the casing. The soft powdery structure is not suitable to hold the casing.
Wiring & Connection
Wiring and connection for speed queen washing/dryer machine.
Wiring color code
The following is the propose color code of the wiring assuming that a CAT5e network cable is used.
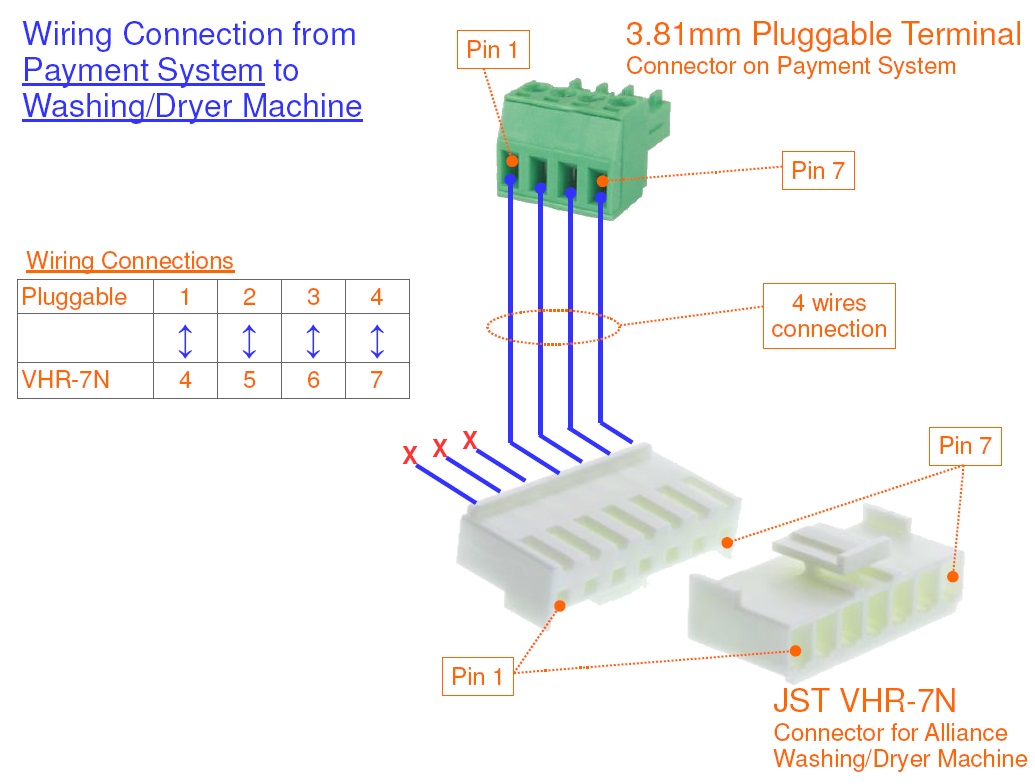
Pluggable Screw Connector
CAT5e wire color code
VHR-7N Connector
Pin 1
Orange/White
Pin 4
Pin 2
Orange
Pin 5
Pin 3
Green/White
Pin 6
Pin 4
Green
Pin 7
Propose standardised color code for the wiring
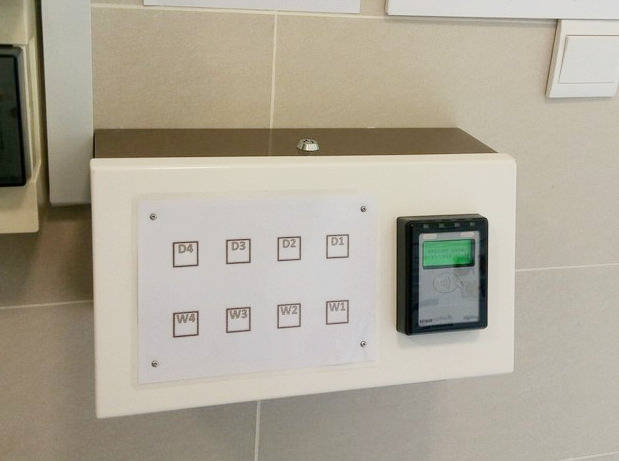
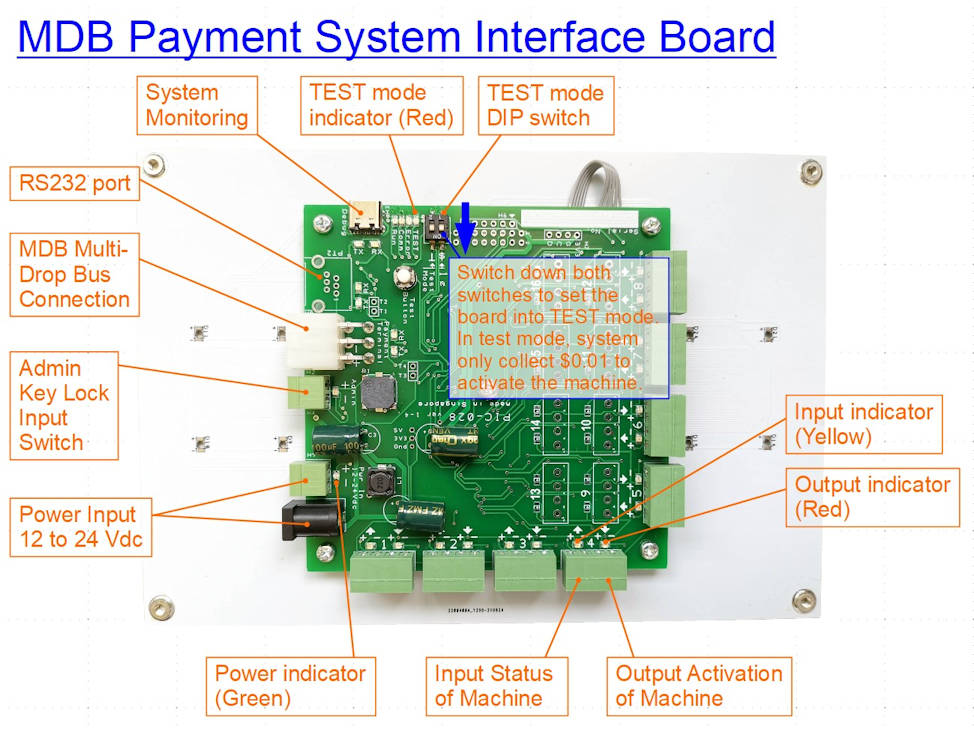
Board Description (MDB Payment Interface Board)
MDB Payment System Interface Electronic Circuit Board
There are two touch button assigned to the payment system to restart the system. It is usually the last button and the first button on the touch panel.
On a 8 machines payment board set, the default buttons are W4 (last button), and D1 (first button). Simply press and hold W4, followed by pressing and holding D1 button. Hold both button until you hear a short beep, followed by a long beep, then you can release your finger.
You should be able to see the system doing a full power off, and on restart process.
For IUC180 payment terminal, you will need to wait for about 10sec before terminal is ready for use.
For IM30 payment terminal, you will need to wait for about 2-3 minutes for the terminal to establish the internet connection before you can start using it.
Video demonstration of restarting the payment system.
Clearing Credits on the Washing Machine
This procedure is for fast forwarding or skipping the washing machine operating procedure. This is needed to help clear the credit triggered on the machine.
A quick paragraph to summaries the procedure. Simply ensure that the bypass switch is activated (disconnected or open circuit), press and hold button 1 & 2 to enter into the maintenance mode “rAPd”. Press “Start” button until the whole process ends.
The detailed procedures and explanation is as follows,
When the machine is idling, the display panel shows “100” indicating the credit of $1.00 required to start the machine.
After the payment, the machine will response with a beep with number changed to 30 (representing 30min of washing) This indicate that the machine has accepted the payment.
Open the front panel with a physical key.
Disconnect the bypass switch. This bypass switch allow us to go into the maintenance mode. With the machine bypass activated, it will also not record any transaction or operation to this machine. If you can see a sensor switch which detect the panel open, this is also known as the bypass switch. The washer (left side), dryer machine (right side), each has their own by pass switch.
Press and hold button 1 & 2 (the left side buttons, top and button). It will go into maintenance mode with the panel displaying “rAPd“.
The front loading door has to be close in order for the machine to cycle through the wash cycle.
Press the green Start button to fast forward the whole washer process. This reduces the timing on the machine. You will see the number 30min reducing. Keep on pressing until the value becomes 1, then wait for a few second for the machine to react, and a final press will get the machine time to becomes 0.
Open the door to complete the whole process. The washing machine will reset back to machine idling state. This panel will display “100” again, and the machine status will become available for the next transaction to take place.
Do remember to restore back the bypass switch before leaving the place. Test to check that the machine cannot enter into the maintenance mode by press holding the button 1 & 2.
Price Settings on the Washing Machine
Open the door for 2 sec and close it back to go into the configuration mode.
Press and hold button 1 & 2.
You will enter into “rAPd” menu. It is a bypass operation.
Press button 3 & 4 (up/down button) to scroll through the menu.
Scroll to the menu item Prog. Then press button 5 to enter.
Scroll to the menu item AtS, then press enter.
Scroll to the menu item 0, then press enter.
Then the price setting will be displayed. Example for $1, it will be 0100.
Press button 3 & 4 to change the price.
Press enter to go to the next digit until the price is entered.
Then press button 2 (back key) to escape all the way to the operation mode.
Troubleshooting Problems
Error messages on the payment terminal iUC180
“REFUSED (XX) REMOVE CARD“ Network connection issue with the payment. Resolved by resetting the payment terminal, or do a manual settlement to see if the problem go away.