Electronic References
Useful technical references for electronic engineers.
AT Command for NB-IoT communication
Hardware used is nRF9160 modem.
Set terminal software to the following setting.
- Baudrate: 115200bps
- Data bits: 8 bits
- Stop bit: 1 bit
- Parity: None
- No hardware handshaking
Note that ↵ means sending of char 0x0D 0x0A (<CR><LF>)
//Test if modem is connected
? AT ↵
? OK ↵

//Get the modem firmware version
? AT+CGMR ↵
? 352656100032351 ↵

//Get IMEI number
? AT+CGSN ↵
? 352656100032351 ↵

//Sim Activation
? AT+CFUN=0 ↵     //turn  off cellular functionality
? OK ↵
? AT+CFUN=1 ↵     //turn  on cellular functionality
? OK ↵

//PDP Context Configuration (configure how the data packet be accepted by the telecom)
Maybe useful AT commands
AT+CGPADDR //show IP address allocated by the networkAT Command for iBasis SIM card using nRF9160 (with help from iBasis technical team)
AT+CFUN=0                           //Power of the modem every time that you change the access mode LTE-M or NB-IoT

AT%XSYSTEMMODE=1,0,1,0              //Enable LTE-M1

AT%XSYSTEMMODE=0,1,0,0              //Enable NB-IOT

AT+CGDCONT=0,"IP","ibasis.iot"      //Configure APN (Optional)

AT%XBANDLOCK=1,"10001000000000000"  //Lock the specific band for your testing, put 1 at the position of specific band (17 and 13 on this example, this is Optional)

AT+CPSMS=0                          //Disable PSM

AT+CFUN=1                           //Enable modem

AT%XSIM?                            //Enable UICC

AT+CFUN?                            //Register

AT+COPS?                            //Search network available
AT Command useful reference with other modems
AT+CSTT               //specify APN
AT-CIPPING            //ping to server to check connectivity
Reference AT command for other modems
- https://blog.wirelessmoves.com/2019/01/nb-iot-from-theory-to-practice.html
https://blog.wirelessmoves.com/2019/01/nb-iot-from-theory-to-practice-part-2.html - ublox, https://www.u-blox.com/sites/default/files/SARA-N2-Application-Development_AppNote_%28UBX-16017368%29.pdf
- NB-IoT (STARHub), https://medium.com/@ly.lee/get-started-with-nb-iot-and-quectel-modules-6e7c581e0d61
Nordic Bluetooth Resources Page
For beginner learning Bluetooth using Nordic microcontroller chip. Please go to this page “Guide to Nordic Bluetooth BLE for Beginner“
Possible source of formal training to Nordic nRF microcontroller programming.
https://embeddedcentric.com/nordic-ble-training/
Notes: Possible point of improving Bluetooth product.
- Company Identity. Register for an unique company ID code, and implement into Bluetooth product. Display of Nordic ID 0x0059 as the company ID can be a security breach.
https://www.bluetooth.com/specifications/assigned-numbers/company-identifiers/
https://www.bluetooth.com/develop-with-bluetooth/join/
https://www.bluetooth.com/develop-with-bluetooth/join/membership-benefits/
https://devzone.nordicsemi.com/f/nordic-q-a/7594/about-company-identifiers
https://devzone.nordicsemi.com/f/nordic-q-a/2636/using-nordic-manufacturer-id-in-advertizing-data
https://devzone.nordicsemi.com/f/nordic-q-a/24449/advertising-manufacturing-specific-data-without-company-id
- XXX Bluetooth (Technical Overview)
https://www.pic-control.com/bluetooth-technical-overview/ - Nordic Chip Programming
https://www.pic-control.com/nordic-chip-programming/ - Thingy 91 Tutorial Startup Guide
https://www.pic-control.com/thingy-91-tutorial-startup-guide/ - nRF52840-DK BLE Bluetooth Development Kit Tutorial Start-up Guide
https://www.pic-control.com/nrf52840-dk-ble-bluetooth-development-kit-tutorial-start-up-guide/ - nRF52840 Dongle (Good programming tutorial resource)
https://devzone.nordicsemi.com/nordic/short-range-guides/b/getting-started/posts/nrf52840-dongle-programming-tutorial - nRF52840 (modifying source-code from example for own custom board)
https://learn.sparkfun.com/tutorials/nrf52840-advanced-development-with-the-nrf5-sdk/all - Compare nRF52840 nRF52832, https://www.cnx-software.com/2017/08/09/nordic-semi-nrf52840-vs-nrf52832-vs-nrf52810-comparison-for-bluetooth-5-applications/
- Learning how Bluetooth connects
https://www.pic-control.com/learning-how-bluetooth-connects/ - XXX BLE Blinky Application (Server & Client)
https://www.pic-control.com/ble-blinky-application/ - Bluetooth GATT protocol
https://www.pic-control.com/bluetooth-gatt-protocol-for-bluetooth-low-energy-ble-4-0/ - Setup to Test Radio
https://www.pic-control.com/setup-to-test-radio/ - Bluetooth Sniffing using Wireshark & nRF52 DK Board
https://www.pic-control.com/bluetooth-sniffing-using-wireshark-nrf52832-dk-board/ - *** Setting up Kali Raspberry Pi for Bluetooth Hacking/Sniffing
https://null-byte.wonderhowto.com/how-to/detect-bluetooth-low-energy-devices-realtime-with-blue-hydra-0179744/
http://www.secuid0.net/?p=471
https://github.com/greatscottgadgets/ubertooth/wiki/Capturing-BLE-in-Wireshark - *** Setting up Eclipse IDE for nRF52840 development work
https://www.disk91.com/2017/technology/hardware/discover-nordic-semi-nrf52832/
https://devzone.nordicsemi.com/nordic/nordic-blog/b/blog/posts/development-with-gcc-and-eclipse - Cortex M4 C++ programming, Nordic API reference.
https://www.pic-control.com/arm-c-programming-reference/ - In depth topic on Nordic SDK: Bluetooth low energy Advertising, a beginner’s tutorial
Handling advertising data, manufacturer specific data.
https://devzone.nordicsemi.com/nordic/short-range-guides/b/bluetooth-low-energy/posts/ble-advertising-a-beginners-tutorial
Bluetooth Smart and the Nordic’s Softdevices – Part 1 GAP Advertising
https://devzone.nordicsemi.com/nordic/short-range-guides/b/bluetooth-low-energy/posts/bluetooth-smart-and-the-nordics-softdevices-part-1
Bluetooth Smart and the Nordic’s Softdevices – Part 2 Connection
https://devzone.nordicsemi.com/nordic/short-range-guides/b/bluetooth-low-energy/posts/bluetooth-smart-and-the-nordics-softdevices-part-2 - In depth topic on Nordic SDK: Bluetooth low energy central tutorial
https://devzone.nordicsemi.com/nordic/short-range-guides/b/bluetooth-low-energy/posts/ble-central-tutorial - In depth topic on Nordic SDK: Bluetooth low energy Services, a beginner’s tutorial
https://devzone.nordicsemi.com/nordic/short-range-guides/b/bluetooth-low-energy/posts/ble-services-a-beginners-tutorial - S140 SoftDevice functions
https://infocenter.nordicsemi.com/topic/com.nordic.infocenter.s140.api.v7.0.1/group___b_l_e___g_a_p___f_u_n_c_t_i_o_n_s.html - Setting up Eclipse for ARMS Cortex development work (only for development, and cannot be used for SEGGER debugging)
Nordic nRF9160 Certification
Certification resources referred by AVNET (Nordic Product Distributor)
https://www.nordicsemi.com/Products/Low-power-cellular-IoT/nRF9160-Certifications
Digital Locks Resources
- Smart Locks
https://www.pic-control.com/smart-locks/ - Bluetooth Padlock | Smart Locks for Enterprise
https://www.pic-control.com/bluetooth-padlock-smart-locks-for-enterprise/ - Compare NB-IoT with LTE-M
https://www.pic-control.com/compare-nb-iot-with-lte-m/ - NB-IoT Smart Locks
https://www.pic-control.com/nb-iot-smart-locks/ - AT command for NB-IoT communication
https://www.pic-control.com/at-command-for-nb-iot-communication/ - AT command for LTE-M communication
https://www.pic-control.com/at-command-for-lte-m-communication/
Nice Article collection
- Custom BLE Services with the nRF SDK
https://64k.space/2019/10/22/custom-ble-services-with-the-nrf-sdk/#Specifying_our_BLE_Service
Bluetooth (Technical Overview)
Bluetooth protocol operates at 2.4GHz, same as ZigBee and WiFi, working in the same unlicensed ISM frequency band.
Each network (Piconets) consist of a coordinating Master and many connecting Slaves.
Bluetooth Profile
Bluetooth profile is like the many various protocol of bluetooth communication. Some profile are for keyboards, some for storage, some for audio. Here are a list of commonly used profiles.
- Serial Port Profile (SPP), or sometimes known as UART
- Human Interface Device (HID)
- Hands-Free Profile (HFP)
- Headset Profile (HSP)
- Advanced Audio Distribution Profile (A2DP)
- A/V Remote Control Profile (AVRCP)
- Generic Attribute Profile (GATT), custom profile communication using Attribute Protocol (ATT) between the master and slave.
GATT is typically used for proprietary project that uses custom communication through the use of exchanging attribute data (Attribute Protocol, ATT).
A temperature sensor device can be acting as a server providing a service to expose the temperature reading.
A mobile smart phone is this case is a client, sending commands, requests and accepts incoming notifications/indications from the server.
The ATT attributes is made up of 4 components.
- Attribute Handle (the address of this attribute during the connection session)
2 bytes address (0x0001-0xFFFF) - Attribute Type (UUID Universally Unique Identifier)
2 or 16 bytes - Attribute Value
Variable length data. - Attribute Permissions

Bluetooth Versions
- Bluetooth v1.2
- Bluetooth v2.1 + EDR (enhanced data rate)
- Bluetooth v3.0 + HS
- Bluetooth v4.0 (BLE, Bluetooth Low Energy)
Reference:
https://learn.sparkfun.com/tutorials/bluetooth-basics/all
Reverse Engineering (Bluetooth)
Reference:
https://www.instructables.com/id/Reverse-Engineering-Smart-Bluetooth-Low-Energy-Dev/
<- Back to Bluetooth Resources Page
Nordic Chip Programming (using nRF Connect Programmer software)
Nordic Chip can be nRF52840, nRF52832, nRF9160
Methods of Programming Nordic Chips
There are 4 ways of loading your program onto Nordic chip.
- Debug header (for use of programming of the full image of the chip memory *.hex). This can be done using nRF52840-DK or nRF9160-DK board as a J-LINK programmer, or using a J-LINK programmer like the j-link Base, j-link BASE Compact or J-Link EDU Mini Programmer.
- USB Bootloader (USB Wired DFU, programming of the non-boot loader, application memory *.hex). This can be done using the onboard USB peripheral.
- Bluetooth Firmware Loader (Wireless DFU, programming of the non-boot loader, application memory *.bin). This can be done when your chip is pre-flash with bootloader firmware and SoftDevice firmware.
- USB Mass Storage (drag and drop *.hex file into the JLINK storage drive to automatically program the chip). This can be done through the nRF52840-DK or nRF9160-DK board.
Tools Required
- An nRF52840-DK kit board to act as the programmer for the chip
- nRF Connect Software
Extra programmer tool like the j-link Base, j-link BASE Compact or J-Link EDU Mini Programmer may come in handy when the tool or chip fails. Besides for nRF chip, this j-link programmer can also be used for other microcontroller chip listed on this page -> click here for supported devices J-Link.
Debug Header Method
This is the most fundamental method of loading in firmware into the Nordic nRF52840 chip.
Connect up the nRF52840-DK or nRF9160-DK kit. They are used as a programmer in this example. These boards contains a programmer chip that uses Jlink driver for connection as a programmer, to upload *.hex file into the nRF52840 or nRF9160 chips.
There is typically 3 *.hex module that you need to load into the chip’s memory. Namely,
- Bootloader
- Soft-Device
- Your Application
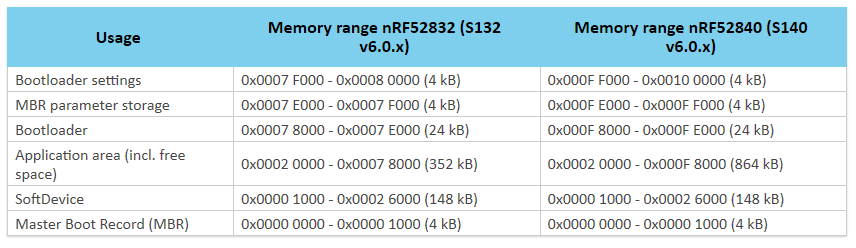
Different chip has its own memory map where the *.hex file should be loaded to. Here is the memory map for nRF52832, nRF52840.
Go to the software “nRF Connect” and open the “Programmer” program.
You will come to the screenshot as follows.
Selecting Programmer Board
There is a drop-down list on the top.
When you board is connected, there should be an option in the drop down list for you to choose from. Select the programmer shown in the list.
If there is no board listed even when you got your board connected to the computer. You may also see error message in red color at the log box below. Check out the last section to see if there is a solution to resolve your problem.

Load Bootloader *.hex file
Bootloader *.hex file is the part that allows you to use USB cable to directly load the program into the chip.
It enables the chip to be able to receive it firmware through wired USB.
Click on the “Add HEX file” on the right side. Choose the bootloader that you want to use.
On the memory map, you will see green (bootloader sectors in use) on the top and bottom of the memory map.
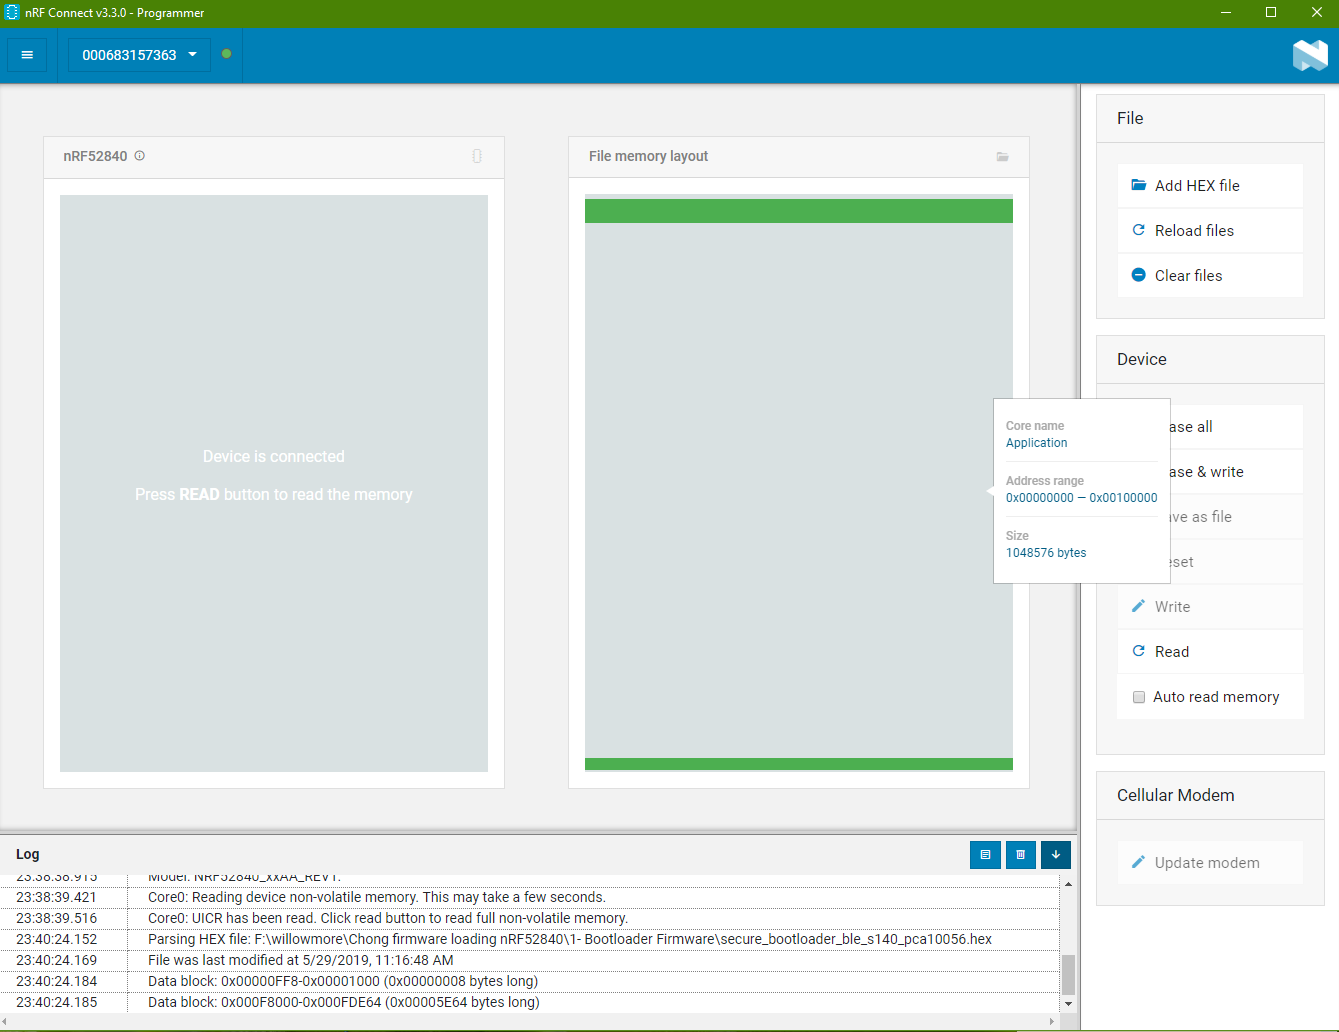
Load SoftDevice *.hex file
SoftDevice is a bluetooth stack codes that you can choose to load into the chip.
There are many version to choose from. You can download them from S132 SoftDevice.
https://www.nordicsemi.com/Software-and-tools/Software/S132
Click “Add HEX file” again to load SoftDevice *.hex file.
The SoftDevice *.hex file is loaded in the other memory of the chip. You can see from the purple color zone in the memory map shown on the right side box.
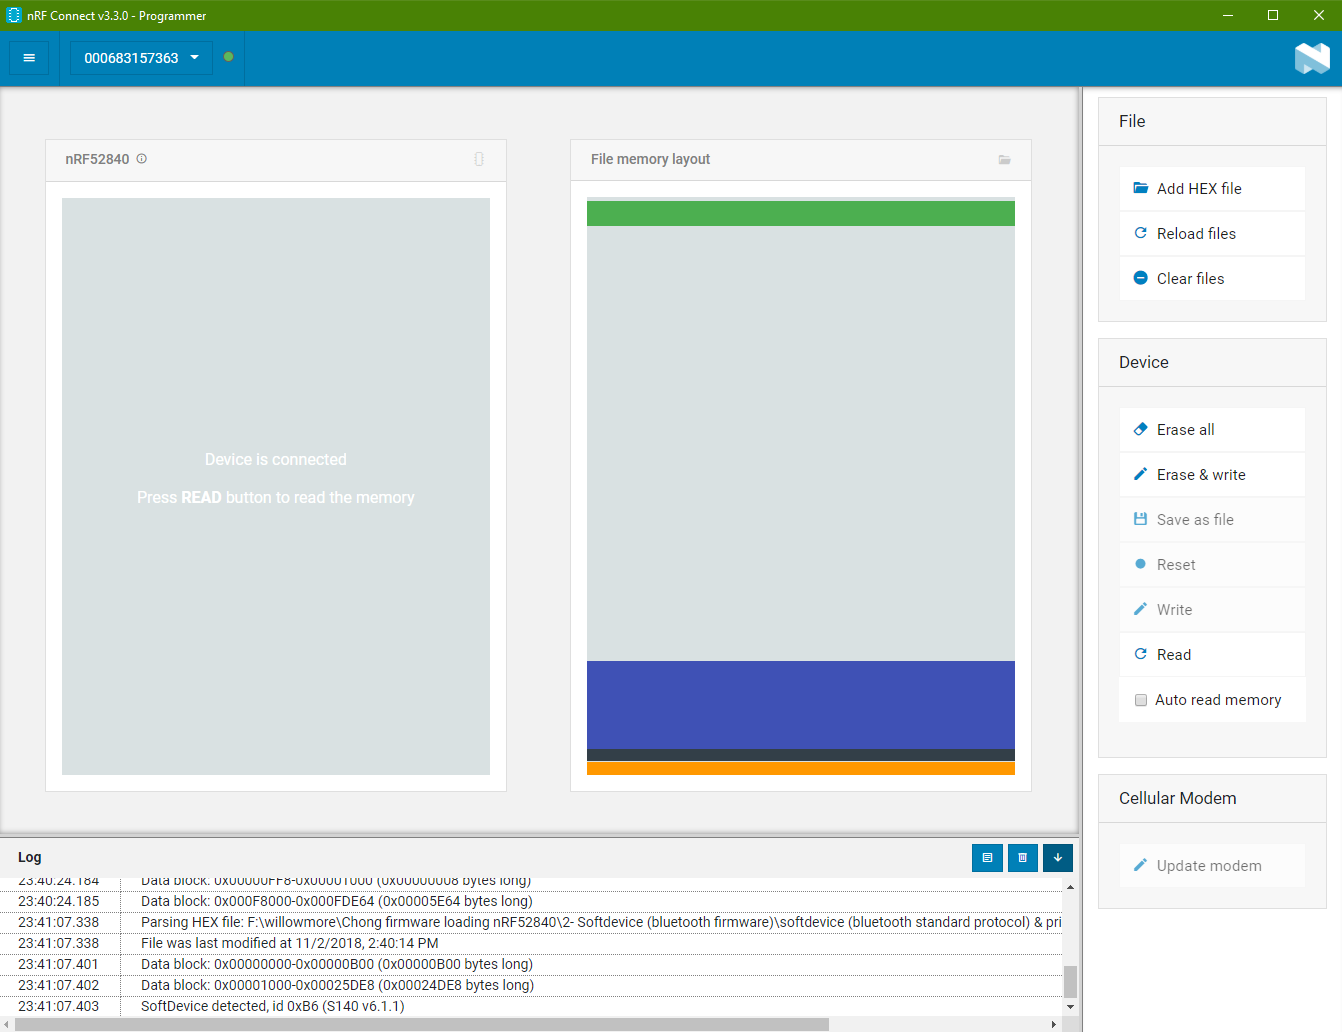
Load Application *.hex file
Lastly, this is the *.hex file for your custom application.
Click on “Add HEX file” again and select the *.hex file of your application.
Download Code into the Chip
Click on the button “Erase & write” to start down loading the firmware containing the 3 sector of the *.hex code into the chip at one go.
nRF52840, “Hello World” Example
Let’s use a simple project “Blinky” as our hello world example to help you kick start your chip programming experience.
Problem Encounter Case Study
Problem encounter from, nRF Connect -> Programmer
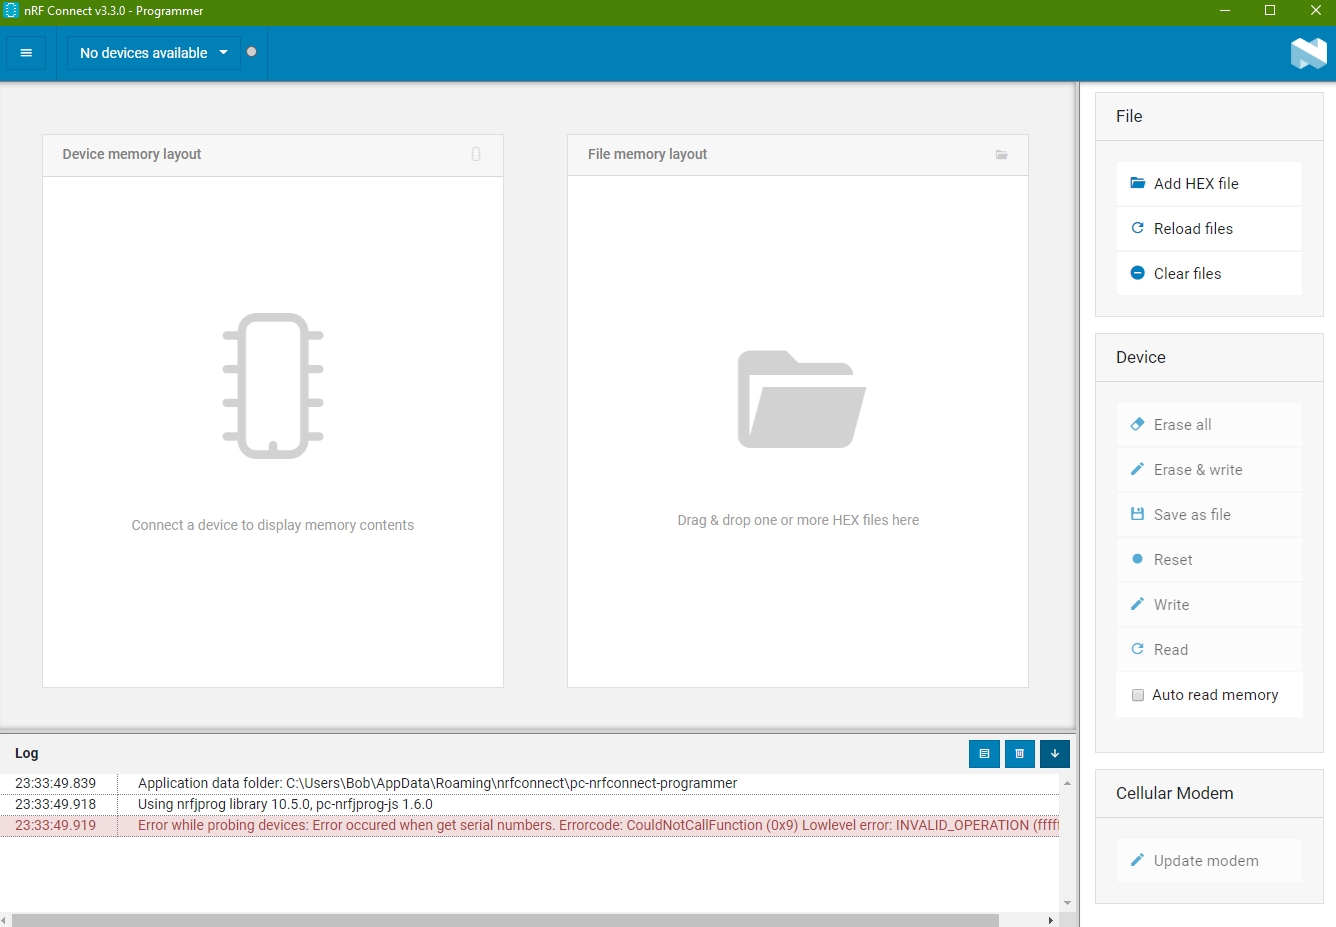
Problem “Error occured when get serial numbers”
Error encounter:
“Error while probing devices: Error occured when get serial numbers. Errorcode: CouldNotCallFunction (0x9) Lowlevel error: INVALID_OPERATION (fffffffe)numbers.“
This error occurred if JLINK driver is not installed on the system.
- Solution 1: Download the latest J-Link Software and Documentation Pack from
https://www.segger.com/downloads/jlink/#J-LinkSoftwareAndDocumentationPack
Remember to install the driver with admin rights!!! - Solution 2: Need to install nrfprog tool (nRF Command Line Tools) and this tool will install the SEGGER JLink driver. (commonly used for microcontroller chip, including chips from Microchip)
Download nRF-Command-Line Tools
https://www.nordicsemi.com/Software-and-Tools/Development-Tools/nRF-Command-Line-Tools/Download#infotabs
The problem is solved after installing the SEGGER JLink driver which comes with the nrfprog tool.
https://devzone.nordicsemi.com/f/nordic-q-a/42439/unable-to-connect-nrf52840-to-nordic-desktop-software-or-load-flash-softdevice-from-keil
https://devzone.nordicsemi.com/f/nordic-q-a/49902/error-when-launching-nrf-connect-for-desktop-on-linux - Solution 3: User Admin rights while installing the software “nRF Connect”
https://devzone.nordicsemi.com/f/nordic-q-a/49294/the-nrf-connect-application-stopped-working - Solution 4: User directory path issues
https://devzone.nordicsemi.com/f/nordic-q-a/49731/nrf-connect-v3-0-0-programmer-does-not-support-devices-nrf52832-nor-nrf9160-error-while-probing-devices-error-occured-when-get-serial-numbers-errorcode-couldnotfindjprogdll-0x2-and-the-detected-device-could-not-be-recognized-
Problem “Unsupported device. The detected device could not be recognized as neither JLink device nor Nordic USB device.”
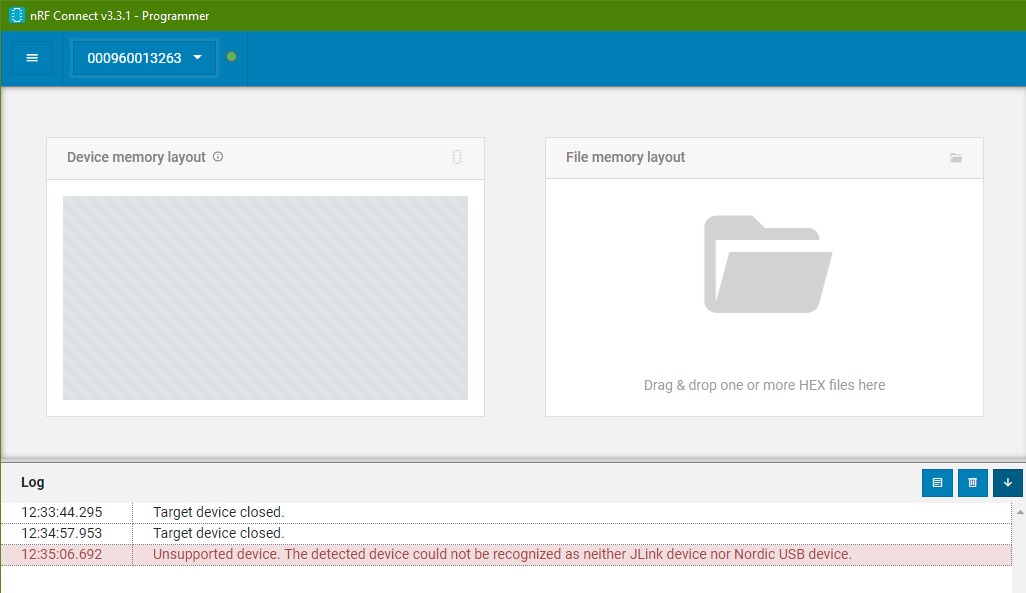
This error occurred when the JLink driver is not working.
(doesn’t work) May need to reinstall SEGGER J-Link driver. Install version 6.22g. Download the J-Link Software and Documentation Pack from
https://www.segger.com/downloads/jlink/#J-LinkSoftwareAndDocumentationPack
Solution 2, can consider reinstalling “nrfprog tool” as the previous example.
Problem: The nRF Programmer got hang when connecting to the nRF9160 chip. Log message halt at “Using nrfjprog to communicate with target”
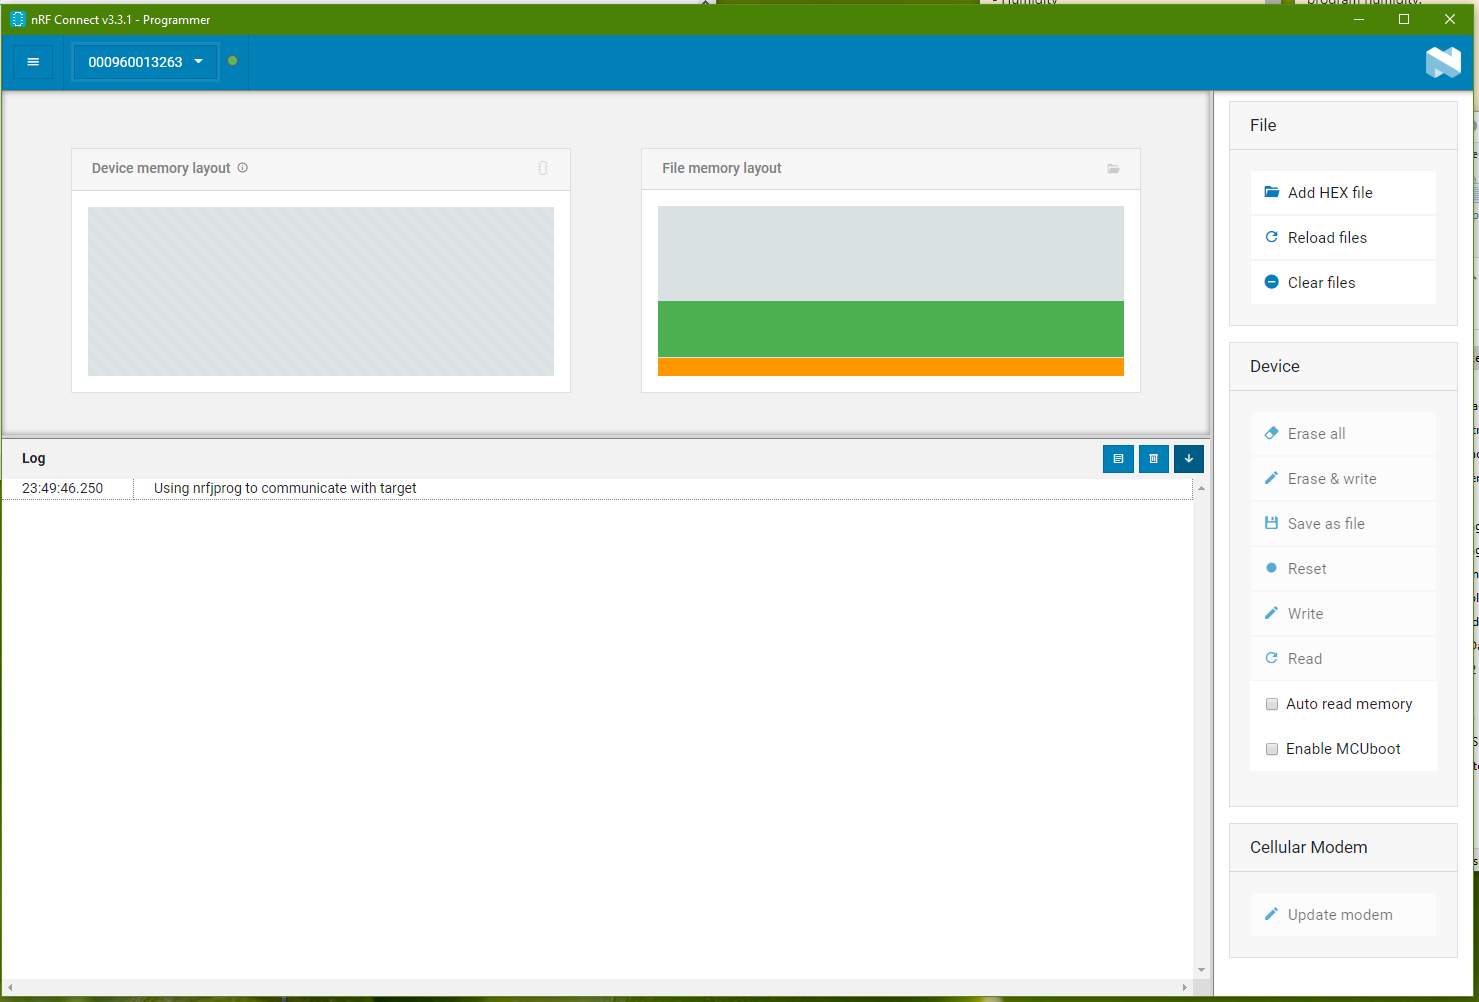
Somehow during one of the attempt to program the nRF9160 chip on Thingy91, the programmer halt.
Upon retry to connect with the chip, the log always stops at “Using nrfjprog to communicate with target”.
It doesn’t happens to the nRF52840 chip on the Thingy91. Only the nRF9160 chip is affect.
I thought it was a hardware issue. Alan from Avnet managed to recover this hang sequence by using the following command (program via command prompt)
> nrfjprog -f UNKNOWN --eraseallOnce this command is issue, the block is clear and the chip can be program normally.
<- Back to Bluetooth Resources Page
How to load Arduino bootloader into ATMEL microcontroller ATMEGA328P
Install Mini-Core
Install Mini-Core following the instructions given on their githhub page:
“https://github.com/MCUdude/MiniCore#how-to-install“
This installation method requires Arduino IDE version 1.6.4 or greater.
- Open the Arduino IDE.
- Open the File > Preferences menu item.
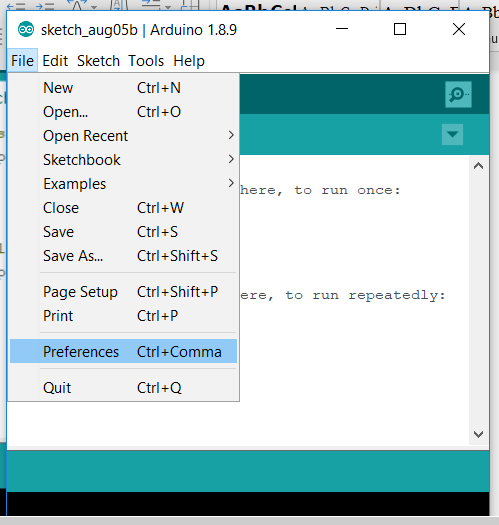
- Enter the following URL in Additional Boards Manager URLs:
“https://mcudude.github.io/MiniCore/package_MCUdude_MiniCore_index.json“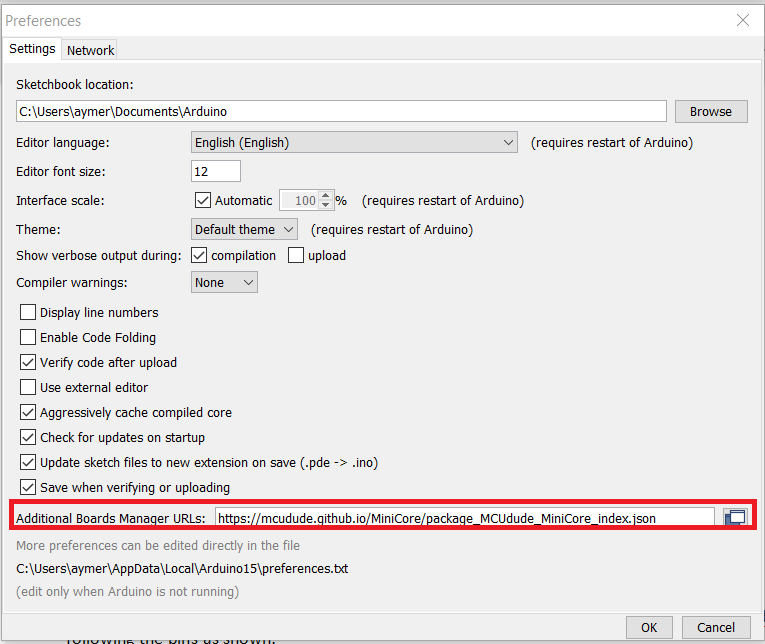
- Open the Tools > Board > Boards Manager… menu item.
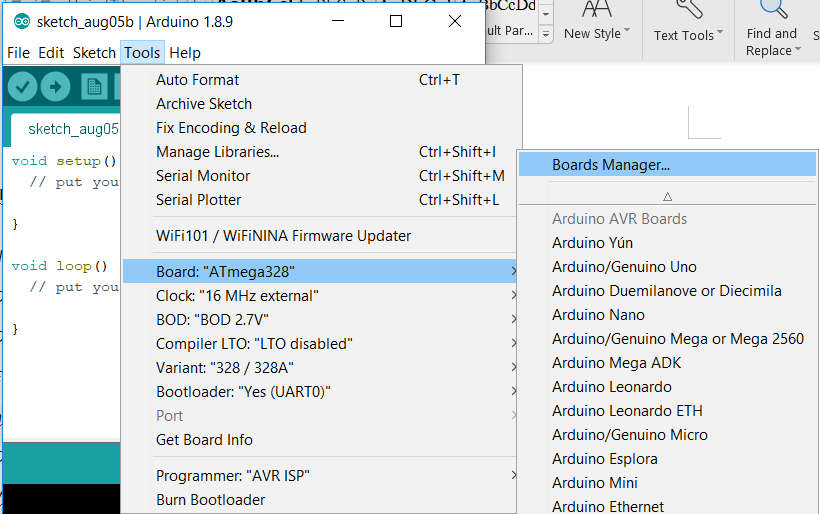
- Wait for the platform indexes to finish downloading.
Scroll down until you see the MiniCore entry and click on it.
Click Install.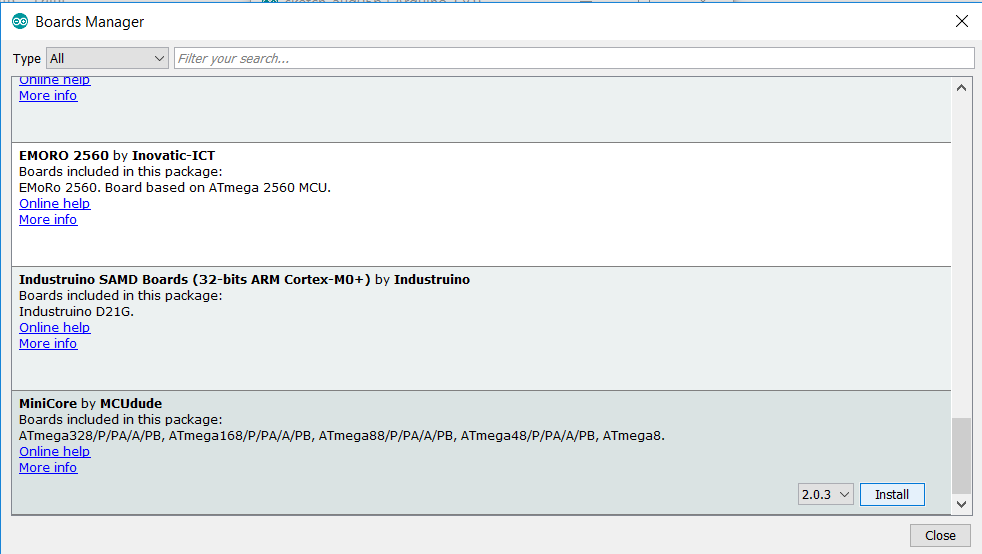
- After installation is complete close the Boards Manager window.
Programmer preparation
Plug the USBasp device into your computer.
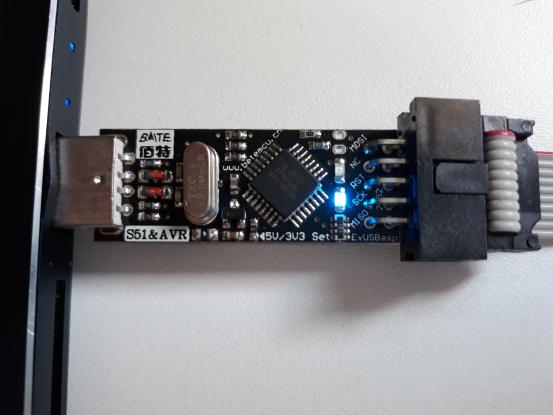
If you get an error stating the USBasp cannot be found,
use Zadig to download the device driver.
Go to : https://zadig.akeo.ie and download the software. Once downloaded
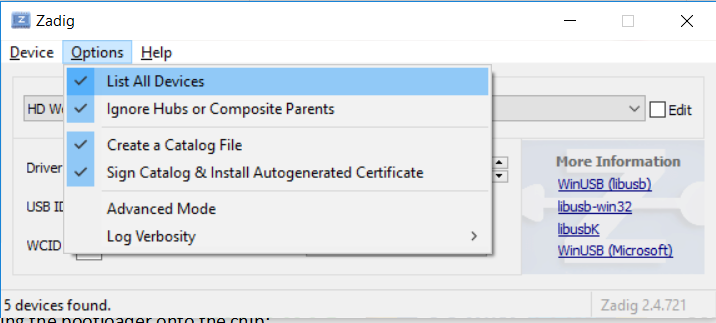
Launch the software and go to Options>List all devices
In the drop-down menu, select USBasp.
Then in the Driver selection click the small arrows until you find “libusbK (v3.0.7.0)”
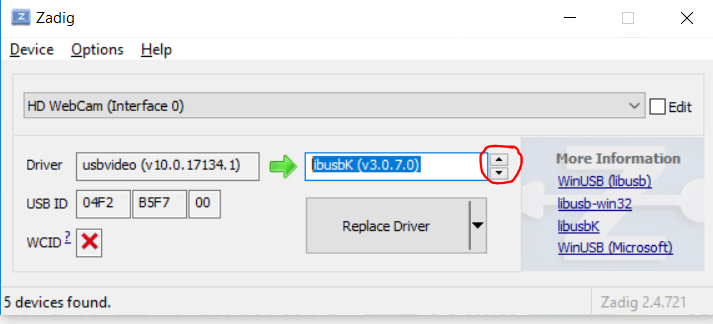
Then click “Replace Driver”
Burning the Bootloader onto the chip
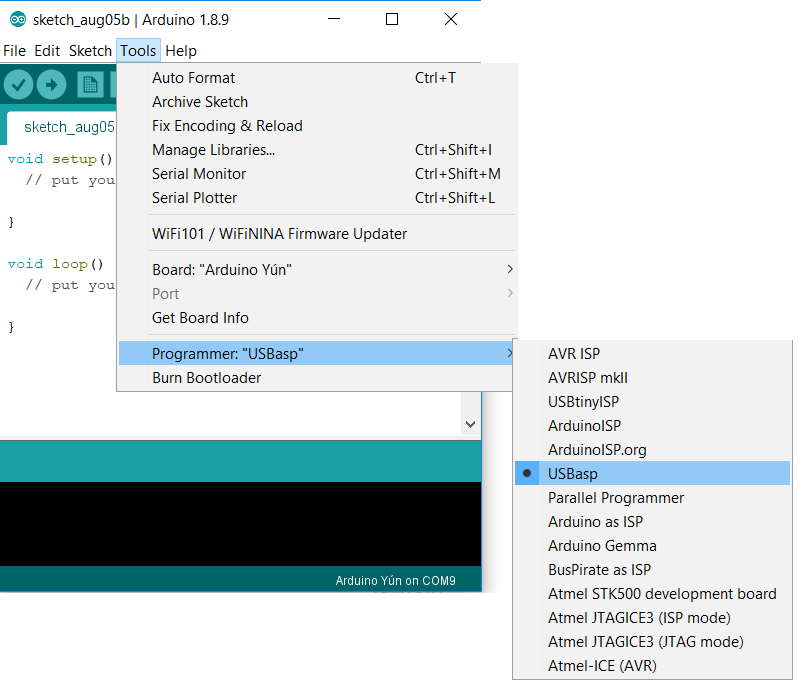
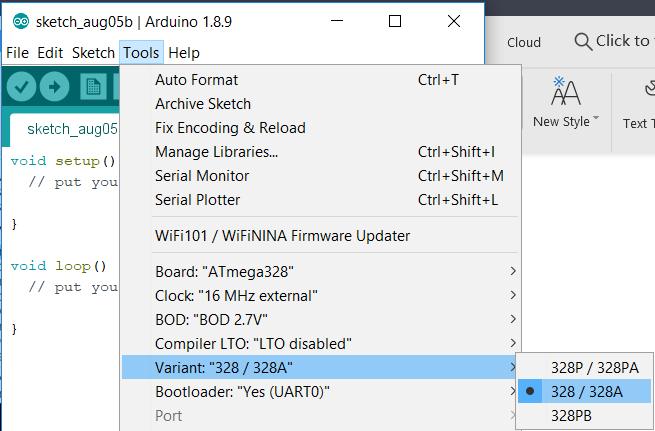
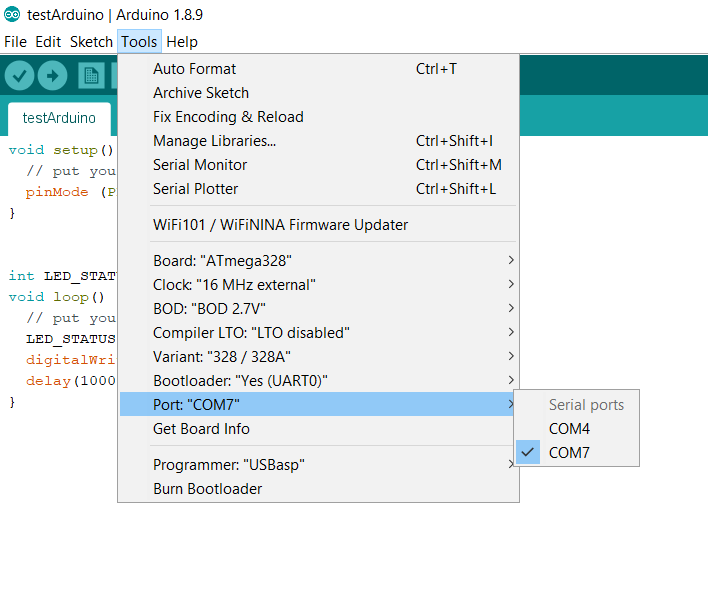
Inside of Arduino IDE go into Tools>Programmer>USBasp
Select the board ATmega328
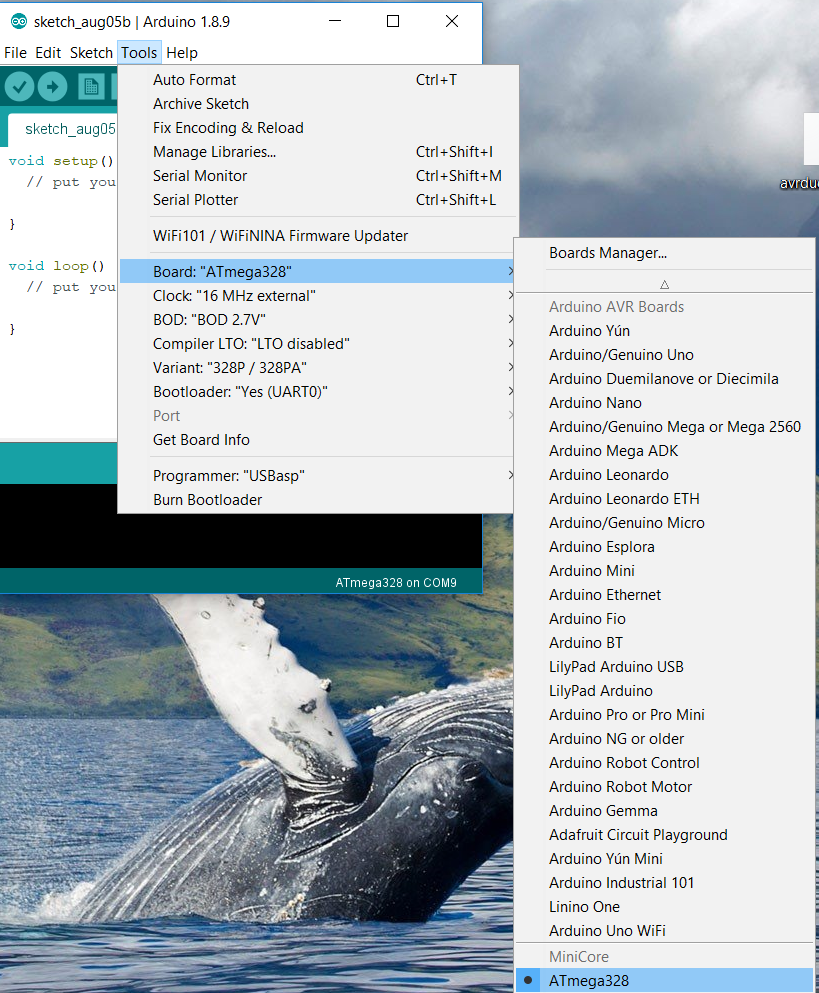
and select the variant 328/328A
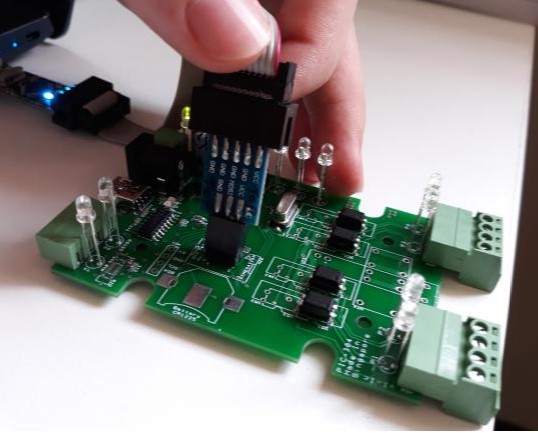
Connect the USBasp to the Arduino programming port (6 pins header)
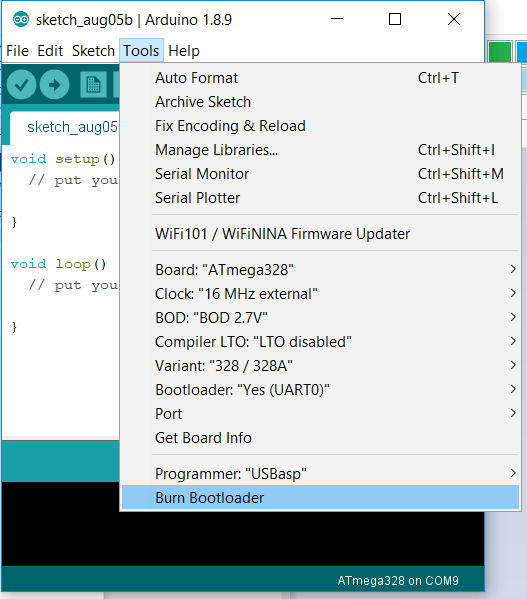
Go to Tools>Burn Bootloader
You should see this message in the console.
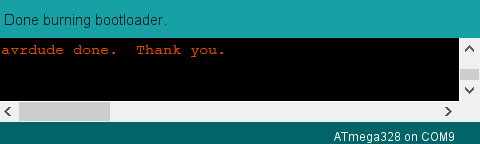
A quick way to check if the boot-loader was correctly burned is to try loading with an empty source code.
If the loading fails, try changing the port in Tools>Port. If the loading still not works, try redoing step 3. for the start.
Arduino programming via USB
You can program the board using a USB B mini, just like you would a normal Arduino Board.
For this you need to change the port if necessary: Tools>Port
Use the Check button to compile ans the arrow to load the code onto the board.
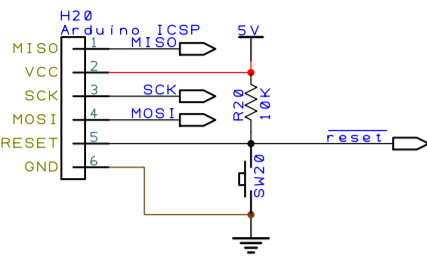
Set up:
The pins of the USBasp must be connected to the corresponding of the Arduino ICSP connector.
Other references
Microcontroller Firmware Programming Upload with MPLAB X IDE
Introduction
This section provides fresh user a step-by-step instruction to upload your updated firmware (a program or machine codes) onto your circuit board using a Microchip microcontroller.
![]()
Things That You Need To Prepare
- Your Microchip microcontroller circuit board
- Programmer Tool (PICkit)
- MPLAB X IDE (Integrated Development Environment)
- Firmware (a hex code file *.hex or project files, containing the program of your controller)
Once you are prepared, you can proceed step-by-step to upload your firmware to your microcontroller.
Microchip Circuit Board
Most microchip circuit board design by PIC-CONTROL comes with a programming port which allows us to upload the program onto the microcontroller chip onboard.
There are standard microchip programming port also known as ICSP, which you can connect to with your programmer tool.
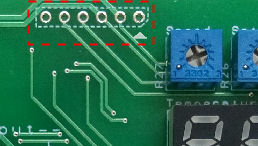
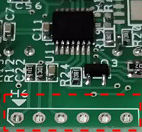
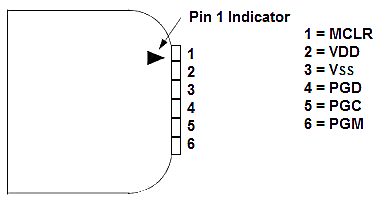
Programming Connector Port on your circuit board product
The programming port is usually located near the edge of your circuit board. It is a row of 6 holes grouped up with a rectangular box (2.54mm pitch header pins).
You must know how to identify the pin no.1 on this port. Pin number 1 of the footprint is indicated by a triangle arrow marking. You can also identify this pin 1 from the bevel corner on the rectangular box.
The following are some photos of how the ICSP programming port looks like on your circuit board.

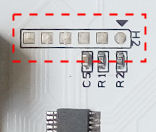 ICSP (a special version without any holes)
You are suppose to connect the programmer tool to these ICSP port, with alignment to the pin 1.
Details of the procedure will be provided in the later section below.
Programmer Tool
You will need to get yourself a programmer tool. A programmer tools helps you to connect your computer to your microcontroller chip. It is used for uploading of the microcontroller firmware (controller program) onto the microcontroller on your circuit board.
There are a number of programmer tools which allows you to upload your firmware. In this example, we are using the official PICkit 3 or PICkit 4 programming tool from Microchip.
Other commonly known programming tools available are ICD4 (In-Circuit Debugger), ICD3, PM3 and REAL ICE.
Please take note of the pin no.1 on the programmer tool. You must identify this pin and align it to the pin 1 of the ICSP port on your circuit board.
PICkit 3 Programming Tool
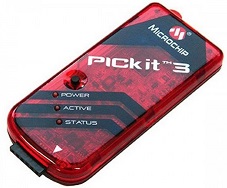
PICkit 3
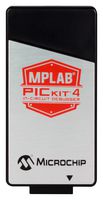
PICkit 4 (new version)
PICkit Programming Tool’s Pin-out
This is the PICkit programmer pin-out. This pin-out is also known as the ICSP programming port.
Please take note that the pin no.1 is identified by the triangular arrow head.
MPLAB X IDE (Integrated Development Environment for Microchip Microcontroller)
The last item that you need is the software which allows you to develop and upload your program to your microcontroller chip.
MPLAB X IDE is a free microchip microcontroller development software. It is a complete platform for your firmware coding development work.
What you should do now is to download the following,
- MPLAB X IDE software (Windows version).
- MPLAB XC Compiler.
Download & Install the MPLAB X IDE Software 
You can click on this shortcut link to download the latest MPLAB X IDE software (Windows version). If this links cannot work, please follow the steps here to download from the Microchip official website.
https://www.microchip.com/mplab/mplab-x-ide
- Click here to go to the Microchip website for MPLAB X IDE software.
- Scroll down to the bottom of the page and look for the “Downloads” tab to click on.
- Go to the respective version (Windows, Linux or Mac) and download the software.
- As of this point in time the software is of version “MPLAB® X IDE v5.05“
Install this software to your computer.
Download & Install the MPLAB X Compiler 
The compiler converts the programming source code into a machine code before you can upload the program into a microcontroller chip. Different microcontroller would requires its respective compiler. It is recommended to install all the compiler as follows.
http://www.microchip.com/mplab/compilers
Install these MPLAB XC8 and MPLAB XC16 compilers to your computer.
Step-by-Step Procedure to Upload Firmware to Microcontroller Chip
Now that you have your
- Circuit Board
- Programmer Tool
- MPLAB X
ready…
We can start to upload your project or *.hex file..
There are two modes of uploading firmware to the microcontroller.
- Method 1: Upload hex.* file (machine code) using MPLAB X IPE software.
- Method 2: Upload project (source code) using MPLAB X IDE software.
Method 1: Firmware upload using IPE Software
This method is usually used for the production. Programmer operators will be provided with a *.hex file for them to upload the firmware to the microcontroller chip.
The advantage of this method is that it is simple, and it do not expose your actual project source code.
Step 1: Launch the program MPLAB X IPE software.
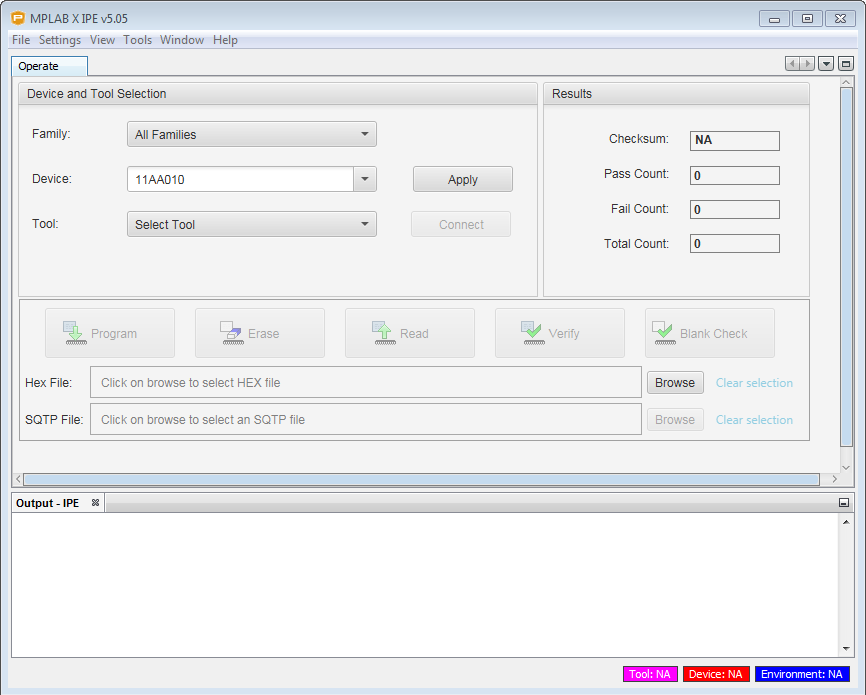
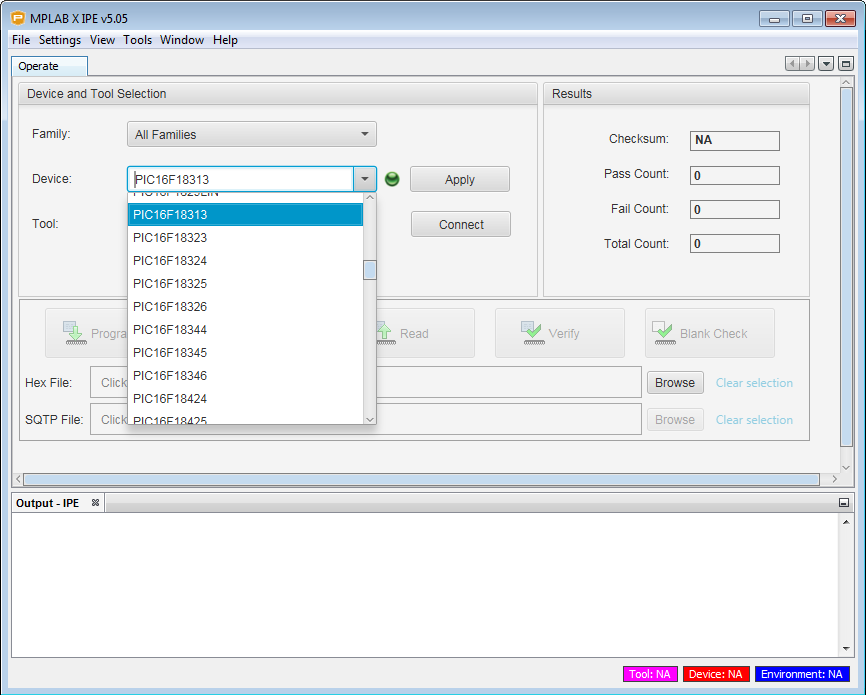
Step 2: Under the section “Device:“, select the microcontroller part number that you want to load your firmware to. Refer to your schematic for the exact microcontroller part number.
Click on the button “Apply“.
Step 3: Plug in your programmer tool to your computer.
You should notice that the software update the “Tool:” section once your tool is detected.
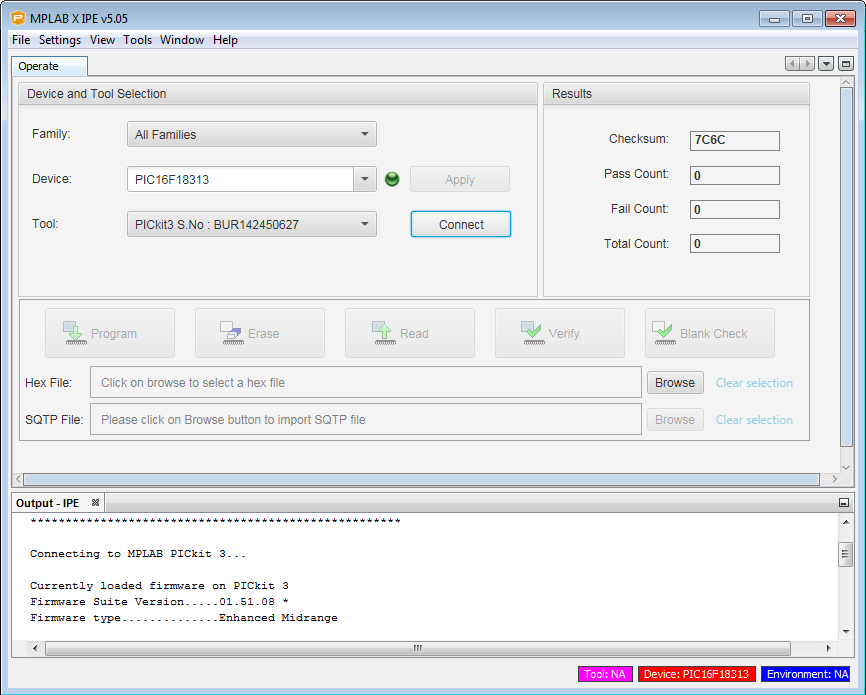
Click on the button “Connect” to start connecting to your programmer.
You should see the following message printed out…
*****************************************************
Connecting to MPLAB PICkit 3…
Currently loaded firmware on PICkit 3
Firmware Suite Version…..01.51.08 *
Firmware type…………..Enhanced Midrange
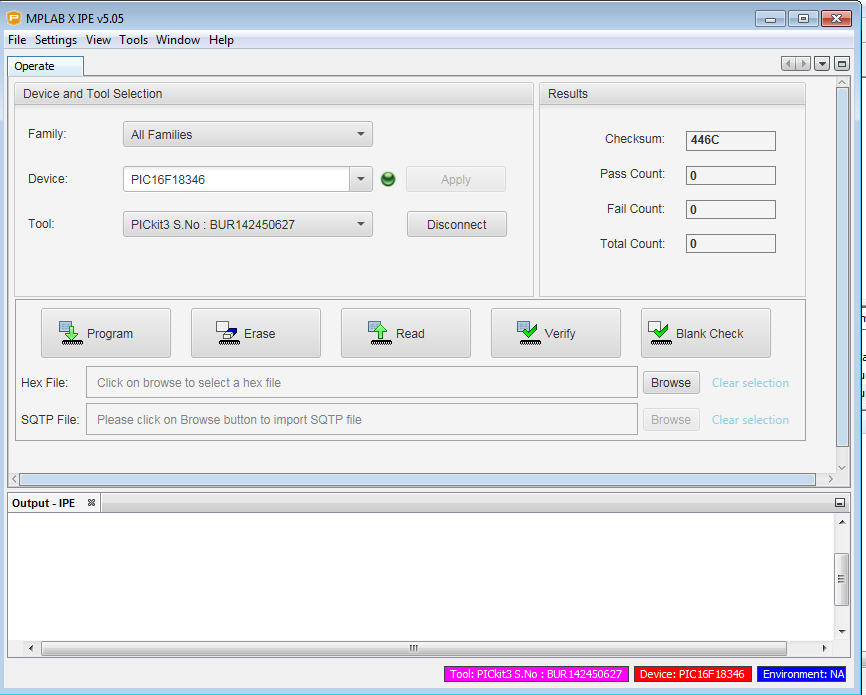
Step 4: Under the section “Hex File:“, load your *.hex file for your production. This is the machine code file for your circuit board. This is the only file required for the production.
For a start, this file is located in your project folder. For example…
Your project directory -> “yourProject.X\dist\default\production\yourProject.X.production.hex“
Step 5: Connect your programmer tool to the ICSP port on your circuit board. Make sure that the pin 1 on your connector is aligned correctly. Then power up your board.
Step 6: Click on the button “Program” to start the uploading of your firmware to the microcontroller chip on your circuit board.
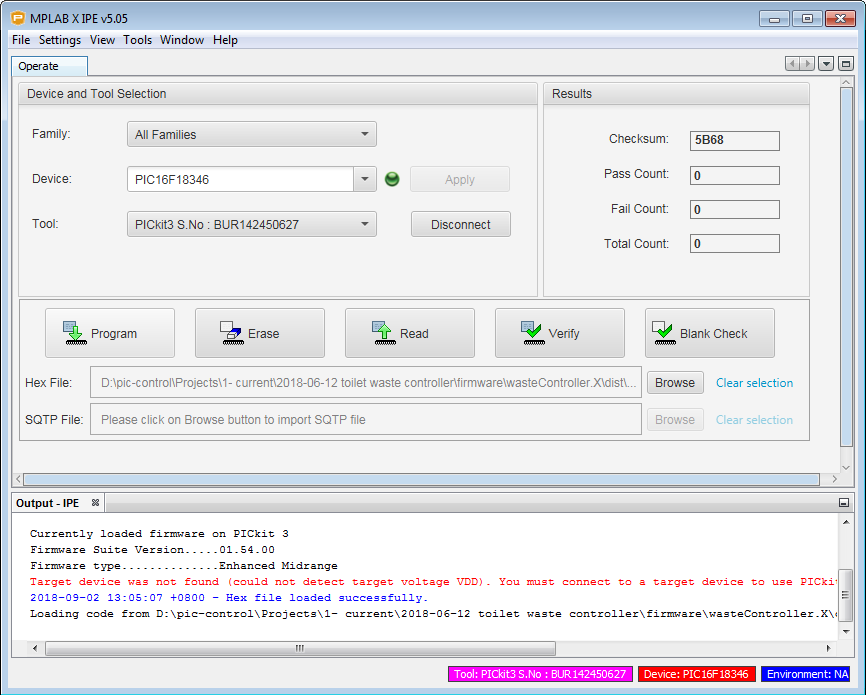
Yes, you are done. Congratulation.
Your board is successfully loaded with the firmware.
Method 2: Project source code upload using IDE Software
This method is usually used during the development. Engineer can edit the source code and upload the firmware changes onto the microcontroller chip directly.
It is recommended to maintain your firmware version while you are doing editing and improvement work. Keeping the original functioning version is a must. You can always fall back on the original copy if you mess up the project source codes.
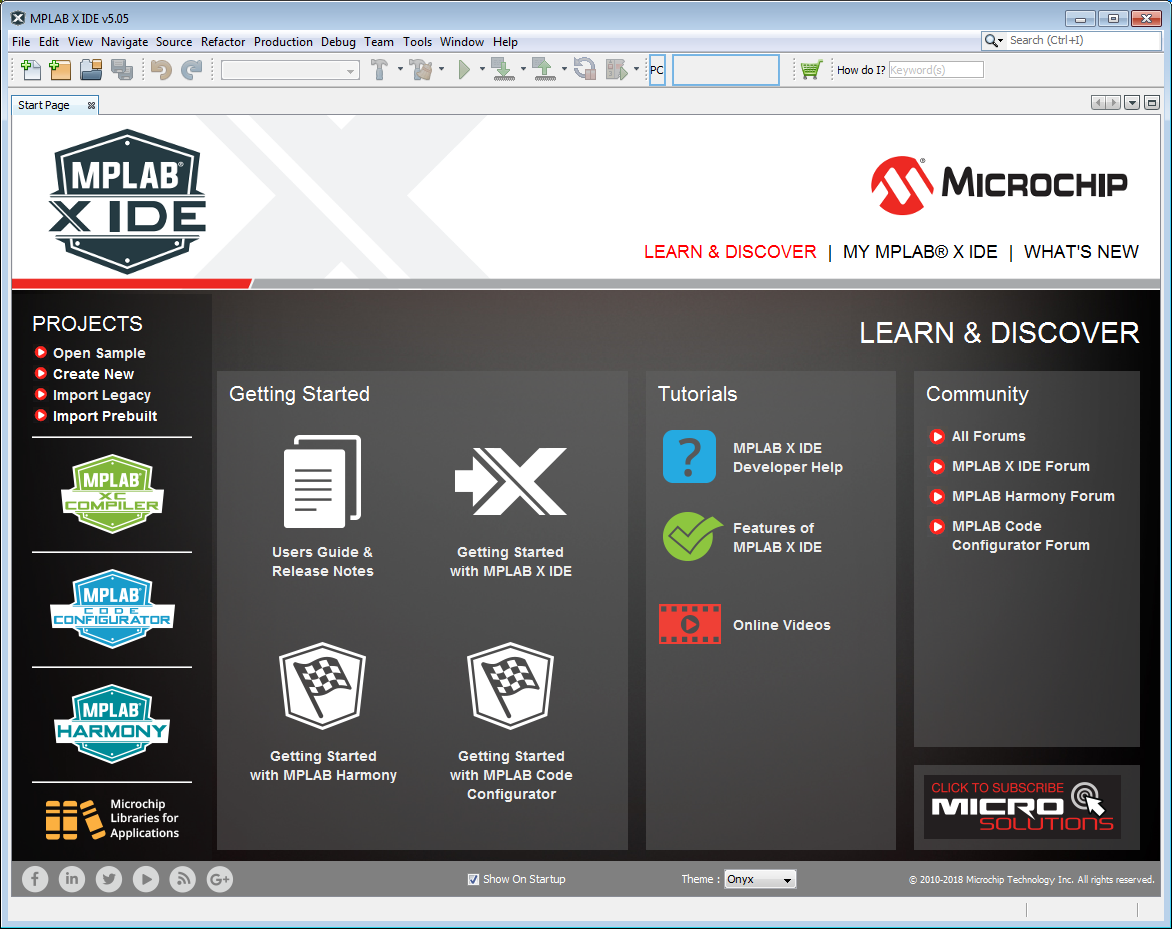
Step 1: Launch the program MPLAB X IDE software.
Step 2: Open up your project files. Go to File > Open Project…
Select your project files. It is the project folder which ends with *.X. For example “yourProject.X”
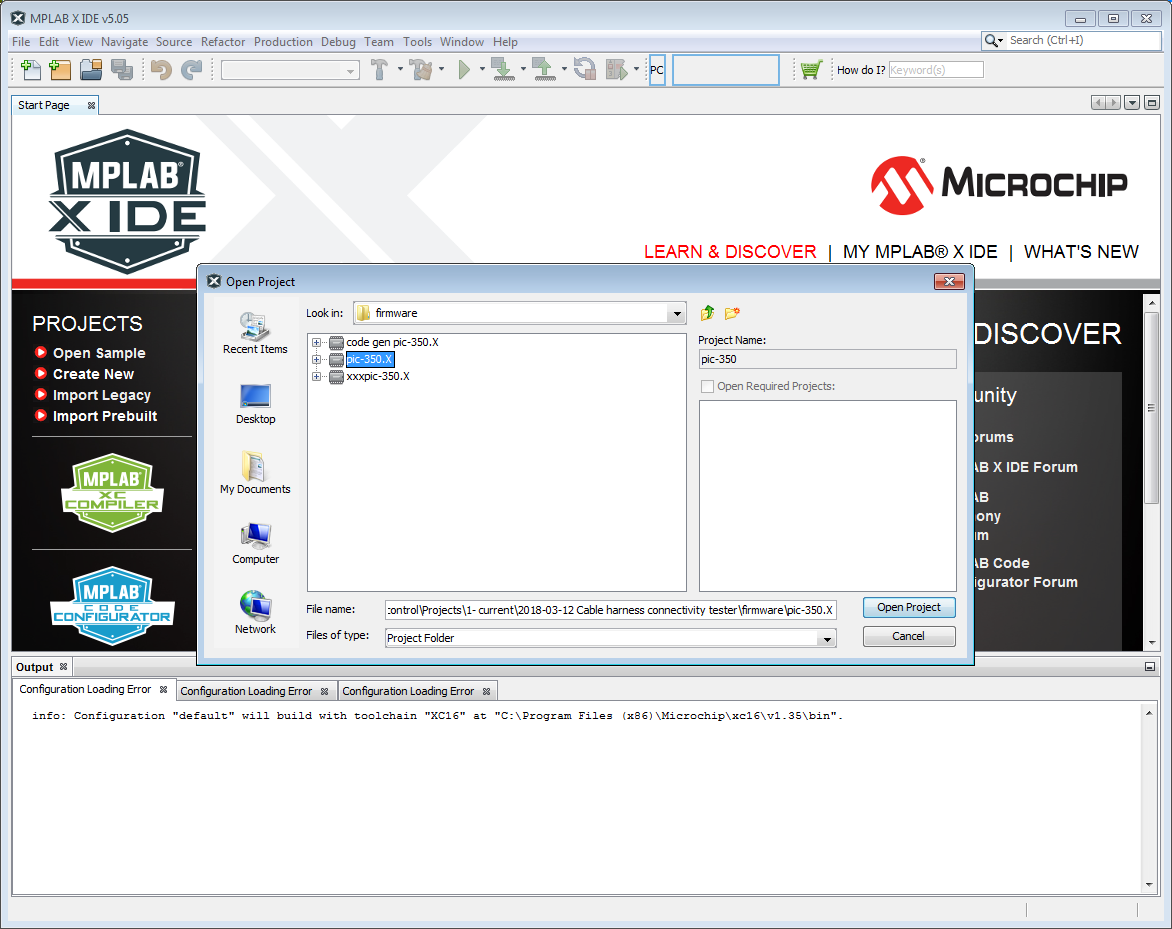
The project will loads up.
Step 3: Plug in your programmer tool to your computer.
Step 4: Connect your programmer tool to the ICSP port on your circuit board.
Make sure that the pin 1 on your connector is aligned correctly. Then power up your board.
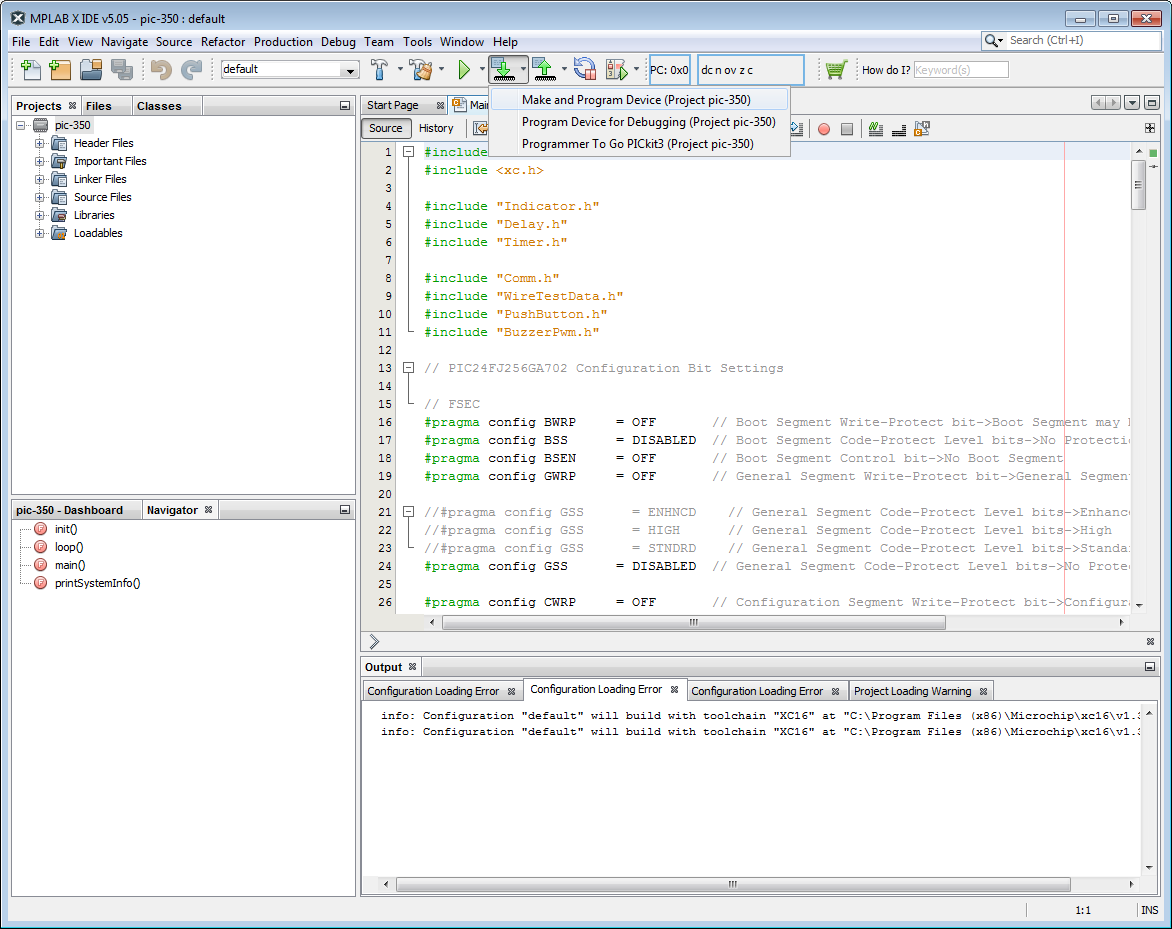
Step 5: Click on the arrow down icon below the menu bar.
Select “Make and Program Device” to start the uploading of your firmware to the microcontroller chip on your circuit board.
Yes, you are done. Congratulation.
Your board is successfully loaded with the firmware.
More…
For further details, you can check up the Microchip official website ![]()
or YouTube ![]() for a more detailed instructions.
for a more detailed instructions.
Electronic Components Store in Indonesia
This page contains references to where you can get electronic components and stuff in Indonesia.
Electronic Components Online Stores in Indonesia
Electronic Components Distributor in Indonesia
More electronic stuffs.
Check out more electronic component stuff that
you can shop in Singapore
and more electronics in Malaysia.
Electronic Circuit Design Companies in Malaysia
Are you looking for electronic circuit design company to develop your electronic product prototype in Malaysia?
Check out this list for your electronic specialise near your place in Malaysia.
Electronic Circuit Design & Prototyping
- Jaavin Electronic Solution Sdn. Bhd. (Kuala Lumpur, Malaysia)
- Wegatech Electronic (Selangor, Malaysia)
- JAC Engineering Sdn. Bhd. (Selangor, Malaysia)
- D3 Electronics (M) Sdn Bhd (Selangor, Malaysia)
- Intelligent Circuit Engineering ICESB (Selangor, Malaysia)
- Expedio Design Sdn Bhd (Selangor, Malaysia)
- Whizz Systems (KEDAH, Malaysia)
- Avetronix Solutions (Penang, Malaysia)
- Ketronixs (Penang, Malaysia)
Electronic Manufacturing Service (Mass Production, Box Build)
- BH-Electronic (Penang, Malaysia)
- ViTrox Technologies Sdn. Bhd. (Penang, Malaysia)
- Precico Electronics Sdn. Bhd. (Penang, Malaysia)
- CEEDTec (Penang, Malaysia)
- BCM Electronics (Kedah, Malaysia)
- HOTAYI (Penang, Malaysia)
More Electronic Services and Stuffs in Malaysia
Wondering where you can purchase electronic components, parts and accessories in Malaysia?
Click here to check out the electronic component marketplace in Malaysia.
Looking for More Options?
Malaysia is a big country. Searching for engineering services can be quite tedious.
Still cannot find…
Check out these electronic design companies in Singapore for more options.
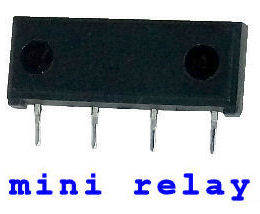
Small Mini Relay Operation Details
Most of the electronic interfacing to another system makes use of switch contact as a form of communication control. This form of connection interface is commonly known as Dry Contact.
Dry contact is simple a switch contact that is activated through a relay. The use of such relay is typically only for signalling purpose. The signalling is very low in the current. A very small mini relay is often good enough for the job.
The switching contact of this relay can drive up to 500mA. LED indicator typically requires a maximum of 20mA. So this small relay is more than enough to switch on an indicator.
Most logic signalling between circuit boards uses very low current. Typically around 1mA or below. A small mini relay is more than good enough.
The simple dry contact of a small relay makes it easy to interface with other circuit systems which uses different voltage as their power source.
Advantages of using a Small Mini Relay
Features of a Small Mini Relay
- Smaller in Size, smaller footprint, lower weight. (size only about 20 x 5 x 8mm)
- Cheaper in cost compare to a bigger relay
- Easier to interface (dry contact)
- Easier to design
- Suitable
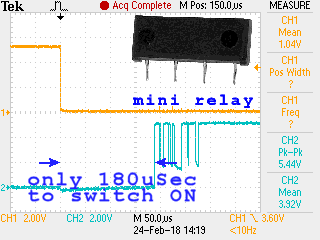
Switching Speed of a Mini Relay
The following measure was done to test the switching speed for the small relay.
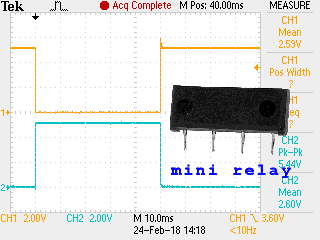
Compare to an active switch like a transistor or solid state relay, the switching speed of a mechanical switch relay is still far from fast. Although it is not as fast as a semiconductor switch, the switching speed is considered fast enough for a very wide range of application.
Mini relay only took about 180usec to switch ON.
Took a shorter time of 120usec to switch itself OFF
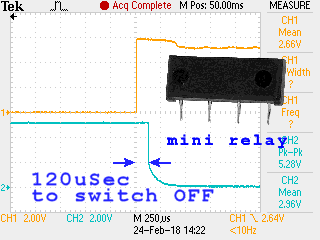
From the switching speed measurement taken, the delay switching of a mini relay is in the range of about 0.1 to 0.2 msec. For an application that requires switching speed in the range of 1msec and more, using a mini relay is very much acceptable.
If you need an even smaller and faster switching device, you should consider a transistor or a solid state relay. Semiconductor is smaller in size, switch faster, and can cost lower than a mechanical switch. The lifespan is also longer. The disadvantage compares to a simple dry contact mechanical relay is that you will need to take more care in choosing and designing for a transistor switch. There is more specification that is under consideration.
Technical Details of Mini Relay
For more technical information of this small mini relay,
check out the mini relay page.
- Mechanical Dimension
- Mini Relay Connection Schematic