This article is written as a guide to loading an Arduino bootloader or firmware onto a brand new ATMEL microcontroller IC chip.
When you first purchase a legitimate ATMEL ATMEGA16U2 chip, it is actually loaded with a default DFU firmware. If you did not purchase the microcontroller from the legitimate source, there might not be any firmware pre-loaded inside. In this case, you can only load the bootloader firmware using the ATMEL ICSP programmer method.
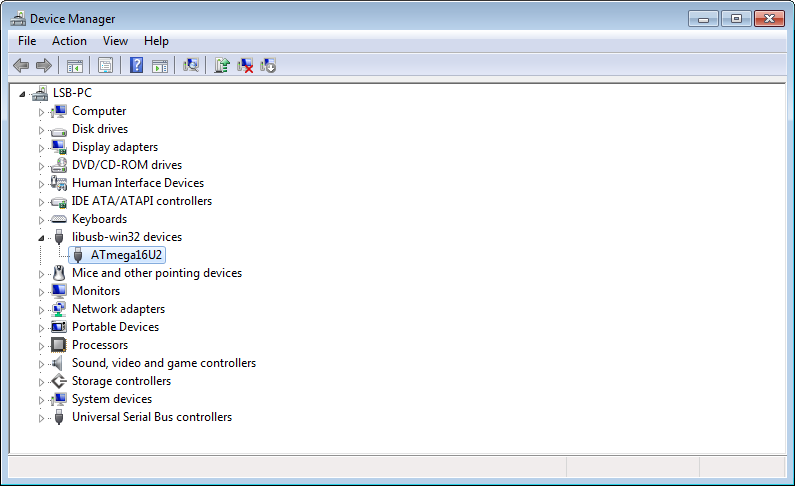
If you built the basic USB circuit using the ATMEL microcontroller and plugged it into your computer’s Windows Operating System (example Win7), you should be able to see a USB device name “ATmega16U2” under a folder libusb-win32 devices in the Win7 Device Manager.
Basic USB circuit for ATMEGA16U2
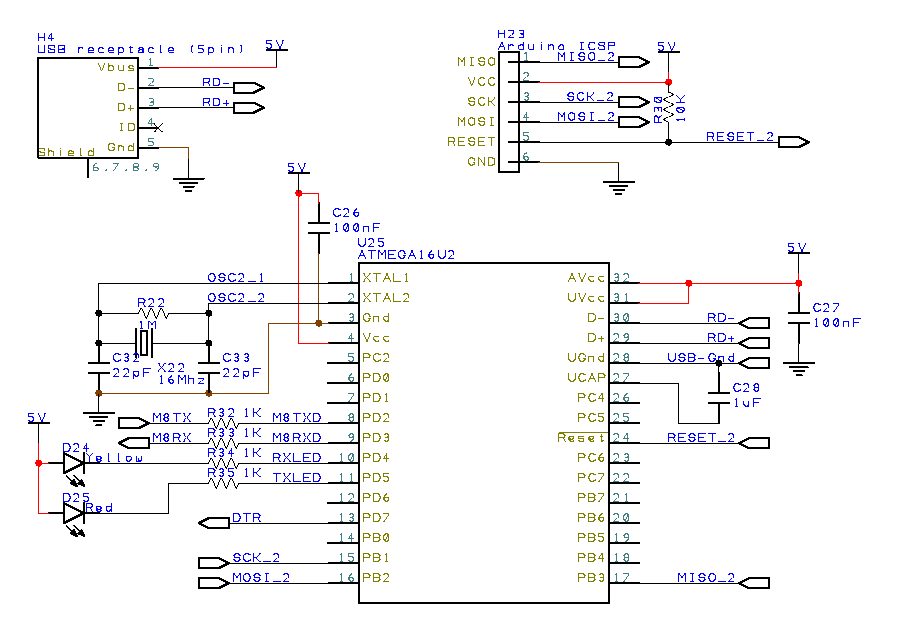 Click to enlarge the basic USB ATMEGA16U2 schematic circuit.
Using the ATMEL FLIP software, you will be able to load firmware or bootloader using its default ATMEL DFU bootloader. You can download this FLIP software from ATMEL website. Or you can download here,
- JRE – Flip Installer – 3.4.7.112.exe, (21MB, updated August 2012), FLIP 3.4.7 for Windows (Java Runtime Environment included)
Uploading Arduino USB Serial Firmware via FLIP
- Plug the USB circuit to your computer. You should see the ATmega16U2 device in the Win7 Device Manager. This is the default DFU firmware loaded in the ATMEGA16U2 microcontroller chip. It is also known as the DFU mode.
- Install and execute ATMEL FLIP software.
- Select the microcontroller. Click “Device”>”Select…”, or use the shortcut key <Ctrl>+S. Select the microcontroller “ATMEGA16U2”.
- Select the communication. Click “Settings”>”Communication”>”USB”, or use the shortcut key <Ctrl>+U.
- A dialogue box may appear. Then click open.
- Download this USB serial firmware for ATMEGA16U2. For ATMEGA8U2, you can download the USB serial firmware here.
- Arduino-usbserial-atmega16u2-Uno-Rev3.hex (11Kbyte, for ATMEGA16U2)
- Arduino-usbserial-uno.hex (11Kbyte, for ATMEGA8U2)
- Load the firmware on the FLIP software. Click “File”>”Load HEX File…”>”Arduino-usbserial-atmega16u2-Uno-Rev3.hex”
- Ensure the check box is checked. “Erase”, “Program” and “Verify”
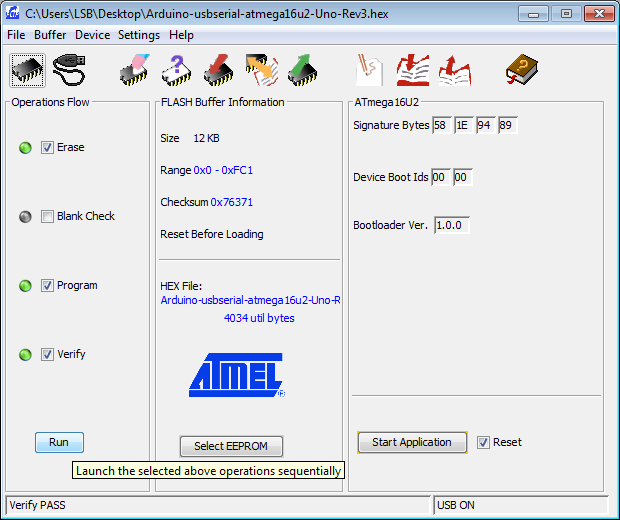
- Click “Run”.
- Once the firmware is loaded, you can unplug the USB connection and plugged it back to your computer. You should be able to see in your device manager as “Arduino Uno” under the section “Ports (COM & LPT)” instead of the previous “ATMEGA16U2” device.
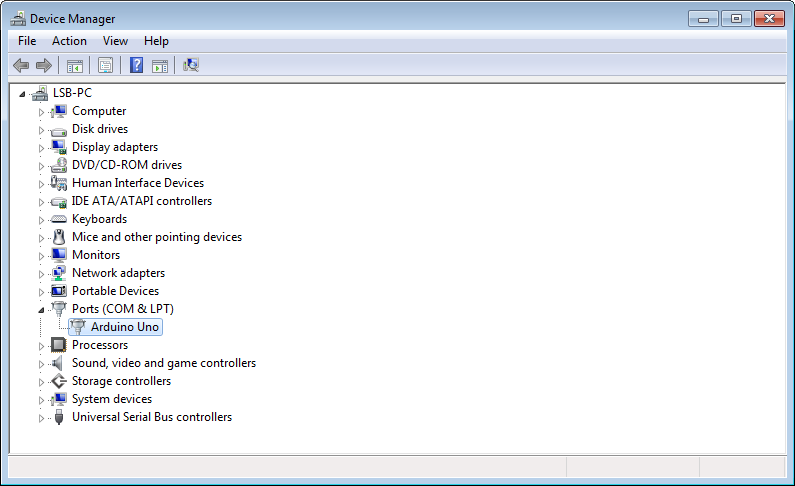
- The ATMEGA16U2 is now loaded with the USB serial firmware which is used in a typical Arduino UNO board. Your ATMEGA16U2 microcontroller is now a USB serial (CDC) or USB to serial communication converter. The same converter IC chip used in Arduino UNO board.
Upload DFU Bootloader to brand new ATMEL USB Microcontroller
For the ATMEL microcontroller which does not have the default DFU firmware pre-load into it, you can load the following DFU hex file for the respective ATMEL microcontroller chip.
- DFU firmware *.hex for ATMEGA8U2
- DFU firmware *.hex for ATMEGA16U2
- DFU firmware *.hex for ATMEGA16U4
- DFU firmware *.hex for ATMEGA32U4
Since the microcontroller does not have a bootloader, the only way to load this DFU to the microcontroller via an ATMEL ICSP programmer. The instruction guide for the uploading of a firmware using an ICSP programmer can be found here.
Upload Arduino Bootloader into ATMEGA328P Microcontroller
For the ATMEL Microcontroller ATMEGA328P used in Arduino UNO, the Arduino bootloader can be upload using an Arduino ICSP programmer with the Arduino IDE (integrated development environment) Software.
- Run the Arduino IDE software.
- Select “Arduino UNO” from the Tools > Board menu.
- Select “ArduinoISP” from Tools > Programmer (depending on the programmer that you are using)
- Run Tools > Burn Bootloader
Now your ATMEGA328P microcontroller is loaded with the Arduino bootloader firmware.
Take Note for ATMEGA328 Microcontroller
Uploading of bootloader for ATMEGA328 (signature ID 0x1e 0x95 0x14) is different from ATMEGA328P (signature ID 0x1e 0x95 0x0F).
Check out the following webpage if you want to upload the bootloader to ATMEGA328.