Very often when using a USB to RS232 device for hardware troubleshooting, a virtual com port number will be generated. If the device is removed and plugged to another USB port, Windows will install another set of drivers for the USB device, resulting in a new com port number assigned. Over along period of time, you may have a lot of unwanted drivers installed with you realising. This is because they are all hidden inside the Device Manager.
Remove Device Driver Manually
To get rid of unwanted drivers manually, devices, or services, use the following steps:
Open the Start menu and choose Run.
Type in “cmd“, right click the cmd terminal icon and right click “Run as administrator“.
At the command prompt, type in “set devmgr_show_nonpresent_devices=1” and press Enter. (Note that nothing seems to happen. This is expected. You are actually setting an environment variable which is going to help you to see hidden devices.)
On the next command prompt line, type “devmgmt.msc” and press Enter. This will launch the Windows Device Manager Console.
In the Device Manager Console, from the View menu, select Show Hidden Devices.
Software Tool to help remove unused device driver
This software do the same as above. A faster way to remove a list of hidden devices that are not in use.
DeviceCleanup
General purpose program to clean up devices in the Device Manager.
I2C can get lockup and hang the whole I2C bus due to communication error. This is due to noise or incorrect signalling resulting in slave waiting for clock cycle, when the master already finish its clocking. The following are some of the common reasons for the communication error.
Too much capacitance on the bus.
Communication speed too high.
It is important to also program your codes to handle possible bus hang. You can clock out at least 10 clock cycle to clear the bus.
Solution
A common problem is that the pull up resistor on the bus is too low. This results in a slow slew rate. The digital signal is not sharp enough. Use a 1Kohm pull up resistor for both the SDA and SCK. It is the most common design problem I have encounter. I always put a pullup resistor value too high. 3.3Kohm can be too high.
This guide provide a certain direction to learn and understand about Bluetooth BLE using Nordic tools and microcontroller.
The learning process with Nordic product can be very overwhelming. This guide provide a means to understand Bluetooth progressively.
Read the book “Inside Bluetooth low energy” by Naresh Gupta This book contains all the technical names of Bluetooth. It is important to know that these names exist. You do not need to read this book in detail for a start. Just a brief read-through of the features available in BLE. You will need to be aware of the wording convention used in Bluetooth Low Energy. Just be aware of the terminology used in the book as it is very helpful when you navigate with the following tools and working with the source-code in nRF SDK. This book can act as a dictionary for you to understand what those terms mean. Another book is “Getting Started with Bluetooth Low Energy: Tools And Techniques For Low-Power Networking” by Kevin Townsend. The content is more relevant to Nordic microcontroller chip product.
This section shows how to setup a tool for sniffing of Bluetooth protocol and learn about the Bluetooth devices through reverse engineering of the Bluetooth protocol.
Inside contains the *.hex file for the nRF Bluetooth board. This file is a firmware to program the hardware board and turns it into a Bluetooth sniffer tools for sniffing Bluetooth communication.
It also contain some script program plugin for Wireshark software to work seamlessly with the nRF sniffer hardware. The files is all inside the folder “extcap” to be copy later into wireshark folder.
Turn nRF52 DK into a Bluetooth Sniffer board
The board I am using is nRF52 DK board. So prepare the hex file “sniffer_pca10056_xxxxxxx.hex”. Connect the board to the computer.
Once you are in the Programmer program, (top left corner) select the device that shows “PCA10040”. This the board model of the nRF52 DK board that we are using.
You should see success message in the Log messages below the application. After a few seconds, the connection will be ready, and you will notice that the <Read> button on the right column of the application is enabled.
Now click on the button that says “Add HEX file”. Browse and select the correct hex file for this PCA10040 board.
Once you choose the hex file, you will be back onto the main window. The file memory layout display will be refresh with a orange block. The button for the <Erase & write> will be enabled too. Click this button to program the PCA10040 board with this sniffer firmware.
The <Read> button will be grayed off during this firmware programming period. When the firmware finish flashing, you will also notice the button is enabled back.
Now your board has become a Bluetooth data sniffer.
After installation, go to the menu -> Help ->About Wireshark. Go to the tab Folders. Double click on the link next to the name Personal Extcap path. This will open up the folder from your Window explorer.
From the files that you have downloaded earlier, copy all the files from the folder “extcap” onto this new directory from Wireshark program.
Press Ctrl+Esc and type in “cmd” from the search field. You will the Command Prompt app appear on the menu. Right click it and click on the “Run as administrator“. This is important to give administrator right when you key in the command in the following section.
Go to the directory “extcap”. Key in the following command in the command prompt.
pip3 install -r requirements.txt
Once installed, key in the following command to check if the installation is correct and is working.
nrf_sniffer_ble.bat --extcap-interfaces
C:\Program Files\Wireshark\extcap>nrf_sniffer_ble.bat --extcap-interfaces

extcap {version=3.0.0}{display=nRF Sniffer for Bluetooth LE}{help=https://www.nordicsemi.com/Software-and-Tools/Development-Tools/nRF-Sniffer-for-Bluetooth-LE}
interface {value=COM16}{display=nRF Sniffer for Bluetooth LE COM16}
control {number=0}{type=selector}{display=Device}{tooltip=Device list}
control {number=1}{type=string}{display=Passkey / OOB key}{tooltip=6 digit temporary key or 16 byte Out-of-band (OOB) key in hexadecimal starting with '0x', big endian format. If the entered key is shorter than 16 bytes, it will be zero-padded in front'}{validation=\b^(([0-9]{6})|(0x[0-9a-fA-F]{1,32}))$\b}
control {number=2}{type=string}{display=Adv Hop}{default=37,38,39}{tooltip=Advertising channel hop sequence. Change the order in which the siffer switches advertising channels. Valid channels are 37, 38 and 39 separated by comma.}{validation=^\s*((37|38|39)\s*,\s*){0,2}(37|38|39){1}\s*$}{required=true}
control {number=3}{type=button}{role=help}{display=Help}{tooltip=Access user guide (launches browser)}
control {number=4}{type=button}{role=restore}{display=Defaults}{tooltip=Resets the user interface and clears the log file}
control {number=5}{type=button}{role=logger}{display=Log}{tooltip=Log per interface}
value {control=0}{value= }{display=All advertising devices}{default=true}
Enable the nRF Sniffer capture tool in Wireshark
Refresh the interfaces in Wireshark, go to Capture -> Refresh Interfaces (or pressing F5). You should see that nRF Sniffer is displayed as one of the interfaces on the start page.
Go to Capture -> Options, to untick other communication interface that is not relating to the Bluetooth. We only want to see communication data from Bluetooth. If all interfaces are enabled, the data captured will be massive and difficult to find Bluetooth data.
Select View -> Interface Toolbars > nRF Sniffer for Bluetooth LE, to enable the sniffer interface menu bar to appear below the file menu in the Wireshark program.
Adding Wireshark profile
Go to Help -> About Wireshark. Select the Folders tab. Go to the link Personal configuration, and double click on the link to open up the folder. There is this profile folder. Open up this profile folder.
Copy the folder “…\Profile_nRF_Sniffer_Bluetooth_LE\” to this into this profile folder. Your directory path should look like the following, “C:\Users\xxx\AppData\Roaming\Wireshark\profiles\Profile_nRF_Sniffer_Bluetooth_LE\“
Go to the menu select Edit > Configuration Profiles. Select the new “Profile_nRF_Sniffer_Bluetooth_LE” profile. This is the configuration of how the data display is setup for easy viewing.
Start Sniffing
Press Ctrl+E or go to menu Capture -> Start to start capturing the Bluetooth packets. You can select the exact Bluetooth device that you want to listen/sniff.
I have two nRF52840-DK boards, with one programmed as a Peripheral which advertise (broadcast), and another one programmed as a Central to do scanning (searching).
Blinky Central (examples->ble_central->ble_app_blinky_c)
To keep learning simple, we evaluate step by step. We switch off the Blinky Central module.
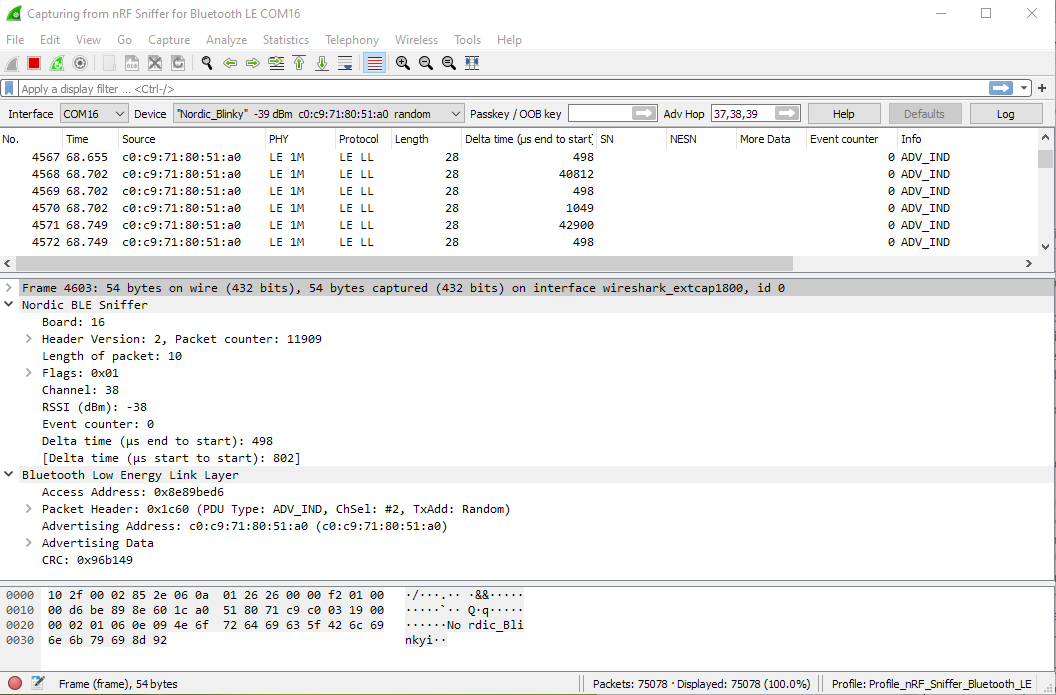
Advertising Packet Transmitted from Blinky
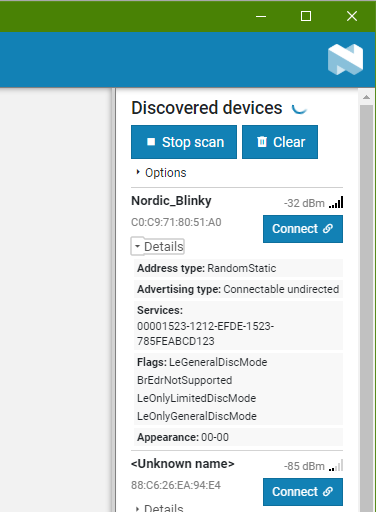
Blinky being a peripheral will boardcast advertising packet to allow other Bluetooth device to locate it. We will study what is inside an advertise packet of this peripheral from Nordic Bluetooth Blinky example.
Packet captured from the Blinky Peripheral
The period of blinky sending advertising packet is about 1msec
From this packet, I can see two part of data. One is from the sniffer itself, displaying the channel that it is sniffing, the RSSI (signal strength).
The other is the BLE Link Layer data sent from the peripheral displaying the address, and its peripheral device name.
Received Signal Strength Indicator RSSI: -17dBm (Very Good Signal Strength) RSSI: -35dBm (Good) RSSI: -50dBm (Ok) RSSI: -70dBm (Poor)
The delta time (end to start): 498us is the time delay of the end of the previous data packet to the start of the current packet. It is the idling time between packet data transmission.
The delta time (start to start): 802us is the time delay of the start of the previous data packet to the start of the current packet. It is the time period of the transmission. (transmission frequency of the packet)
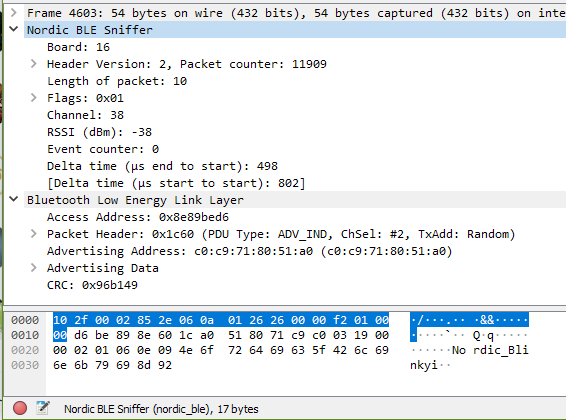
Packet Information from the Sniffer
Is probably added information from the sniffer itself. It tells us about the information of the packet. Eg. Timing, RSSI, packet counting, data direction, transmitting channel, etc…
PDU Type: ADV_IND means Undirected Advertising. To broadcast itself to a Bluetooth Central device for a connection.
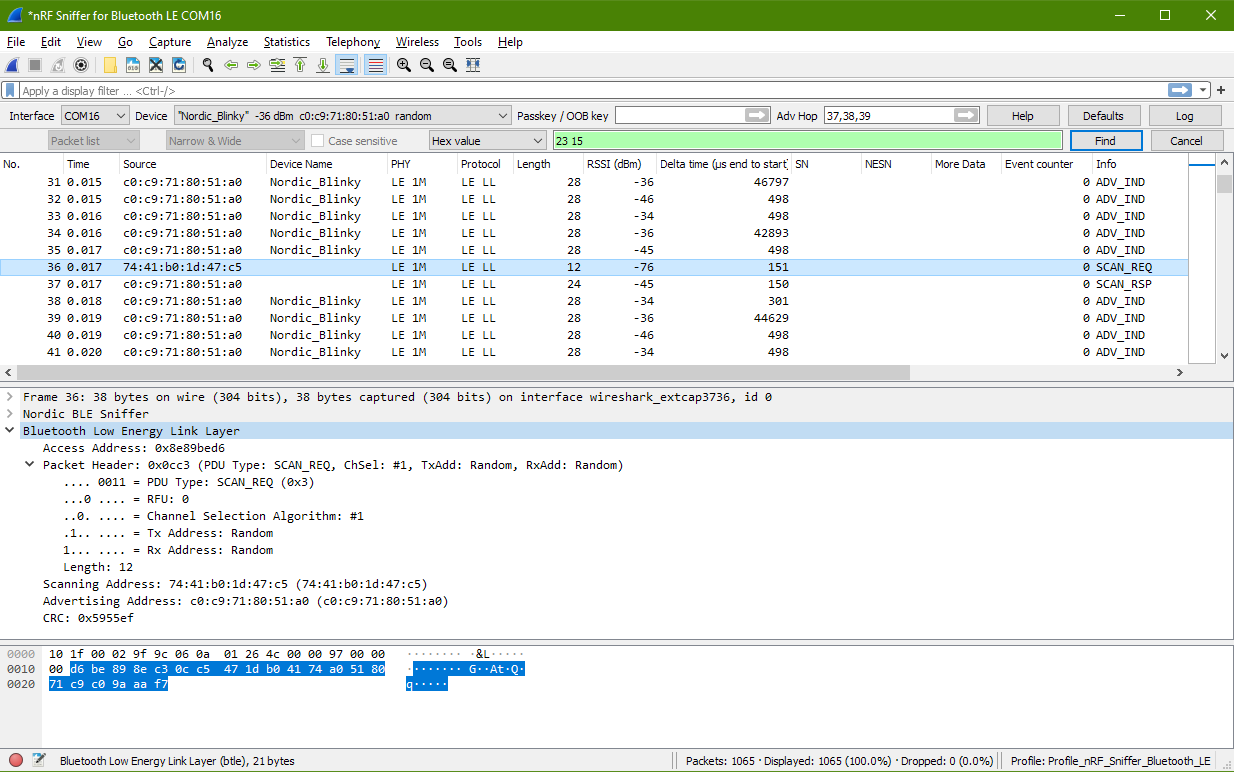
Scan Response Detected from Blinky
After looking at the the advertising packet from Blinky, I also notice Blinky transmitting out another packet.
Scan Request Packet to Blinky Peripheral
From the packet no. 37, I can see that Blinkly is transmitting a packet. Looking at the end of the “Info” column, I see SCAN_RSP. This is a scan response from Blinky
Looking at a packet before this packet, I can see packet no.36 (source=74:41b0:1d:47:c5) sending out a SCAN_REQ scan request packet. It is other Bluetooth device sending a scan request to Blinky. You can see from the RSSI of -76dBm that this device is quite a distance away from my Blinky device.
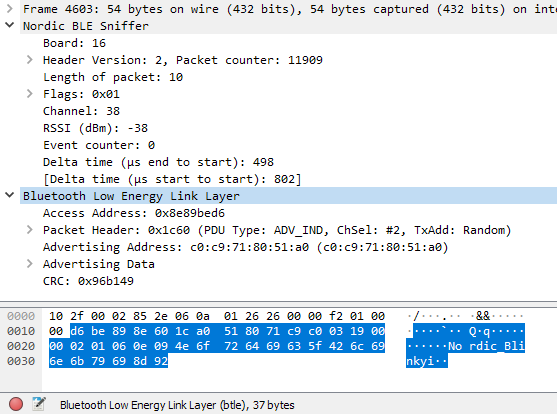
As the front data are from Nordic BLE Sniffer, we will skip that and proceed to look at only the data from the Bluetooth Low Energy Link Layer only.
The Access Address (AA) is the same as the previous evaluation that we did. After some research, it is found that this Access Address is standardise to 0x8E89BED6. It is a preamble signal to identify the radio communication on the physical link.
Now going back to look at the Scan Response packet.
d6 be 89 8e 44 18 a0 51 80 71 c9 c0 11 07 23 d1
bc ea 5f 78 23 15 de ef 12 12 23 15 00 00 2a 92
d0


d6 be 89 8e | Access Address: 0x8e89bed6

44 18       | Packet Header: PDU Type: SCAN_RSP
              44 |
                 | b7 Reserved: False
                 | b6 Tx Address: Random (1)
                 | b5 Channel Selection Algorithm: #1 (0)
                 | b4 RFU: 0
                 | b3-b0 PDU Type: SCAN_RSP (0b0100)
              18 | Length: 24 (Advertising Address (6bytes) + Scan Response Data (18bytes))

a0 51 80 71 c9 c0 | Advertising Address: C0:C9:71:80:51:A0

11 07 23 d1 bc ea 5f 78 23 15 de ef 12 12 23 15 00 00
                  | Scan Response Data (advertising data)
                    11 | Length: 17
                    07 | Type: 128-bit Service Class UUIDs (0x07)
                    23 d1 bc ea 5f 78 23 15 de ef 12 12 23 15 00 00
                       | Custom UUID: 00001523-1212-efde-1523-785feabcd123

2a 92 d0          | CRC: 0x54490b
The scan response returns the data type 128-bit Service Class. This is the long form UUID 00001523-1212-efde-1523-785feabcd123, which identify the service provided by this Bluetooth peripheral.
How CRC is computed?
CRC is 0x54490b base on the hex data of 2a 92 do
Probing a Connection to Blinky
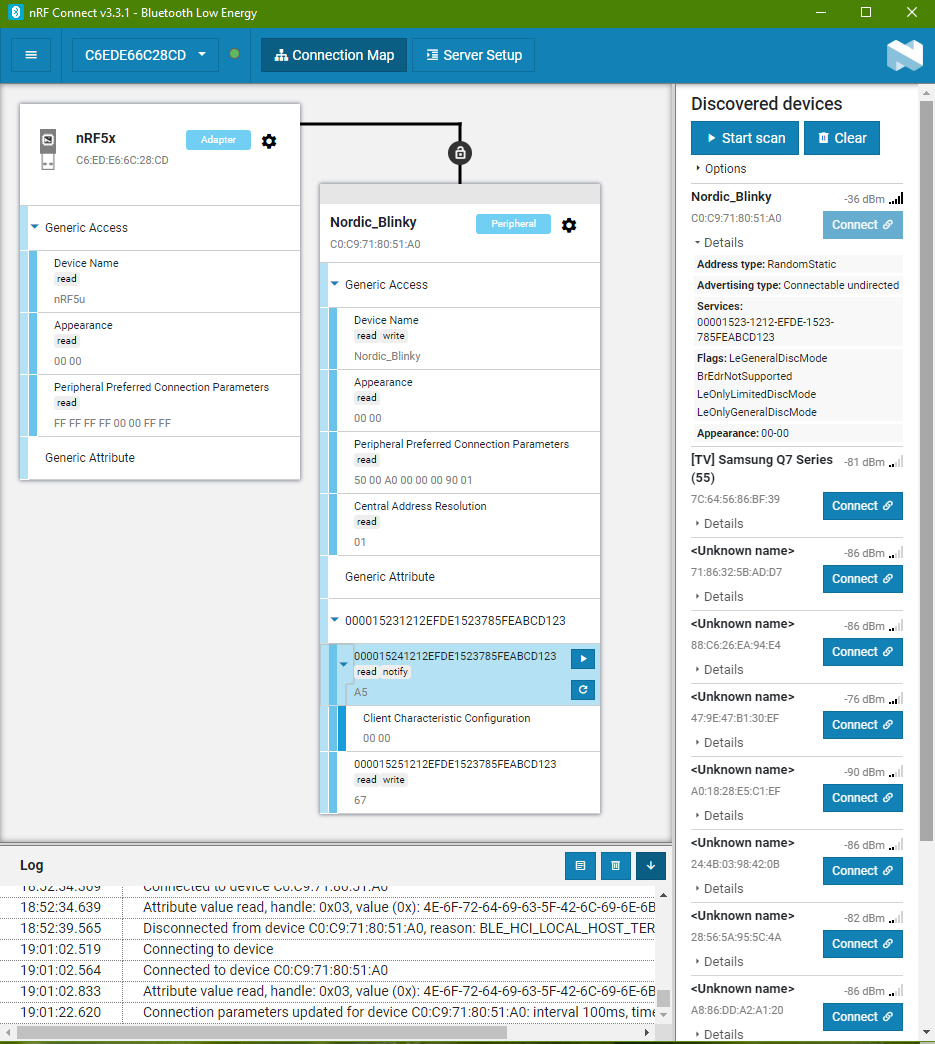
The following uses nRF Connect to connect to the Blinky board.
Connected to Blinky
This screen shot shows what data will be read to this nRF software when the Blinky gets connected.
This data will be verified with the data communication after the module is connected. We will dive into the data packet details later. We should be able to see all the data as reflected in this nRF Bluetooth app.
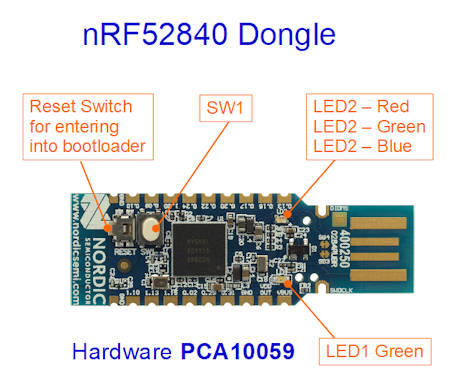
The nRF software uses nRF52 Dongle as the bluetooth device to scan for Blinky device. The nRF52 Dongle MAC address is C6:ED:E6:6C:28:CD
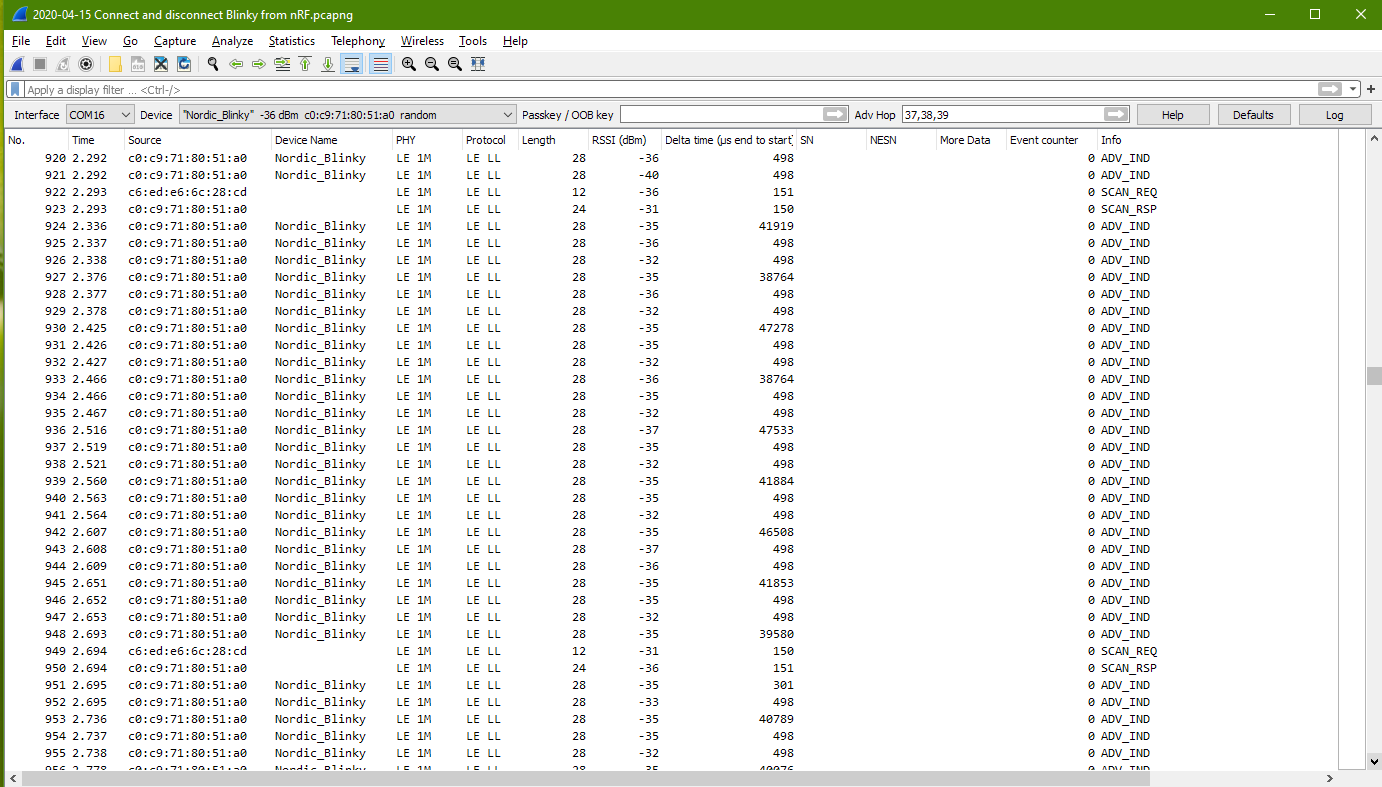
Packet Capture to show nRF scanning for Blinky board.
This packets shows Blinky sending advertise packets to broadcast to other bluetooth. It also shows that the nRF software is sending out scan request to check out the blinky device which was advertising itself frequently. The scan request message from nRF to the Blinky is observed to be about 400ms apart. About 2 scan request message per second.
Blinky responsed to the scan request sending back more detail about itself.
Packet Capture to show nRF scan request connection to Blinky
The nRF apps get to connect with Blinky about 135ms after its scan request.
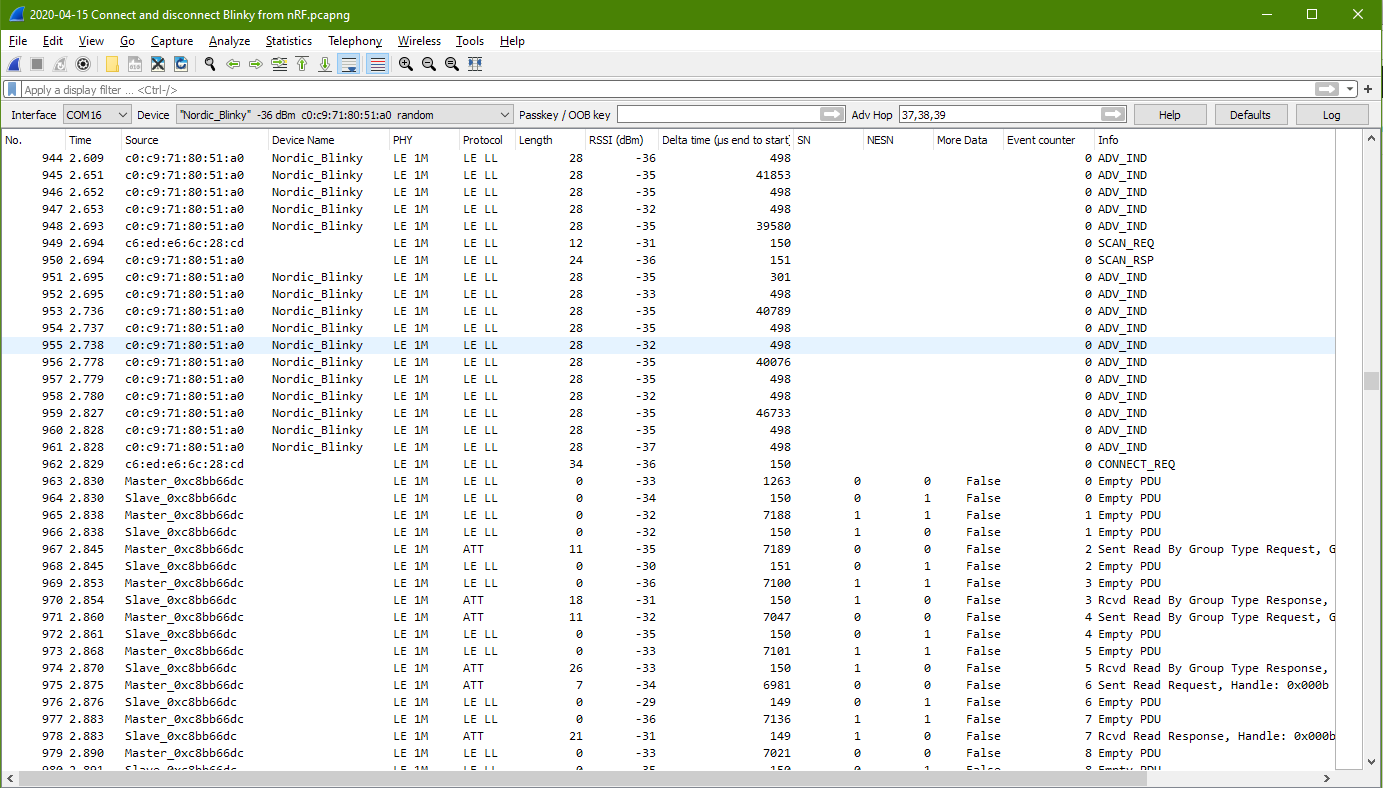
This connection started at packet no. 962, with the nRF Connect connects to the Blinky.
After the connection, the source and destination MAC address seems to be no longer appear.
There will be no more advertising from the Blinky.
Communication is only between nRF apps (Master) and the Blinky (Slave). Period of communication is about 5-10msec.
PDU is no longer indicated after the connection. PDU is for higher level BLE device discovery and connection process. Type of PDU available – ADV_IND – ADV_DIRECT_IND – ADV_NONCONN_IND – SCAN_REQ – SCAN_RSP – CONNECT_REQ – ADV_SCAN_IND
Packet Capture to show nRF disconnect from Blinky
When nRF apps disconnect from the Blinky, the Control Opcode: LL_TERMINATE_IND can be observed. Slave response, and shortly after return to its disconnected state and begin to advertise again. Advertise period is about 10msec.
Service Discovery packets after connected
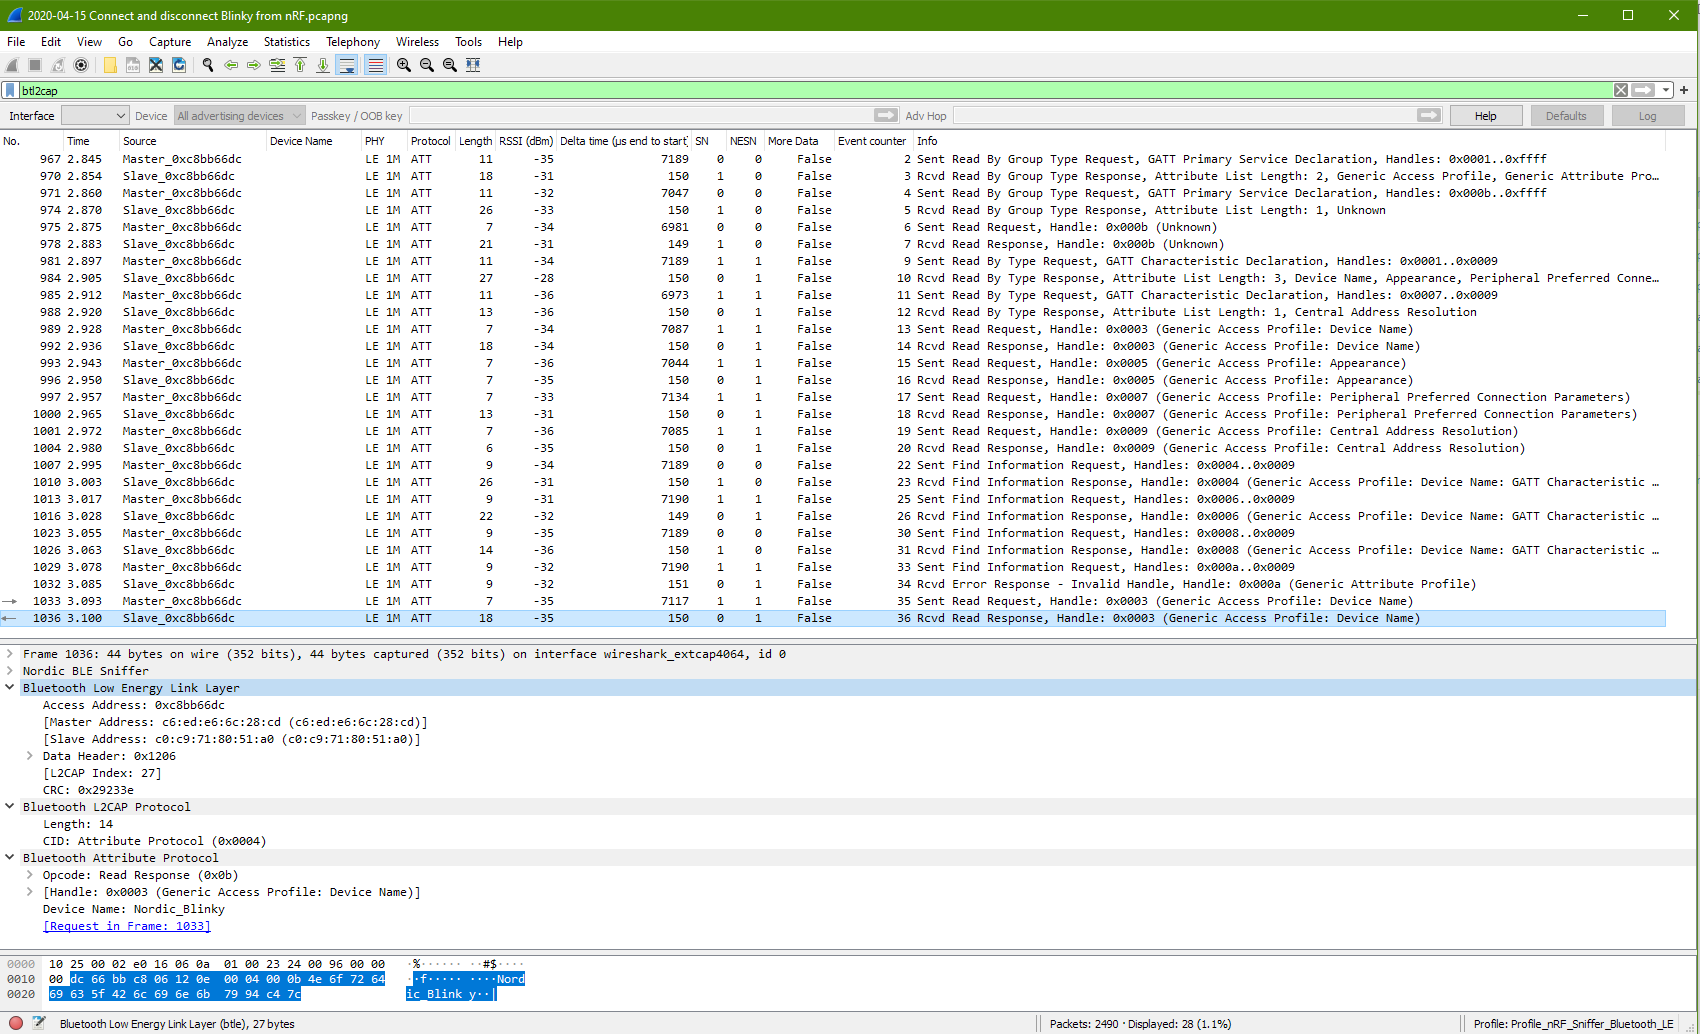
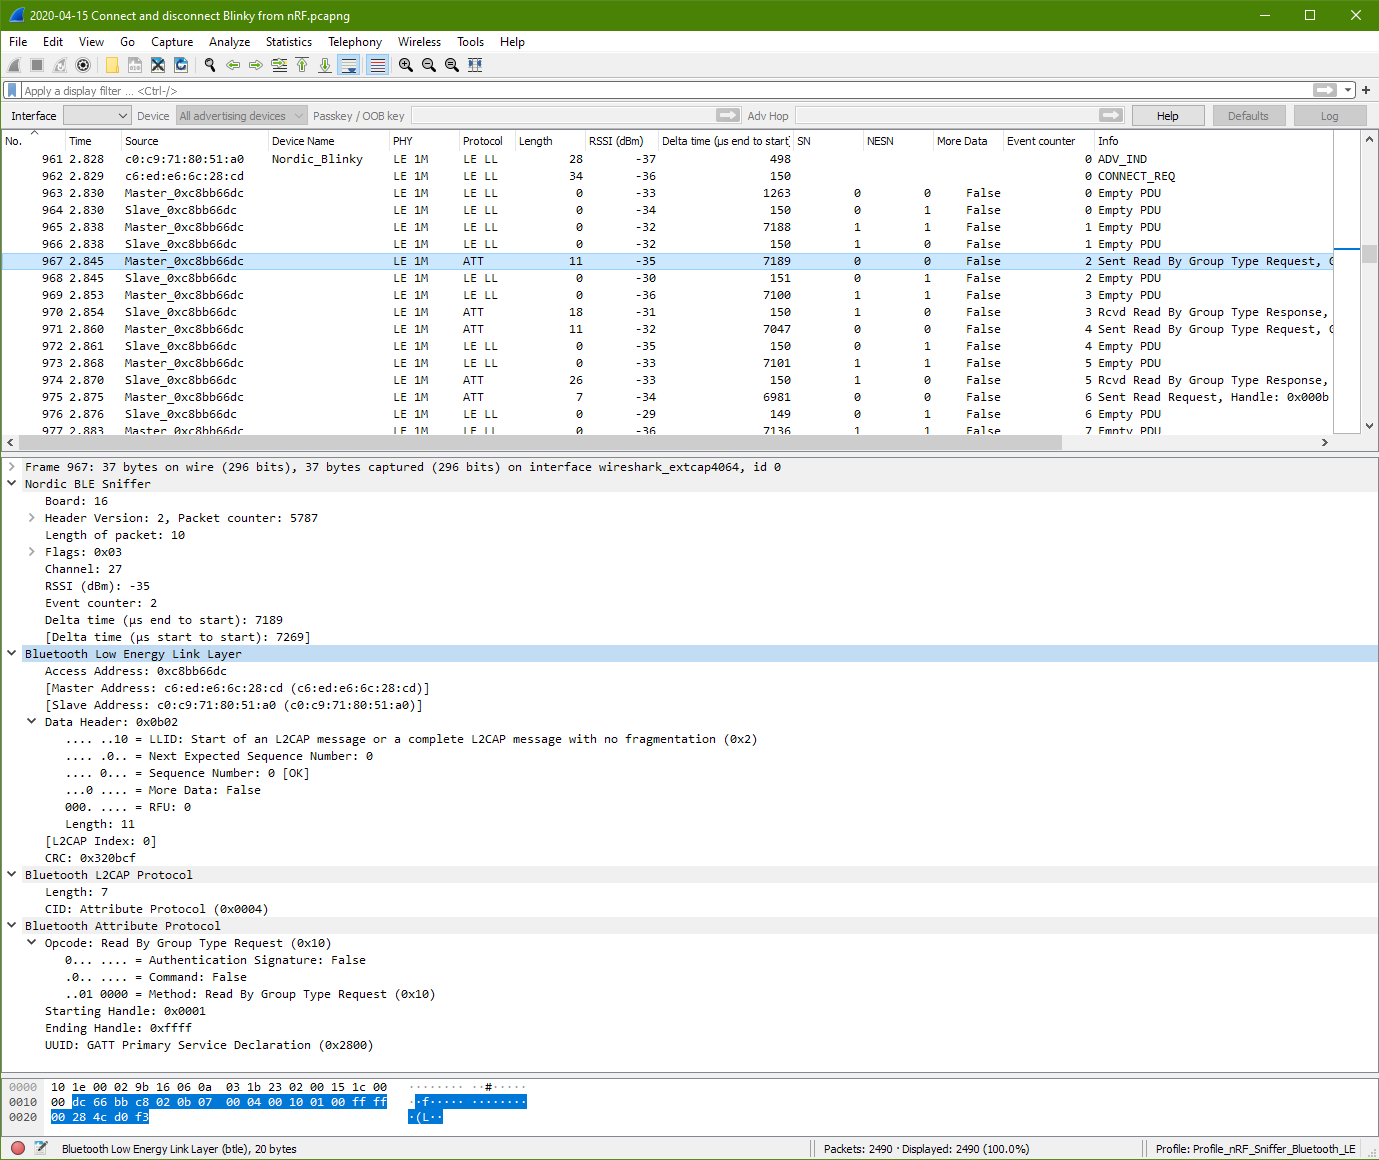
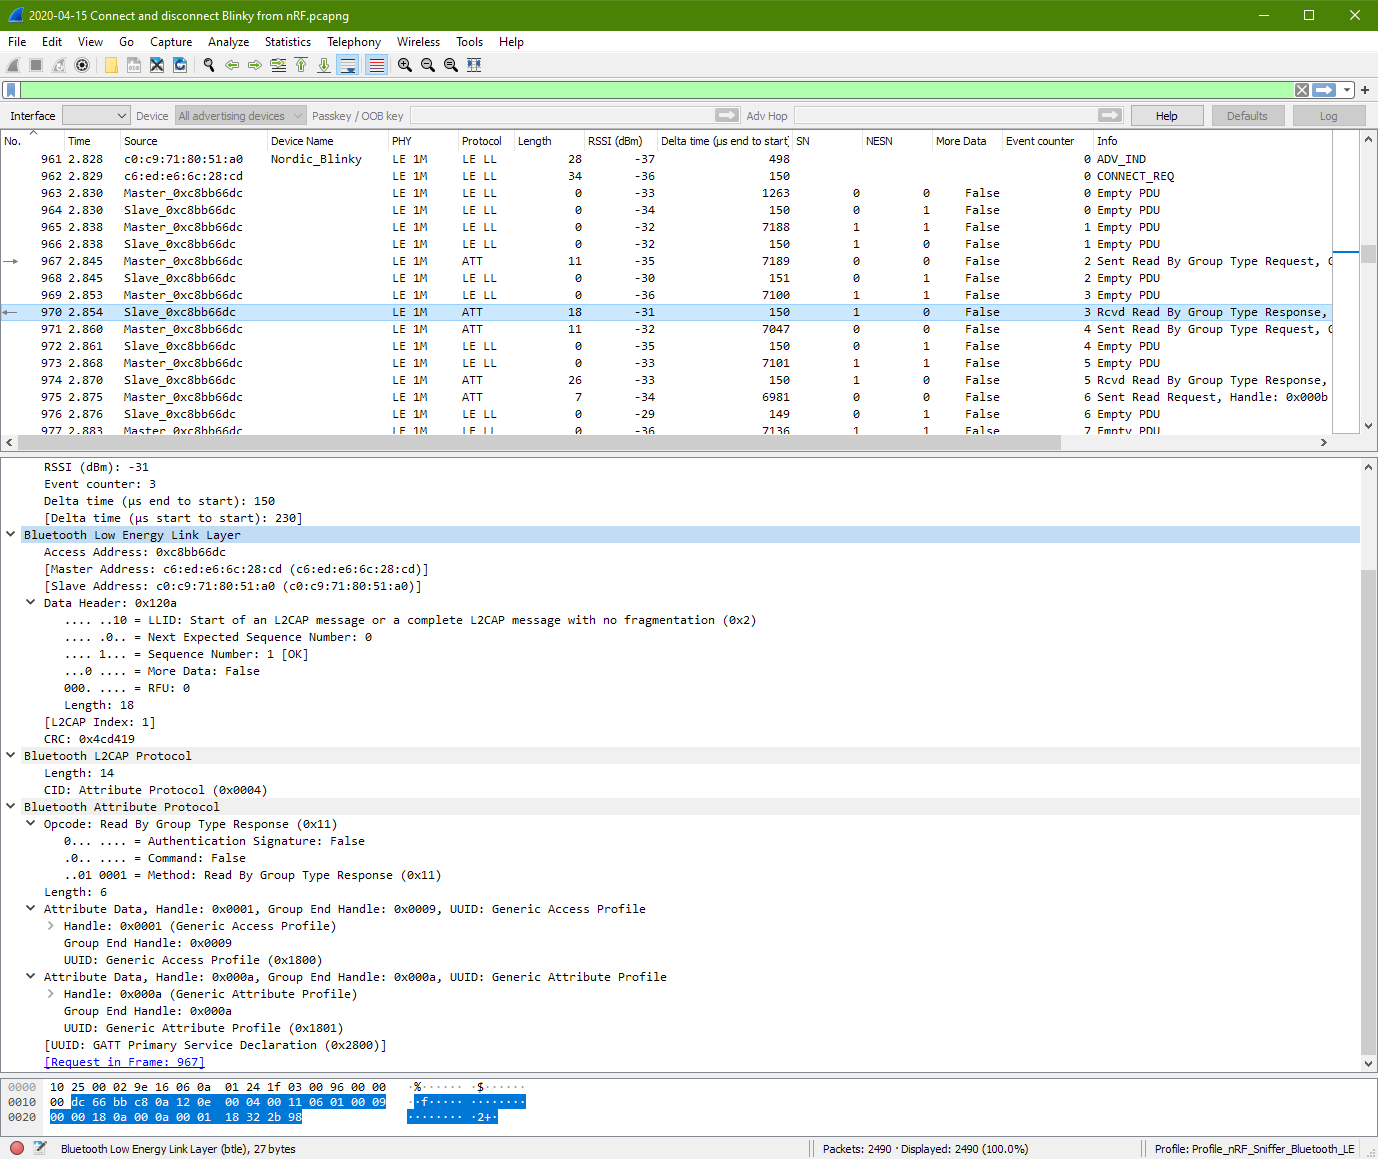
Shortly after the Blinky gets a request to be connected at packet 962, the GATT discovery starts popping out from packet 967 (time 2.845sec) to packet 1036 (time 3.100sec)
Packet 967 from master has a starting handle of 0x0001 to 0xffff, seems to be master asking for services that within these range from the slave.
Packet 970 from slave response with 2 services. One at handle 0x0001, the other at handle 0x000a.
Packet 971 packet from master is almost the same as packet 967. Only the starting handle is different thsi time. It is at 0x000b. This is perhaps master is probing from the slave whether if there are more services from the handle range 0x000b to 0xffff.
The slave response at packet 974 with a handle at 0x000b (which is unknown) with a UUID of 23d1bcea5f782315deef121223150000.
Handle 0x000b eventually stop at packet 978.
The master send a packet no. 981 for a range from starting handle: 0x0001 to 0x0009. Seems that the master understand the messages from slave and starts to adjust its range. It is note that this master has change its read request from “Read By Group Type Request” to “Read By Type Request”.
At packet no. 984, the slave returns even more information. Information about the Generic Access service block.
The master continue to probe at packet 985. Slave packet 988 returns the remain information from the Generic Access service block.
Packet no. 989 to 1004 is master probing deeper (Read Request) from the Generic Access service for more detailed information.
The master starts from “Read By Group Request” (packet 967 to 974) to “Read by Type Request” (packet 981 to 988), and finally “Read Request” (packet 989 to 1004).
These are the GAP profile from what I can see on the Wireshark screen.
Then the master process to Find Information from packet 1007 to 1029. These are the GATT characteristic as displayed.
The last 2 packets (packet 1033, 1036) are Read Request from GAP Profile’s Device Name.
Summary of the connection.
The connection happens at packet no. 962 (time: 2.829sec), and ends at packet no. 2350 (time: 8.027sec).
Within the connection period from packet no. 962 to 2350, the GATT protocol appear. GATT communication (ATT L2CAP protocol) start on packet no. 967 (2.845sec) and ends at packet no. 1036 (3.1sec).
The GATT packets are filtered out from Wireshark. It is noted that it took a total of 28 packets (ATT L2CAP protocol), to complete exposing Blinky’s GATT services to the master device.
Average RSSI maintain good at around –35dBm.
Generic Access Service information can be detected at packet no. 970
Generic Attribute Service information can be detected at packet no. 970
Going through the connected packets one at a time.
We are more or less familiar with how data are presented in the bytes level. We will now focus more on the data information instead of the bytes level.
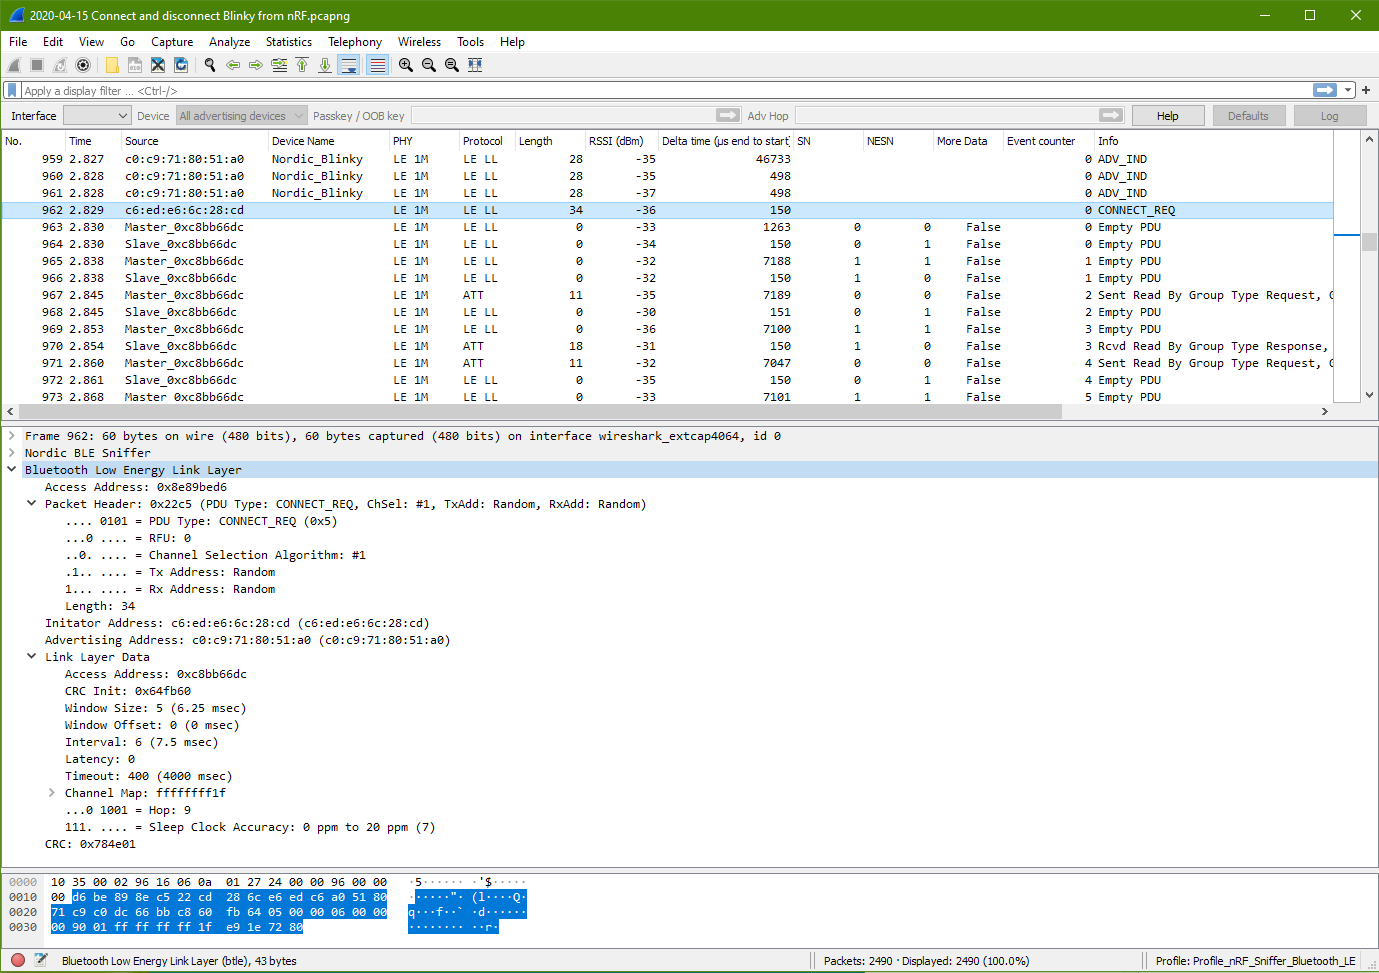
Connect Request Packet
This packet data and the usual data structure to take note. The Bluetooth Low Energy Link Layer packet is always consist of size part.
Bluetooth Low Energy Link Layer
Access Address (preamble data)
Packet Header (what this packet is about)
Initator Address (who request the connection)
Advertising Address (the peripheral device to accept this connection)
Link Layer Data (the data)
CRC (data integrity checking)
Access Address: 0x8e89bed6 (the usual fixed preamble data at the beginning of the BLE data packet)
Packet Header
PDU Type: Connect_REQ (0x5) Data Length: 34 (address + link layer data)
Initator Address: c6:ed:e6:6c:28:cd
Advertising Address: c0:c9:71:80:51:a0
Link Layer Data
An new Access Address is assigned as 0xc8bb66dc CRC Init: 0x64fb60 Window Size: 5 (6.25msec) Window Offset: 0 (0msec) Interval: 6 (7.5msec) Latency: 0 Timeout: 400 (4000msec) Channel Map: ff ff ff ff 1f (default RF Ch 0, 12, 39 for advertising) Hop: 9 Sleep Clock Accuracy: 0 to 20ppm (7)
CRC: 0x784e01
Hop: 9 means to hop 9 channel away from the current channel. New channel = (curr_channel + hop) mod 37
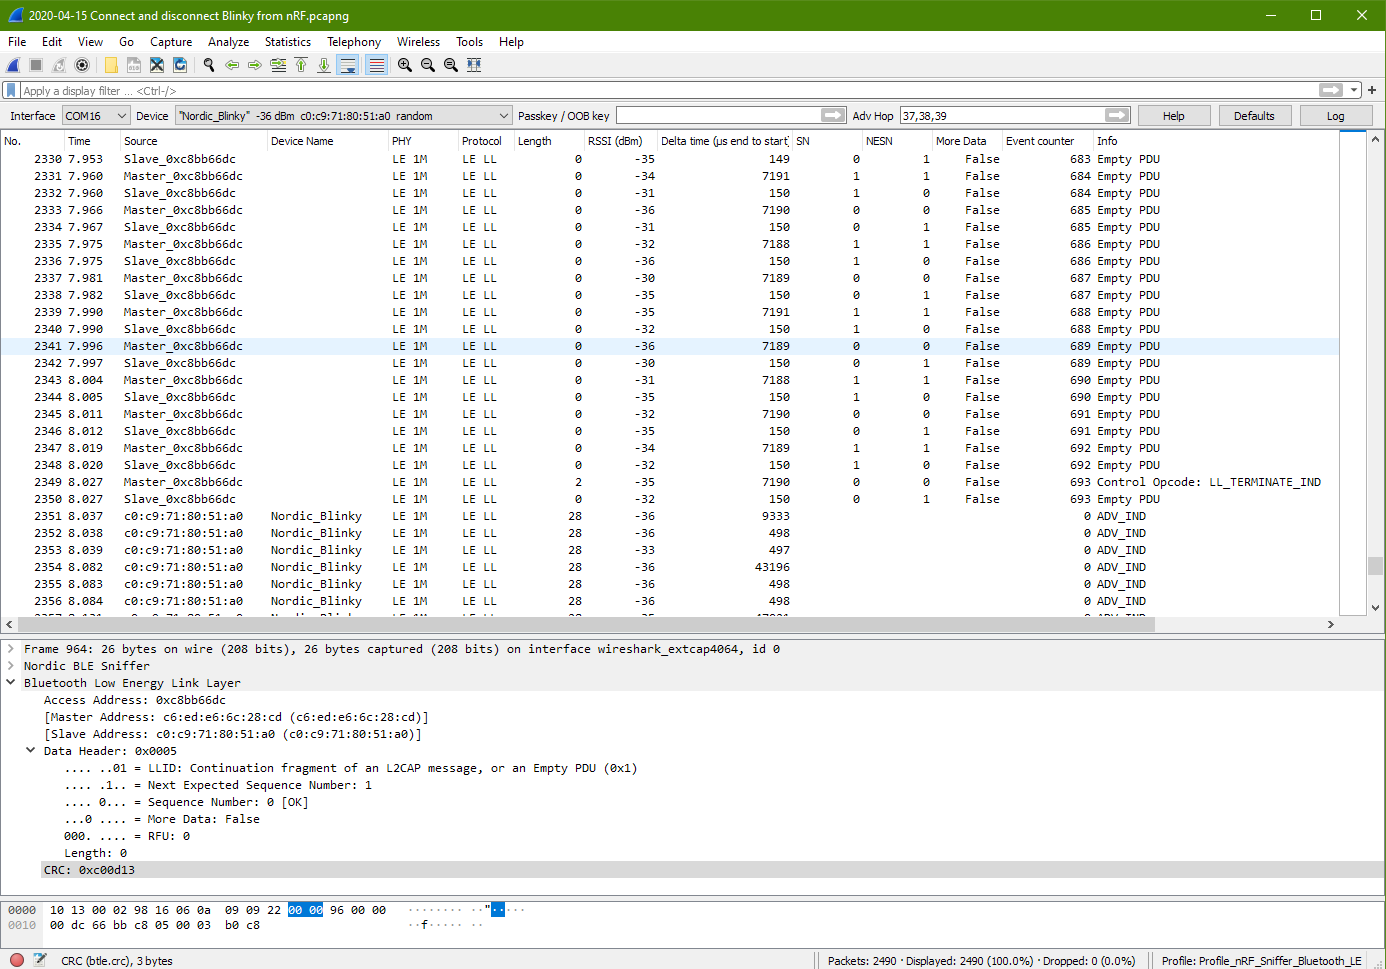
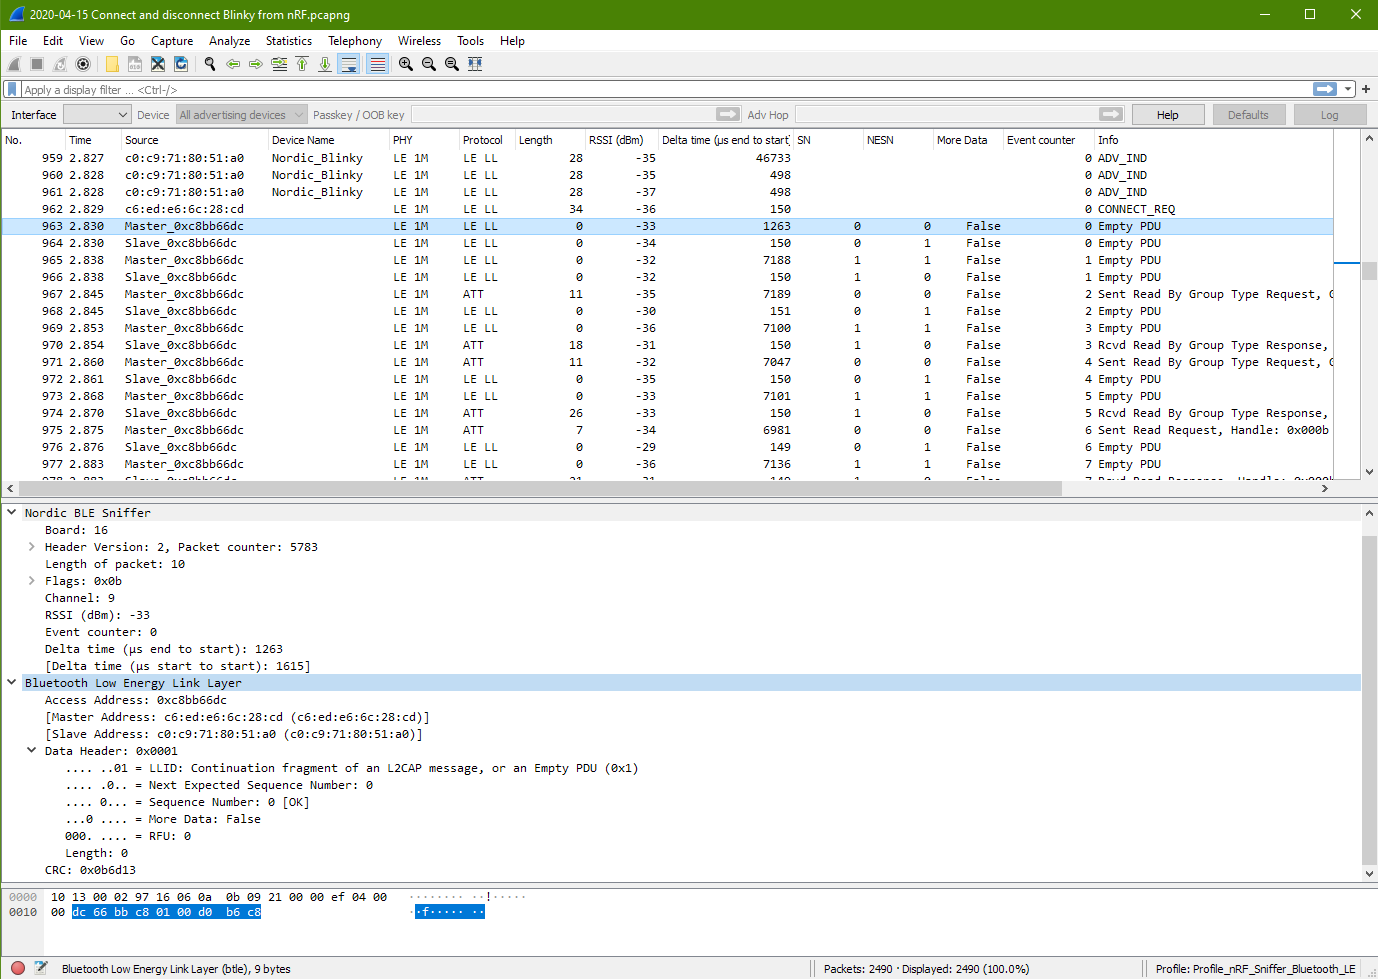
Connected (Master packet 963)
10 13 00 02 97 16 06 0a 0b 09 21 00 00 ef 04 00
00 dc 66 bb c8 01 00 d0 b6 c8

10 13 00 02 97 16 06 0a 0b 09 21 00 00 ef 04 00 00 | Nordic BLE Sniffer

dc 66 bb c8 01 00 d0 b6 c8 | Bluetooth Low Energy Link Layer
It is noted that the communication Channel is 9. The previous channel during the advertising and connection packet was at Ch 39. This current channel 9 could be the result of the channel hopping.
Access Address: 0xc8bb66dc The access address is different from the previous one. This same access address is used through out the connection period.
It is noted that the Master & Slave Address being keep tracked. However the address is no where to be found in the packet. This means that the addresses should be tracked by the Wireshark program, probably through the Access Address 0xc8bb66dc
There is only the data header with no data. The data header format has changed. It is different from the format before the connection. – LLID: L2CAP message – Next Expected Sequence Number: 0 – Sequence Number: 0 [OK] – More Data: False – RFU: 0 – Length: 0
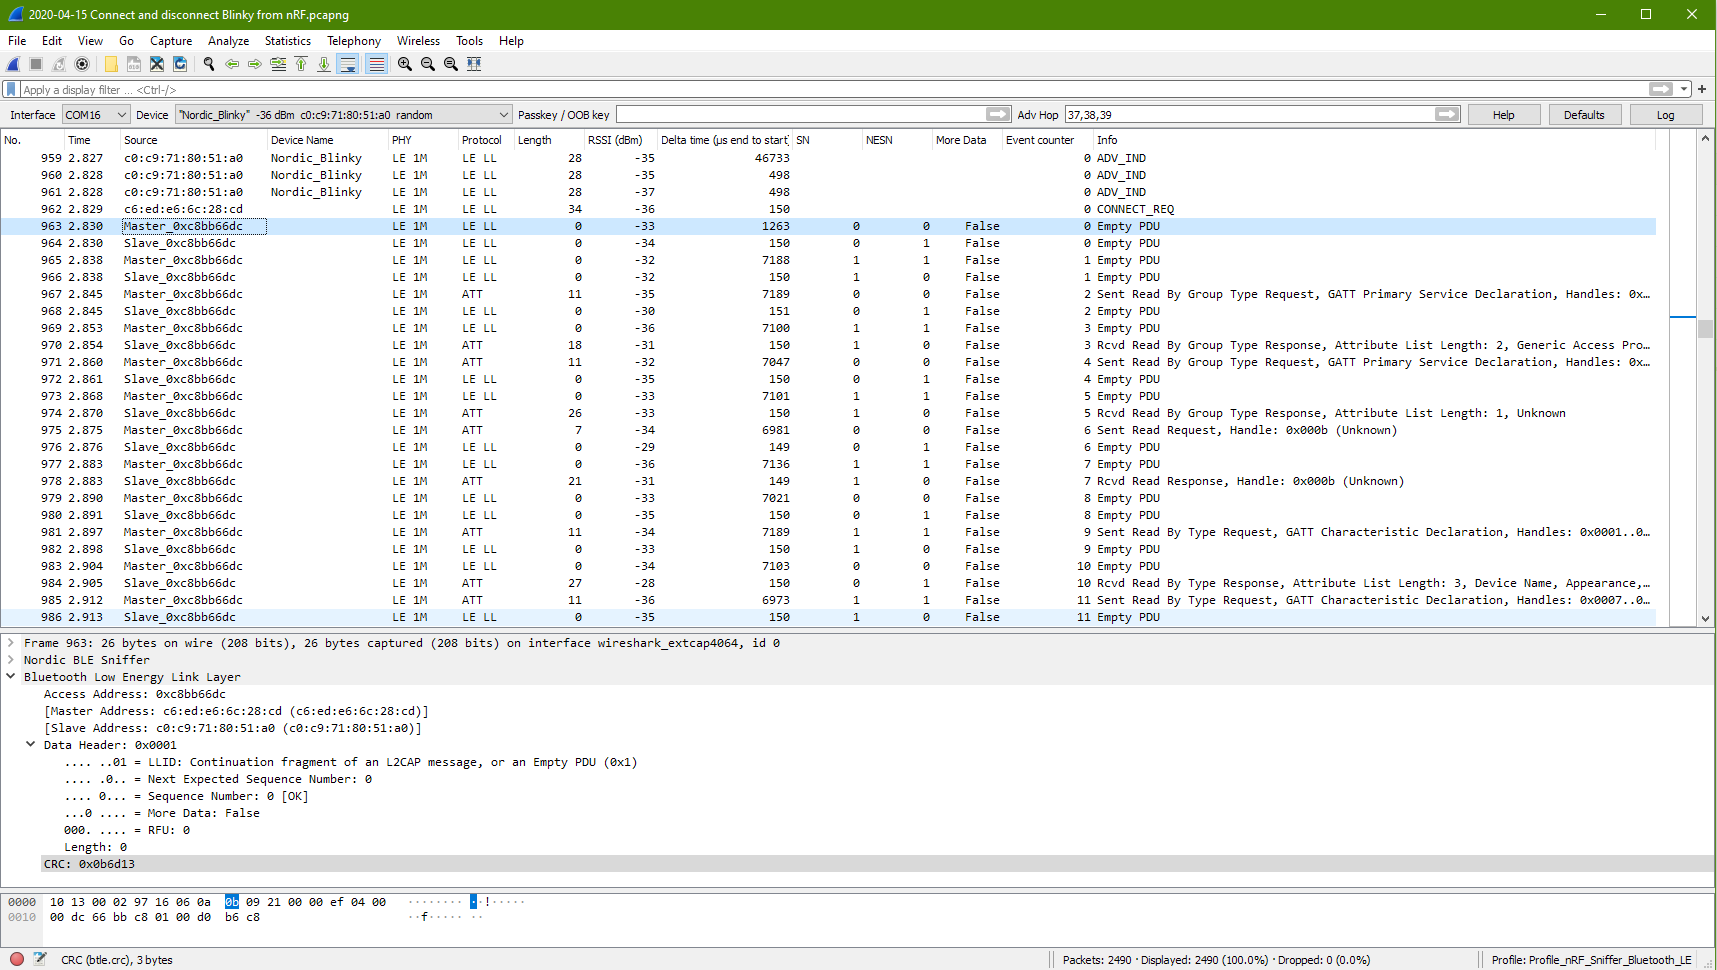
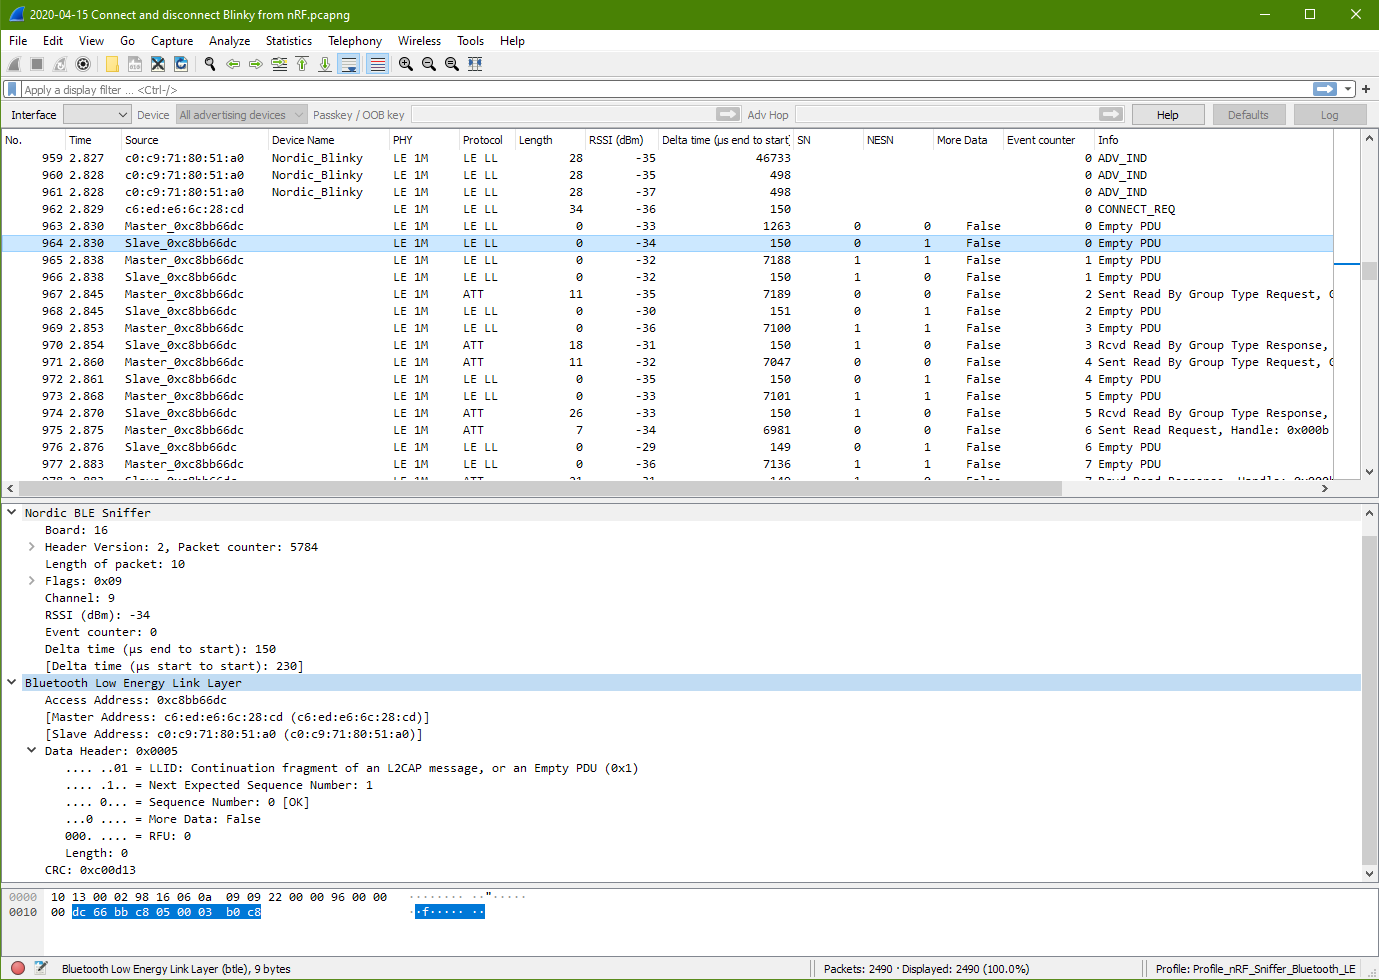
Connected (Slave packet 964)
This slave packet looks very similar from the master packet. The Access Address is the same. The next expected sequence number is 1.
It is observed that both the Next Expected Sequence Number and the Sequence Number keep rotating in sequence 00 01 11 10 ….. It is a sequence number using 2 bits.
More Data could mean if there are more following packets coming which is related to this current packet.
It is also observed that for every pair of master/slave packet, the channel hop by 9 ch. Ch9, 18, 27, 36, 8, 17, 26, 35, 7, ……. The channel keep hopping. There is also an event counter on the sniffer which will increment for each pair of master/s;ave communication.
The delta delay between the Master and Slave pair is about 150us gap, 230us packet period.
The delta delay between the Slave and Master of the next pair is about 7190us gap, 7270us packet period.
This packet seems to be sending a command to start the GATT.
The slave seems to reply nothing (packet 968) like the previous slave response. Seems more like an acknowledge purpose to the master device.
This is followed by Master sending nothing (Master packet 969).
It is noted that packet 968 and 969 doing nothing is labelled as the LE LL protocol (Low Energy Link Layer).
The attribute data packet 967 and 970 are labelled as ATT L2CAP (Logical link control and adaptation protocol).
First Attribute Response Protocol (Slave packet 970)
This is noted in the sniffer wireshark that this packet 970 is the response that is requested from packet 967 (GATT Service request 0x2800). The tools is keeping track of the messages.
More data can be seen by this slave response. The slave is returning 2 groups of attribute data.
UUID: Generic Access Profile (0x1800)
Handle ID (0x0001)
End Handle ID (0x0009)
UUID: Generic Attribute Profile (0x1801)
Handle ID (0x000a)
End Handle ID (0x000a)
Other observation on the bluetooth communication
In this observation on the bluetooth pad lock, it was noted that during the CONNECT_REQ, the Channel Map turns out to be FF FF FF 07 00. This is very different from the previous observation which is FF FF FF FF 1F. In the previous observation, all the channels are active except for the advertising channel 37, 38, 39.
Base on this difference and some research from online, I would assume that the purpose of this Channel Map is probably to map out the available channel for use. In the previous observation, except for the 3x advertising channel, all the channels are available for use. So it means that in this new observation channel 27 to 36 (or RF Channel 29 to 38) may not be available for use. Let’s looking into the other packet to see if this understanding is true.
Note that RF channel is the physical radio frequency channel. The RF channel for advertising is RF Channel 0, 12, 39. The corresponding Channel number for these 3 advertising channel is data digitally represented in decimal as 37, 38, 39. Please take note of the difference…..
The Hop number is found to be 5. Meaning that for every pair of data packet communicated, the next channel will increment by 5, to the next channel. This Channel Map should be determine by the CENTRAL device connecting to the PERIPHERAL device. It is probably representing which channel is busy and to be avoided.
The connect request from Master started on channel 37. This is followed by Master communicating at channel 5 on the next packet. The slave responded on channel 5. Next following two packet is channel 10. Next pair is at channel 15. Next is channel 20. Next pair is at channel 25. Then it jump straight into channel 3 fromo Master. Followed by response at channel 3 too by the slave. Then next pair are channel 8, 3, 8, 13, 18, 23, 1, 6, 1, 1, 6, 11, 16, 21, 26, 4, 9, 4, 9, 9, 14, 19, 24, 2, 7, 2, 7, 12, 17, 22, 0, 5, 0, 5, 10, 15, 20, 25, etc… (from packet<1194> to packet<1282>)
It is note that the channel can sometimes go backward, sometimes remains the same. For this observation, it is always on the lower channels. Could be be that there are data corruption and there is a need from the master to repeat using the channel? How did the slave knows that the master has switch backward to the previous communicating channel?
One thing noted is that there isn’t channel 27 to 36 appearing. Which proves the purpose of the channel map. It determines which channel can be used for the communication, and communicated to the slave device during the connection request. From channel 23 to channel 1, is exactly 5 hops away from the next available channels. Those not available is not counted in the hopping.
One possible explanation that I can imagine could be that the receiver board may not have acknowledge or captured the packet, prompting the sender to do a resend on the same channel or even move backward to the previous channel.
Wireshark Filter Operator for digging out the data.
You can select a variable for the filter by right clicking the variable and click on -> Apply as Filter -> Selected (to pick them up) or Not Selected (to hide them)
Start scan on the program to search for the Bluetooth device named “Nordic_Blinky”. Connect to it.
Browse through the services, there is one that starts with 00001523xxxxx… Under this service, there is a attribute ID starting with 00001525xxxx… This is the input that acts like a switch on the actual board. Change the number in this field to 00 or 01 and see the LED 3 lights up on the nRF52840-DK server board. Under this service, there is also an attribute ID 00001524. Here there is a play button. Click on the play button to receive notification from the server board. When the button 1 is pressed on the server board, you should see that this value will change according to the physical button pressed.
The whole experiment is similar to the BLE Blinky Client Application board.
Program one of the board to view the frequency spectrum. When you select the board inside the RSSI Viewer, it will assist you to flash in the RSSI Viewer firmware.
Setup RF Transmitter Board
On another board, load in the firmware for the example Hardware peripheral examples – > Radio Test Example
This can be found from the SDK directory F:\…..\nRF5 (SDK)\examples\peripheral\radio_test\hex
Connect this board to a console.
Key in the command “start_tx_carrier“. This will make the board transmit at a frequency. You should notice that frequency (at channel 0) spike up from the RSSI Viewer on the spectrum analyser board. You can change the frequency to transmit using the command “start_channel” followed by again the command “start_tx_carrier“. Example to change transmitting RF at channel 20.
start_channel 20
start_tx_carrier
You can also change the transmit power using the command “output_power” followed again by the command “start_tx_carrier” to start transmitting at the new power set.
The command “cancel” switch off everything.
The command “parameters_print” display the current settings.
Key in the command “start_tx_sweep“. You will see the frequency sweeping from the left (lower frequency) to the right (higher frequency). You can use the command “time_on_channel” to set a sweep delay (from 1ms to 99ms) to make the sweeping slower. You can also control the channel (frequency) range to sweep using the command “start_channel” and “end_channel“.
Issue with Radio Test example
No idea how to send and receive data for the radio test.
You will need at least two development board to play around with the advertise, scanning for Bluetooth devices, and connection.
The source code and *.hex provided by Nordic are for nRF52840-DK (PCA10056) and nRF52832-DK (PCA10040) boards. In this example, I am using two sets of nRF52840-DK board.
The example used is nRF5 (SDK) -> Examples -> BLE Central and Peripheral -> Experimental -> BLE App Interactive -> PCA10056
The *.hex file can be found from this directory. Source codes are here as well. \…..\nRF5 (sdk)\examples\ble_central_and_peripheral\experimental\ble_app_interactive\pca10056\s140\ses\Output\Release\Exe
Flash both boards with the same firmware.
Playing with the Bluetooth connectivity through console
Once the firmware is flash, the USB connection is also the virtual com port. Connect them to the PC and open the port using a serial console like MobaXterm.
Serial port settings: Baudrate is 115200bps, 8 bits data, 1 stop bit, no parity, no hardware control.
Once connected through com port, you can start to issue commands
Root Commands
advertise - Turn advertising on or off.
bonded_devices - List bonded_devices.
connect -<address/peer_id> Establish a connection with a device.
connected_devices - Display connected devices and security information on each connection.
device_name -<name> Set device name.
devices - List available (advertising) devices.
disconnect -<address> Disconnect from a device.
gatt - GATT Client procedures.
key_reply -<key> Enter passkey displayed by another device (for pairing mode: “Passkey Entry”).
nfc_read -<subcmd> Turn on NFC reader (requires additional hardware) <on/off>.
numeric - Confirm or reject a numerical value (for pairing mode: “Numerical Comparison”).
pair -<subcmd> <address> <option> Initiate pairing with a connected device.
parameters -<subcmd> Change or request new Link Layer or GATT parameters.
privacy - Set privacy settings.
remove_bond -<subcmd> Remove a bonded device.
scan - Turn scanning on or off.
LED Indicators
LED indicators to help us see the state that the Bluetooth is in.
LED 1: Means board is scanning for Bluetooth devices
LED 2: Means board is connected to a BLE Peripheral device.
LED 3: Means board is advertising itself. (boardcast)
LED 4: Means board is connected to a BLE Central device.
You can set the name for the board using the command “device_name“. This name is volatile and not permanent. The name will be gone after a reset. Key in this command to set a name “Board 1” & “Board 2” to differential this two board. eg. “device_name Board 1”
Key in the command “scan on“, you will notice that LED 1 will be lighted up. After this key in the command “devices“, you will get to see a list of nearby Bluetooth devices advertising themselves (broadcasting their ID). The command “devices” will only display the list when the board has its scanning activated.
You will not be able to see the other Bluetooth board that you have because that board has not yet started its advertising.
For the other board, key in the command “advertise on“. You will notice the LED 3 on this board lighted up.
On the first board which is still on the scanning mode, key in the command “devices”. You will get to see a list of Bluetooth devices. This time round you should be able to see the other board, its Bluetooth address ID and its device name.
On the first board, key in the command “connect” follow by the board ID of the other board that I want to connect. When connecting, both board will display messages about the connection. This first board will have LED 2 lighted up, indicating that it is connected to a peripheral board, while the other board has its LED 4 lighted up indicating that it is connected to a central board.
You can check the connected device using the command “connected_devices“
In the process of connection, I tried to make another connection from the Board 1 (central) to Board 2 (peripheral). It is known that a central device can make multiple connection to various peripheral devices. In this experiment I notice that it is possible for the Bluetooth peripheral to receive multiple connection. Each connection is reference by a handler ID.
Pairing is a temporary exchange of security features. Security key are exchanged. Bonding is a permanent exchange of security features. It just means the the security key that is exchanged are saved and be used for any future connection. Bonding can only be executed after pairing is done. It is simply saving the security keys on both side.
After the Connection
After the connection you can proceed to use the other commands “pair“, “parameters” and “gatt“.
Technical Name Recap
The GAP (Generic Access Profile) defines the discovery, connection and link management part of Bluetooth. Central (usually connected to multiple peripheral) and peripheral (usually a single connection to the central) are both related to GAP.
The GATT (Generic Attribute Profile) is one of the data communication method after the Bluetooth devices are connected. The Bluetooth device is the server serving the data, while the one accessing it is the client.
GATT is a protocol style of exchange data over the wireless Bluetooth connection that is introduced for BLE 4.0.
The Bluetooth connection can consist of many services. A service is like data channel or view as a data object passing to and from the Bluetooth device. Inside each service can consist of many data attributes which is also known as the characteristic. Characteristic is simply the data that is associated with a standard defined label.
Topic: – Handler (16 bit ID as and address for the attribute) <- is it address for the Service? – Permission – UUID identify the data attribute type in the data block.
Hands-on GATT protocol
One useful tool in learning the new GATT Protocol designed for Bluetooth Low Energy (BLE4.0 and above) is using the nRF Connect’s Bluetooth Low Energy apps from Nordic. You can install the nRF Connect software to have access to this app.
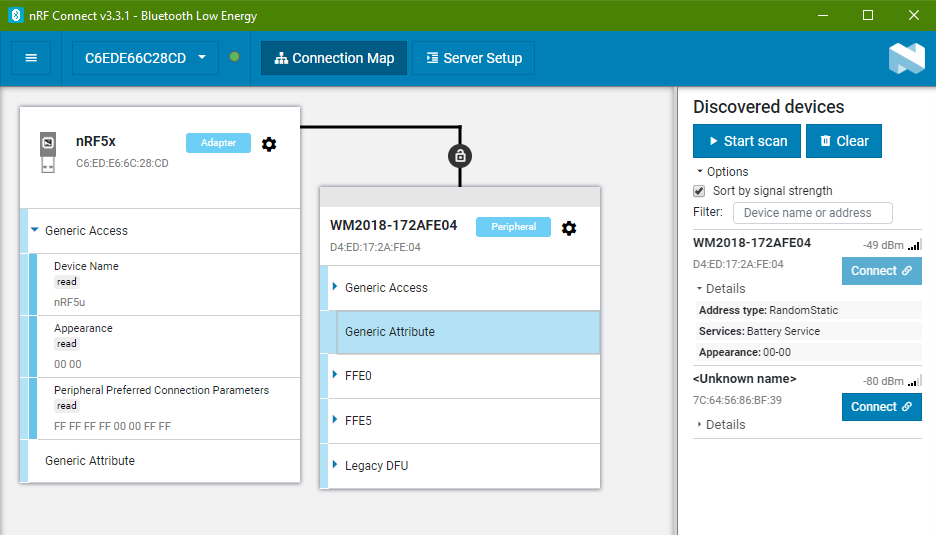
The following example uses nRF52840 Dongle as a sniffer.
When in the BLE apps, select the dongle device to start.
On the right side, click on the button <Start scan> to scan for nearby Bluetooth devices.
Bluetooth devices is constantly sending our advertisement broadcast so that other Bluetooth client can detect it and be able to connect to it.
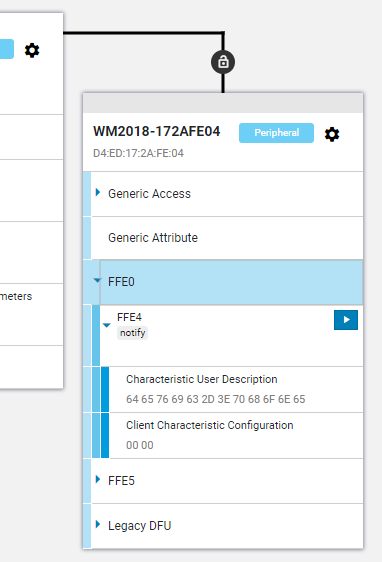
In the following example, a BLE device is detected by the scan process. The device name ending with “…..-172AFE04”. Select the device and click on the <Connect> button.
The column on the left represents the nRF52840-Dongle which is now a Central Bluetooth device. The right column is displaying the connected Bluetooth Peripheral (server) device name “…..-172AFE04”. The central is a Bluetooth client device which can connect to one or more peripheral devices. Each peripheral (server) can only accept one connection from the central (client) Bluetooth device. Once the peripheral is connected, they will stop their advertisement broadcast. Other Bluetooth devices will not be able to see and connect to them.
In the connected peripheral Bluetooth device with name ending with “…..-172AFE04”, along the connection line, there is a lock icon. Hover your mouse to check up the connection information. The configuration icon inside the device box have option that allows you to disconnect the Bluetooth connection of the central device to the peripheral device.
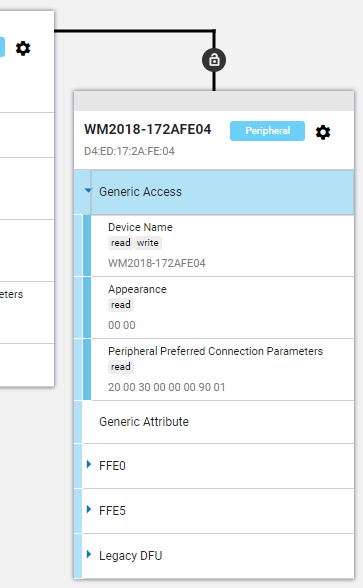
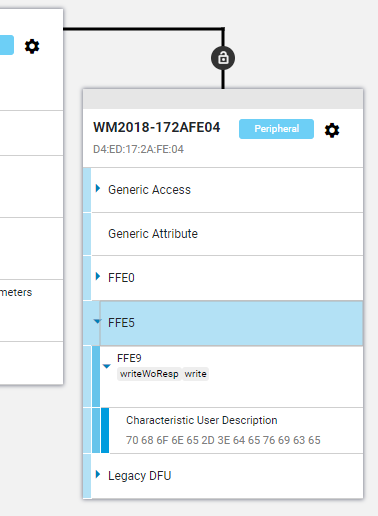
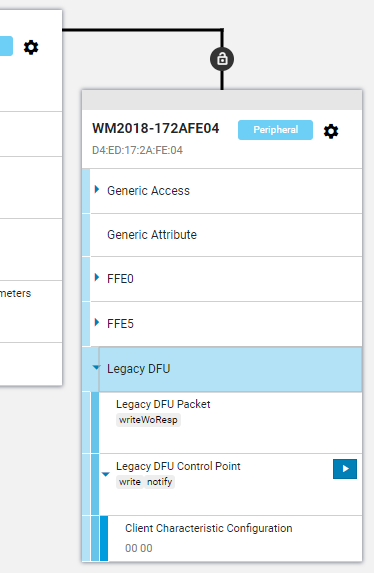
Inside the peripheral device, you will notice the following section of data. These are the GATT Services available from this server peripheral Bluetooth device.